Okay, I know what you're thinking (or maybe not)....Plasti-Dip on my car? No way, that looks cheesy. Well, I thought the same thing, until I came across some great pics on the Lexus forum. The process is so incredibly simple, and there is no way you can mess up your vehicle. Nothing is permanent but it does last a long time if you choose. I'll address a few issues before showing some pics. I know the look isn't for everyone, but here it is.
Durability - It is basically spray on rubber. It will stay on for years and look great. You can wash it at a carwash or by yourself. I just did and used a microfiber washer with regualar car soap. Easy peasy lemon squeezy. It will come off if you pick at it with your nail or something, but it ironically holds up against road debris.
Forever? - Nope, I put this on some chrome pieces and after a few years, if I don't like it, I simply peel it off in a couple seconds and the chrome is like new. I might also put it where the "rear bumper guard" would go if I'd ordered it from Mazda. (This is far cheaper though, and removable.)
Cost - $5.98 plus tax.....BOOM, cheapest mod ever. Purchased at Home Depot
What you'll need - Black Plasti-Dip, or any color of your choice, paper and tape, toothpick, a clean surface.
Okay, I'd bet I'm starting to sound annoying to some folks, so on with the pics and the process.
First you'll have to tape off a generous portion of the vehicle while leaving rectangles of exposed paint plus chrome where you want to plasti-dip.
Next, spray the BLACK PLASTI-DIP one the exposed area just like a spray can. I've heard of doing anywhere from 3-5 layers. The more layers, the easier it is to peel off more precisely. I used 5 coats. Waited about 20-30 minutes between coats. The first should be really thin. The last couple coats can be thicker. Hold can about 8-12 inches from the area to be sprayed.
Now you're ready to peel it off. Simply grab a corner and slowly pull it off. I kept a pocket knife handy in case it began to peel in places where I wanted it to stay. I also used a toothpick to get at the areas in the middle of the lettering. It was very simple, just make sure to let it dry long enough.
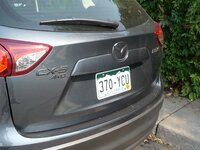
I thought it came out pretty good! I also saw that it looks awesome on white and silver vehicles.
Let me know if you have any questions and I'll try to answer them.
Good luck!


Durability - It is basically spray on rubber. It will stay on for years and look great. You can wash it at a carwash or by yourself. I just did and used a microfiber washer with regualar car soap. Easy peasy lemon squeezy. It will come off if you pick at it with your nail or something, but it ironically holds up against road debris.
Forever? - Nope, I put this on some chrome pieces and after a few years, if I don't like it, I simply peel it off in a couple seconds and the chrome is like new. I might also put it where the "rear bumper guard" would go if I'd ordered it from Mazda. (This is far cheaper though, and removable.)
Cost - $5.98 plus tax.....BOOM, cheapest mod ever. Purchased at Home Depot
What you'll need - Black Plasti-Dip, or any color of your choice, paper and tape, toothpick, a clean surface.
Okay, I'd bet I'm starting to sound annoying to some folks, so on with the pics and the process.
First you'll have to tape off a generous portion of the vehicle while leaving rectangles of exposed paint plus chrome where you want to plasti-dip.
Next, spray the BLACK PLASTI-DIP one the exposed area just like a spray can. I've heard of doing anywhere from 3-5 layers. The more layers, the easier it is to peel off more precisely. I used 5 coats. Waited about 20-30 minutes between coats. The first should be really thin. The last couple coats can be thicker. Hold can about 8-12 inches from the area to be sprayed.
Now you're ready to peel it off. Simply grab a corner and slowly pull it off. I kept a pocket knife handy in case it began to peel in places where I wanted it to stay. I also used a toothpick to get at the areas in the middle of the lettering. It was very simple, just make sure to let it dry long enough.
I thought it came out pretty good! I also saw that it looks awesome on white and silver vehicles.
Let me know if you have any questions and I'll try to answer them.
Good luck!