
dougefresh_
Member
- :
- 2006 MS6 wwp
Why did I decide to upgrade my ebcs go with the Perrin EBCS in interrupt mode?
My boost was not smooth, and would spike from time to time. Now that I have my fmic installed, and I am running more boost, I wanted it pinned down, and not spiking. If you're running say 16.5 PSI, and you spike to 18 PSI, it's not a huge deal (though spiking is no good regardless). Since I'm running like 20 PSI (may lower to 19), I wanted to hit my boost targets dead on, and therefore decided on running the new Perrin in "Interrupt" mode as explained below. There's also a link to Perrin's website at the bottom that explains everything you need to know about the ebcs, wga, etc.. in detail with pics. In a nutshell, here is what the Perrin EBCS is all about:
You're also not maxing your wastegate all the time w/ the upgraded ebcs set up in "interrupt" mode... I was only using like 91% wgdc in my logs while running 21+ PSI. That's too much boost, but I'm still working on tune, and my hpfp died in the meantime so I can't do anything right now :/
Okay so here's how to set up the new "round" style Perrin Pro EBCS in "Interrupt" mode, without splicing your factory wires (plug doesn't fit), and mounting it in the stock location. Be warned that the stock location takes a bit longer, but it looks sweet, and you don't have to worry about any "ticking" sound in the car if not insulated properly on the firewall. You MUST have a tuning method (Cobb AP, etc..) to run this in interrupt mode. The factory set up is "bleed" and it's quite different. Some of this is repetitive, but I wanted it to be though for n00bs like me, and I'm tired, so bear with me here.
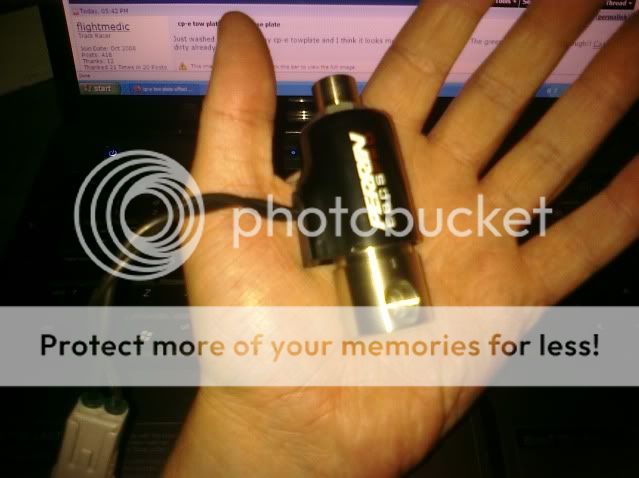
So, the new New Perrin Pro Electronic Boost Control Solenoid is shaped like a cylinder. The top near my fingers has one port that goes to an unrestricted boost source. You can drill out the restrictor pill on the compressor (be careful doing that or you can screw things up) and use that as your unrestricted boost source. Unrestricted means NOTHING else can be attached to it. So, you can't used your bpv line, etc. If you have the stock tmic, you can use an ATP "Quick Tap" found here: FTG-QuickTap-CompHSG : atpturbo.com and run a line from that as your unrestricted source, and cap off the compressor hose. I have an fmic, and there wasn't room in the coupler on my hot pipe, so I choose to have my hot pipe tapped, and an aluminum barb welded on. ALL THREE PORTS are used in interrupt mode. None of the instructions say this, because it ignores us folks that run our bpv in recirc. One port on the ebcs is used to run from the ebcs to the TIP.
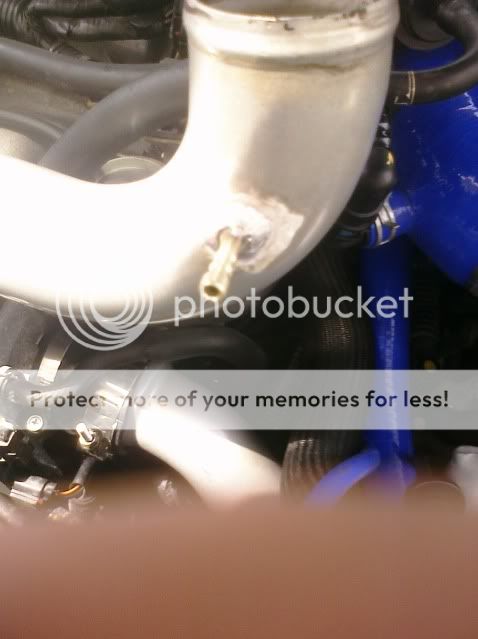
Here's my hot pipe tapped. Crappy cell pic, but weld is awesome:
PLEASE READ YOUR INSTRUCTIONS, TO MAKE SURE THE PORT NUMBERS ARE THE SAME. If not, you may need to plug them into different ports. FOLLOW THESE AT YOUR OWN RISK!
Now, before we get into the nitty gritty, I didn't want to splice my factory wires, and the Perrin does not plug up. JMHINKLE did a very nice write up on how to disassemble the plug. Follow his instructions in this link:
GrimmSpeed EBCS Write up - Mazda 6 Forums : Mazda 6 / Mazda Atenza Forum
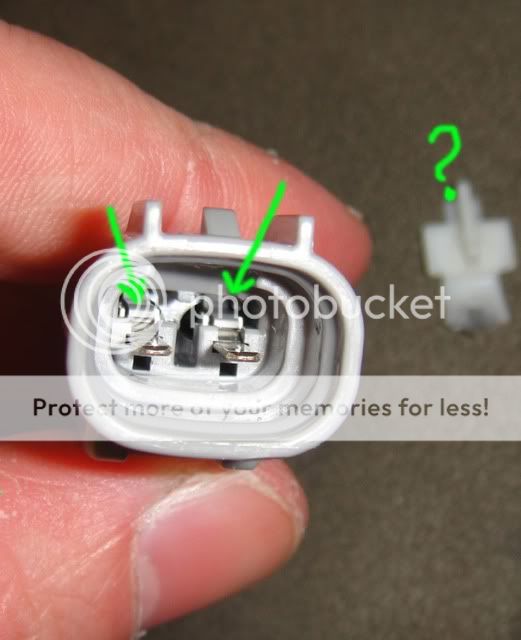
Joel used "electronic dental pics" to undo the first white tab. That's why I used, and they worked great. Just be careful and take your time. Here's a couple extra pics that may help you out taking the plug apart after you get the white tab out (by the ?). The green arrows are pointing to two tiny tabs just above the two wire connectors. You need to pry these up in the pic below, and then gently pull the wires out. I used an eyeglass repair kit to pry these up, and the wires slide right out:
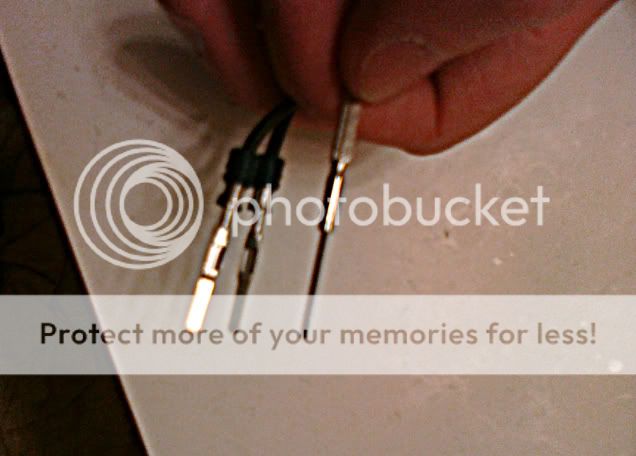
Here's a pic of the wires disassembled, and the eyeglass repair kit screwdriver I used to pry those plastic tabs up in the pic above, and the wires slide right out:
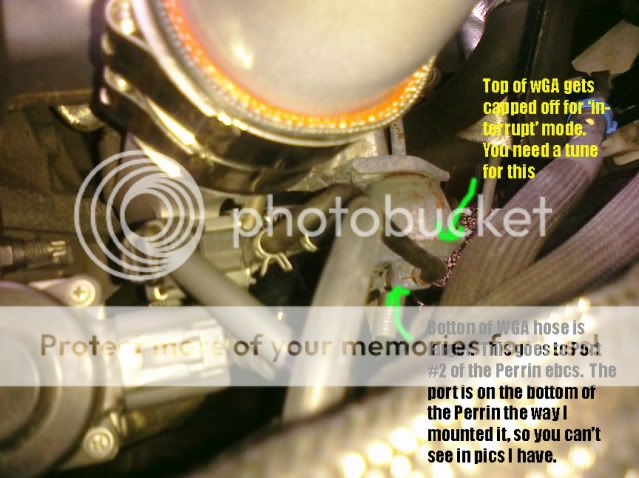
IMPORTANT: So this is a pic of the factory set up with the STOCK ebcs still in there. On the WGA there are two tubes coming off it. The bottom one is larger, and goes to the compressor. I have no pics of the compressor, so just follow the larger tube going from the bottom of the WGA to the compressor. Remove the line going to the compressor, and depending on your set up, either 1) Drill out the restrictor pill carefully and use this as you unrestricted boost source, OR 2) Cap it off and use an ATP quick tap FTG-QuickTap-CompHSG : atpturbo.comon your hot pipe coupler if you have room on your hot pipe coupler, OR 3) Cap off the compressor, and drill a hole in your fmic hot pipe, and have an aluminum barb welded on like I did. The top of the WGA gets capped off and is not used with the Perrin set up in "interrupt" mode. ALSO: The line coming from the top of the WGA is plugged into your OEM ebcs when you start out. You can see two small vacuum lines going into it in the center of the pic. The factory plug just to the left of them is the what you will be plugging your two "naked" wires from the Perrin into, which you disassembled as described above. Finally, the factory ebcs has a bolt thread facing straight down with an 11mm (I think) nut on the bottom side of it. Unscrew this to get the stock ebcs out, and you'll need a bolt and nut to mount the Perrin ecbs to that hole, with 90 degree mounting bracket that it comes with. Now, the pic below describes where the bottom (larger) line on the WGA goes in you Perrin ebcs:
Here's a pic of the unrestricted boost source (off my hot pipe) going into the top of the Perrin installed:

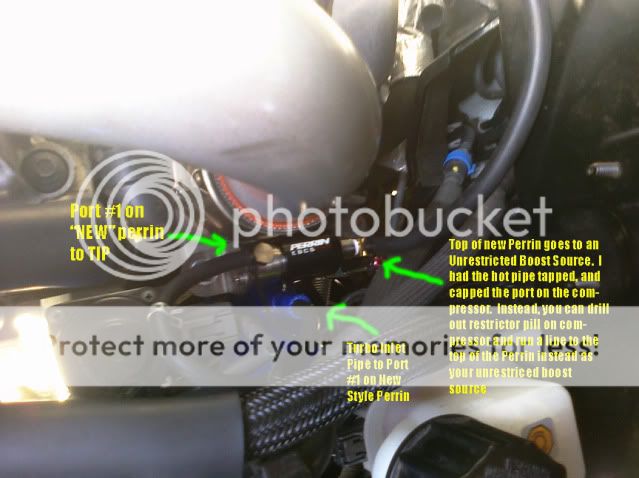
In the pic below we see the Perrin mounted right on the factory location. The pic below shows the connection between the TIP, and Port #1 of the new style Perrin Pro ebcs. Note, that the Perrin can be installed "upside down" (label facing down), and therefore the port #'s will obviously be reversed, so pay attention. The pic also shows the top of the WGA capped with a piece of vacuum line and that purple bolt, lol. We just used a small piece of vacuum line, and threaded a much bigger screw into it, and zip tied it as well for good measure. MAKE SURE ALL YOUR HOSES ARE SECURED TIGHTLY. Note: In the pic, the green arrow is pointing at the purple bolt. The boost line I mention in writing on the right side of the pic is referring to the boost line that is just above it going to the top of the Perrin, just to be crystal clear.
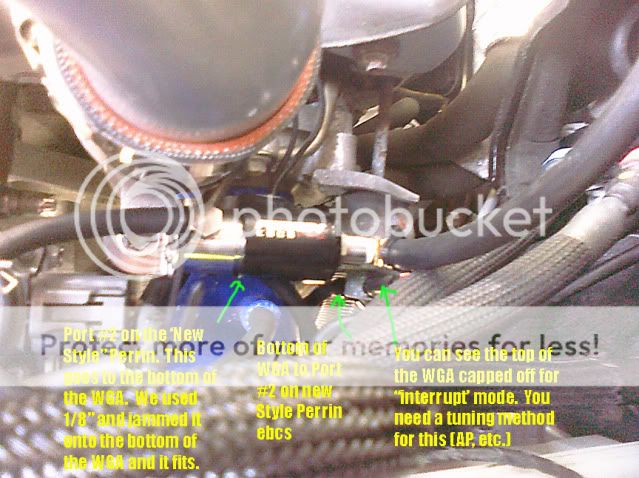
Here we have the harder to see port #2 on the bottom of the Perrin, which goes go the bottom the the WGA. Remember we took that tube off the bottom of that actuator going to the compressor, and capped the compressor off in my set up here.
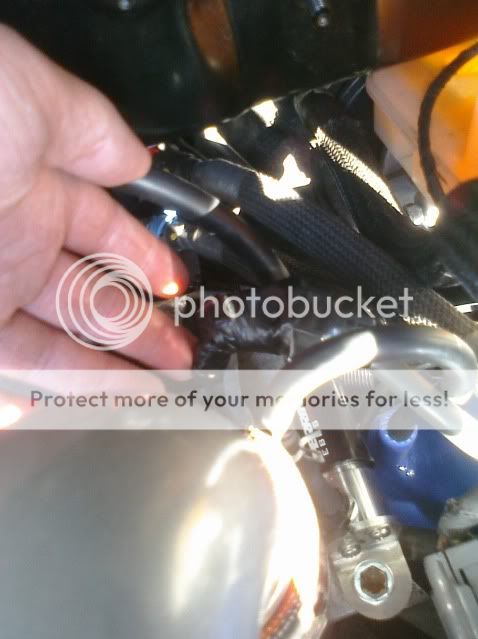
Now, time to hook it up. In the pic below, I'm holding the two wires I fanagled out of the cap in the pic 5 pics above, and it's time to plug this b**** in. Be careful here. Only the thin flat portion of the metal tips slide into the stock female plug. Don't try to jam it in further (that's what she said) or you'll break something. I followed Joel's zip tie method to keep the plugs apart and attach it.

After securing it, I just wrapped the exposed end in electrical tape. It looks like I missed a spot, but that's just a reflection because of my crappy cell pic:
And here she is, all mounted up nice:

Remember, this is set up in "Interrupt" mode, and you WILL need a some sort of tuning method to make it run properly.
HELPFUL TIPS: Remove your TIP and SF (or if you have a CAI, just separate that, leave it in place, and remove your TIP). Everything is super tight back there, and it's practically impossible to do this with the TIP in the way. Don't forget to plug up whatever you remove with some rags so you don't get dirt/pollen or creppy critters crawling in there while you're working. Also, test fit the hell out of it if you have the new style Perrin Pro like me. We had to pay attention to where the tiny barbs screwed into the Perrin. That is, the which direction the barbs were facing, but make sure they are screwed tightly into the Perrin, whatever you do. The barbs on the Perrin are also tiny, so not all the vacuum lines "fit" perfectly. We used smaller line when possible (for the bottom of the WGA for example), and just jammed it on.
And a big thanks to EMS for helping me wrestle with this thing this afternoon. It came out great, but mounting it in the factory location just right took some time. And if you wondering, the large 1/4" barb on the top of my Perrin (boost source) going to the 1/4" barb I had welded on the hot pipe was "aftermarket" lol.
For more info on the WGA, EBCS and how they work, and more pics of the turbo & compressor, as well as a couple ATR screen shots, read this great info from Perrin's website that explains everthing in detail:
Perrin Performance - Boost control explained
Also, a huge thanks to Forzda for helping me with everything. I was all thrown off, because ALL the directions say to LEAVE ONE PORT OPEN, but obviously (from pics above, lol) we have to use all 3 ports running in interrupt mode, because our bpv is set to recirc, not VTA. The "bleed" set up is different than the interrupt mode, so keep this in mind.
**Sorry I did this write up last week, and forget to post it in this forum as well :/ Better late than never!
My boost was not smooth, and would spike from time to time. Now that I have my fmic installed, and I am running more boost, I wanted it pinned down, and not spiking. If you're running say 16.5 PSI, and you spike to 18 PSI, it's not a huge deal (though spiking is no good regardless). Since I'm running like 20 PSI (may lower to 19), I wanted to hit my boost targets dead on, and therefore decided on running the new Perrin in "Interrupt" mode as explained below. There's also a link to Perrin's website at the bottom that explains everything you need to know about the ebcs, wga, etc.. in detail with pics. In a nutshell, here is what the Perrin EBCS is all about:
In most turbo applications the boost solenoid is used to bleed boost pressure off the hose that actuates the wastegate actuator. In these applications the boost control solenoid has 2 ports, an IN and an OUT. The PERRIN EBCS Pro can be setup like the stock solenoid, to "BLEED" boost from the system, but that is not where the EBCS Pro has its advantage. The PERRIN 3 port EBCS Pro can be setup to "block" pressure from getting to the wastegate actuator. This makes for a more responsive turbo and for much better boost control, not to mention higher boost levels are possible with proper tuning. In this case 3 is better than 2!
You're also not maxing your wastegate all the time w/ the upgraded ebcs set up in "interrupt" mode... I was only using like 91% wgdc in my logs while running 21+ PSI. That's too much boost, but I'm still working on tune, and my hpfp died in the meantime so I can't do anything right now :/
Okay so here's how to set up the new "round" style Perrin Pro EBCS in "Interrupt" mode, without splicing your factory wires (plug doesn't fit), and mounting it in the stock location. Be warned that the stock location takes a bit longer, but it looks sweet, and you don't have to worry about any "ticking" sound in the car if not insulated properly on the firewall. You MUST have a tuning method (Cobb AP, etc..) to run this in interrupt mode. The factory set up is "bleed" and it's quite different. Some of this is repetitive, but I wanted it to be though for n00bs like me, and I'm tired, so bear with me here.
So, the new New Perrin Pro Electronic Boost Control Solenoid is shaped like a cylinder. The top near my fingers has one port that goes to an unrestricted boost source. You can drill out the restrictor pill on the compressor (be careful doing that or you can screw things up) and use that as your unrestricted boost source. Unrestricted means NOTHING else can be attached to it. So, you can't used your bpv line, etc. If you have the stock tmic, you can use an ATP "Quick Tap" found here: FTG-QuickTap-CompHSG : atpturbo.com and run a line from that as your unrestricted source, and cap off the compressor hose. I have an fmic, and there wasn't room in the coupler on my hot pipe, so I choose to have my hot pipe tapped, and an aluminum barb welded on. ALL THREE PORTS are used in interrupt mode. None of the instructions say this, because it ignores us folks that run our bpv in recirc. One port on the ebcs is used to run from the ebcs to the TIP.
Here's my hot pipe tapped. Crappy cell pic, but weld is awesome:
PLEASE READ YOUR INSTRUCTIONS, TO MAKE SURE THE PORT NUMBERS ARE THE SAME. If not, you may need to plug them into different ports. FOLLOW THESE AT YOUR OWN RISK!
Now, before we get into the nitty gritty, I didn't want to splice my factory wires, and the Perrin does not plug up. JMHINKLE did a very nice write up on how to disassemble the plug. Follow his instructions in this link:
GrimmSpeed EBCS Write up - Mazda 6 Forums : Mazda 6 / Mazda Atenza Forum
Joel used "electronic dental pics" to undo the first white tab. That's why I used, and they worked great. Just be careful and take your time. Here's a couple extra pics that may help you out taking the plug apart after you get the white tab out (by the ?). The green arrows are pointing to two tiny tabs just above the two wire connectors. You need to pry these up in the pic below, and then gently pull the wires out. I used an eyeglass repair kit to pry these up, and the wires slide right out:
Here's a pic of the wires disassembled, and the eyeglass repair kit screwdriver I used to pry those plastic tabs up in the pic above, and the wires slide right out:
IMPORTANT: So this is a pic of the factory set up with the STOCK ebcs still in there. On the WGA there are two tubes coming off it. The bottom one is larger, and goes to the compressor. I have no pics of the compressor, so just follow the larger tube going from the bottom of the WGA to the compressor. Remove the line going to the compressor, and depending on your set up, either 1) Drill out the restrictor pill carefully and use this as you unrestricted boost source, OR 2) Cap it off and use an ATP quick tap FTG-QuickTap-CompHSG : atpturbo.comon your hot pipe coupler if you have room on your hot pipe coupler, OR 3) Cap off the compressor, and drill a hole in your fmic hot pipe, and have an aluminum barb welded on like I did. The top of the WGA gets capped off and is not used with the Perrin set up in "interrupt" mode. ALSO: The line coming from the top of the WGA is plugged into your OEM ebcs when you start out. You can see two small vacuum lines going into it in the center of the pic. The factory plug just to the left of them is the what you will be plugging your two "naked" wires from the Perrin into, which you disassembled as described above. Finally, the factory ebcs has a bolt thread facing straight down with an 11mm (I think) nut on the bottom side of it. Unscrew this to get the stock ebcs out, and you'll need a bolt and nut to mount the Perrin ecbs to that hole, with 90 degree mounting bracket that it comes with. Now, the pic below describes where the bottom (larger) line on the WGA goes in you Perrin ebcs:
Here's a pic of the unrestricted boost source (off my hot pipe) going into the top of the Perrin installed:
In the pic below we see the Perrin mounted right on the factory location. The pic below shows the connection between the TIP, and Port #1 of the new style Perrin Pro ebcs. Note, that the Perrin can be installed "upside down" (label facing down), and therefore the port #'s will obviously be reversed, so pay attention. The pic also shows the top of the WGA capped with a piece of vacuum line and that purple bolt, lol. We just used a small piece of vacuum line, and threaded a much bigger screw into it, and zip tied it as well for good measure. MAKE SURE ALL YOUR HOSES ARE SECURED TIGHTLY. Note: In the pic, the green arrow is pointing at the purple bolt. The boost line I mention in writing on the right side of the pic is referring to the boost line that is just above it going to the top of the Perrin, just to be crystal clear.
Here we have the harder to see port #2 on the bottom of the Perrin, which goes go the bottom the the WGA. Remember we took that tube off the bottom of that actuator going to the compressor, and capped the compressor off in my set up here.
Now, time to hook it up. In the pic below, I'm holding the two wires I fanagled out of the cap in the pic 5 pics above, and it's time to plug this b**** in. Be careful here. Only the thin flat portion of the metal tips slide into the stock female plug. Don't try to jam it in further (that's what she said) or you'll break something. I followed Joel's zip tie method to keep the plugs apart and attach it.
After securing it, I just wrapped the exposed end in electrical tape. It looks like I missed a spot, but that's just a reflection because of my crappy cell pic:
And here she is, all mounted up nice:
Remember, this is set up in "Interrupt" mode, and you WILL need a some sort of tuning method to make it run properly.
HELPFUL TIPS: Remove your TIP and SF (or if you have a CAI, just separate that, leave it in place, and remove your TIP). Everything is super tight back there, and it's practically impossible to do this with the TIP in the way. Don't forget to plug up whatever you remove with some rags so you don't get dirt/pollen or creppy critters crawling in there while you're working. Also, test fit the hell out of it if you have the new style Perrin Pro like me. We had to pay attention to where the tiny barbs screwed into the Perrin. That is, the which direction the barbs were facing, but make sure they are screwed tightly into the Perrin, whatever you do. The barbs on the Perrin are also tiny, so not all the vacuum lines "fit" perfectly. We used smaller line when possible (for the bottom of the WGA for example), and just jammed it on.
And a big thanks to EMS for helping me wrestle with this thing this afternoon. It came out great, but mounting it in the factory location just right took some time. And if you wondering, the large 1/4" barb on the top of my Perrin (boost source) going to the 1/4" barb I had welded on the hot pipe was "aftermarket" lol.
For more info on the WGA, EBCS and how they work, and more pics of the turbo & compressor, as well as a couple ATR screen shots, read this great info from Perrin's website that explains everthing in detail:
Perrin Performance - Boost control explained
Also, a huge thanks to Forzda for helping me with everything. I was all thrown off, because ALL the directions say to LEAVE ONE PORT OPEN, but obviously (from pics above, lol) we have to use all 3 ports running in interrupt mode, because our bpv is set to recirc, not VTA. The "bleed" set up is different than the interrupt mode, so keep this in mind.
**Sorry I did this write up last week, and forget to post it in this forum as well :/ Better late than never!
Last edited:
") . Only drawback is you gotta know your ATR or someone that does or a get a pro-tune... the new Perrin is quite different so far tuning wise than the old one, so I'm working on that w/ him now as well. Just a fair warning
. Only drawback is you gotta know your ATR or someone that does or a get a pro-tune... the new Perrin is quite different so far tuning wise than the old one, so I'm working on that w/ him now as well. Just a fair warning