
dougefresh_
Member
- :
- 2006 MS6 wwp
Here are the instructions I followed from the 6club, which worked great. I just figured I'd add a few pics and explain a little more:
I had to take my HPFP out today to send it back to PTP, so I took a couple pics to help while I was at it to help people out. This could not have been easier. Just make sure you buy an E8 Internal Star socket to get the 3 long screws on the fuel pump out. You'll also need a 19mm wrench, as an adjustable won't fit. I followed the directions above, so I'll slip those in here. I also had to take my hot pipe off, because it was in the way of the wrench.
Disconnect negative terminal on battery, and disconnect the breather tube going to your intake. The breather tube is the small black tube closest to the cone on your intake (about 3/4" in diameter). You can leave the other end attached to the intake valve, just push it up out of the way:
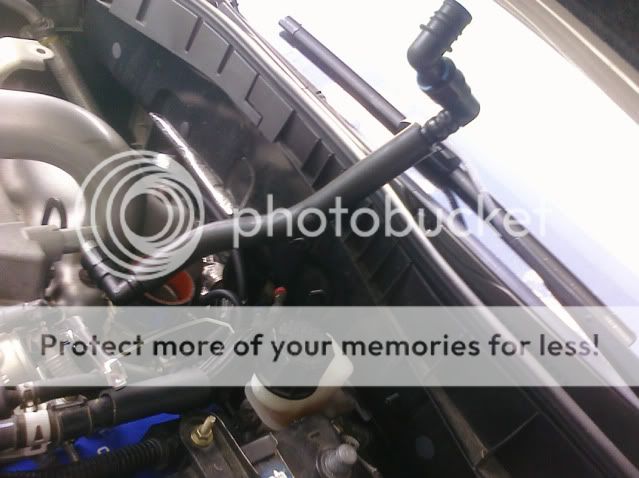
I have a FMIC, so I didn't have to take the shroud off, but that takes 2 seconds. I did have to take my hot pipe off though. You can see that in the above pic though anyways.
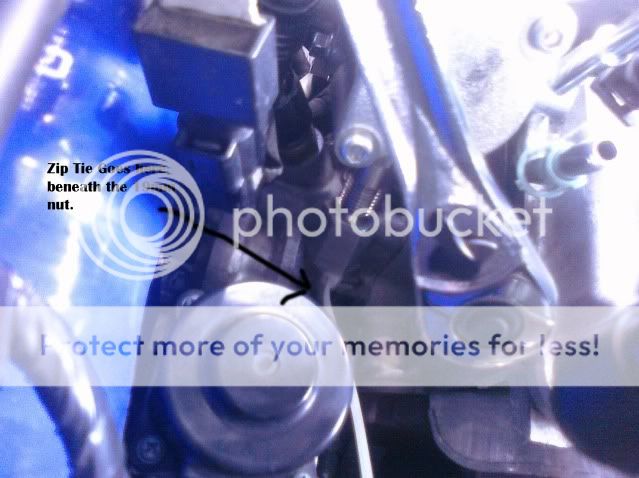
Next, put a tie-wrap below the nut for the low pressure line on the bottom of the pump. This is to keep the nut from sliding down too far. This was actually the most time consuming partm for me, lol. It was hard to get the zip tie on there beneath the bolt. Here's a couple pics of that line. AFTER you get the zip tie on there, VERY SLOWLY unscrew the large 19mm nut just above the zip tie. You will hear pressure release when you first start to unscrew it, and a little gas will trickle down below the bolt. I squeezed a rag in there to avoid a mess, but if you do it slow enough, you can bleed off the pressure, and not get sprayed with any gas at all. The wrench was there out of convenience for my picture taking, which was an after thought... wasn't planning on doing a "how to" lol:

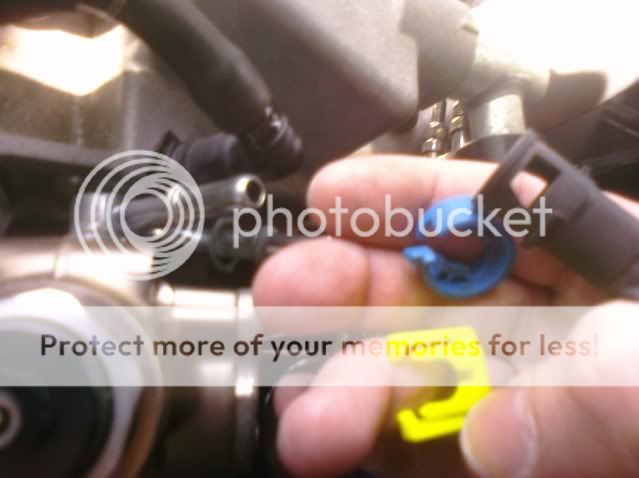
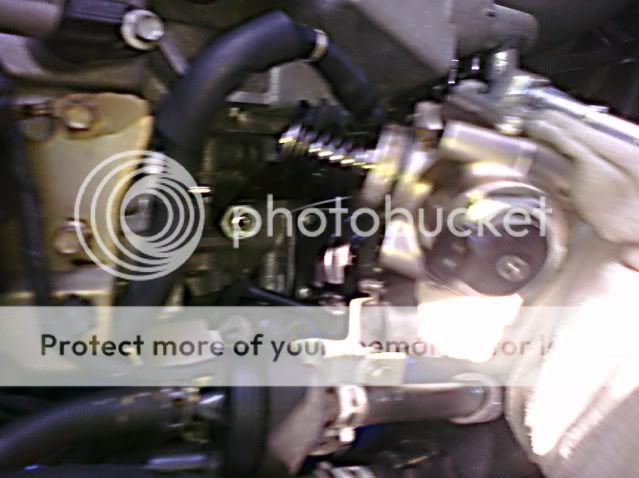
Now, take off the plug from the wire harness that is connected to the HPFP, as well as the two smaller high pressure lines. There is a colored "cap" on each of the high pressure lines. Mine were yellow and blue, but one is square and one is circular at any rate. They easily unclip, and then just slide right off the high pressure lines. Some people had problems with gas squirting out, so use a rag for this. I didn't have this problem, because I slowly unscrewed that bottom 19mm nut earlier: EDIT: Be Careful taking these clips off.. there's a smaller light blue plastic piece that sits inside the blue one (2nd pic below), and I dropped it into my engine bay without realizing it. I fished it out today with a coathanger! lol Here's what Philly B from msf said how to do it as he took those clips off the first time, and almost lost the blue thing too, lol:

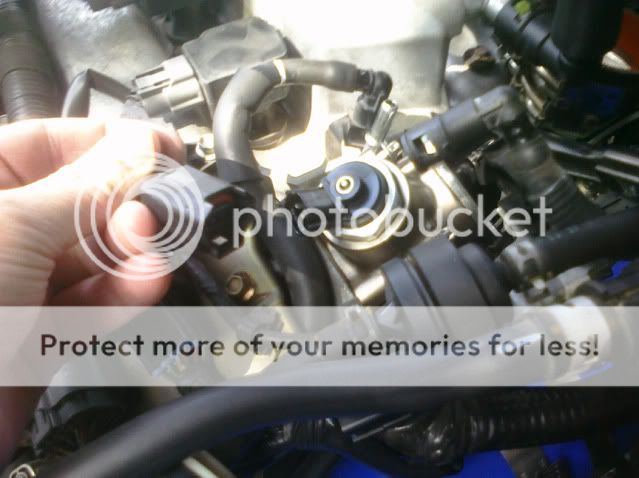
Here's another picture of the two HPFP lines and the factory wire harness plug disconnected. For the wire harness plug, simply squeeze near the base of it on the bottom. You can see how it unplugs, and it's super easy.
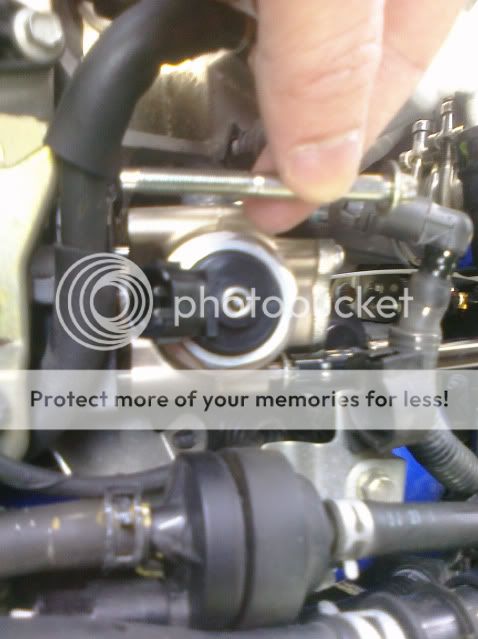
Now, Use the star socket to remove the three (3) long bolts holding the HPFP in. Two are right on the side, and the third one is on the side underneath. They all face the firewall, and you can't miss them. . You can see the one underneath in this pic, as my ratchet is still attached to it, lol. At any rate, they are all easily accessible with a ratchet:
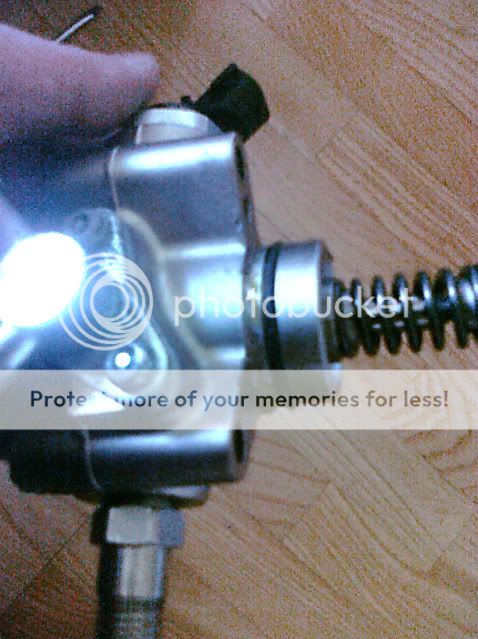
Now that the three bolts are out, just slide the HPFP out towards the fire wall:

And there you have it:
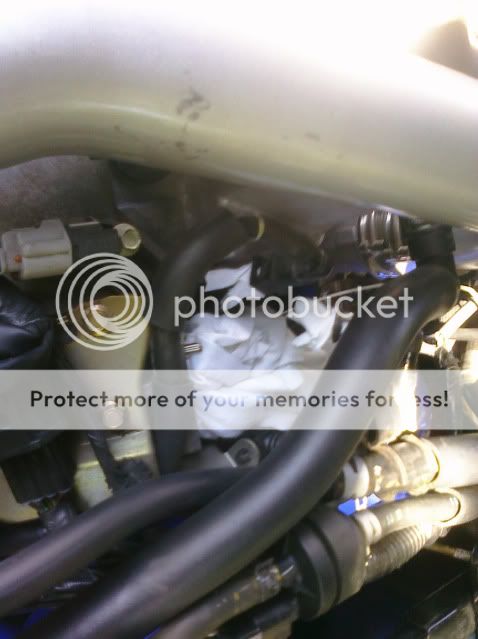
ALSO, if you're going to be out of a fuel pump for a few days like me, make sure to cover up the hole where the fuel pump attached, as well as the HP fuel lines:
It was very easy and takes like 20-30 minutes, and this was my first time doing it. I got hung up on the damn zip tie of all things, LOL. I HIGHLY recommend n00bs to tackle this install on their own, because it is literally 3 screws, a 19mm bolt, a breather tube, two high pressure fuel lines that pop right out, and a plug. And it will save you some $ you can put towards other mods.
I don't have a "how to" re-install because I just mailed that HPFP back today, so I have no fuel pump!! But it's just the reverse of the above steps as the guys said.
I actually skipped taking the part about taking your fuel "circuit" out of the fuse box. I didn't get any gas on me, but that's probably because I VERY slowly released pressure at the 19mm nut for about 1-2 minutes. It might also be because my fuel pressure was low, lol.
ONE LAST THING.... If you're lazy like me and don't drain all the gas out, and just bleed the pressure from that 19mm bolt, make sure you do NOT turn your key to the "ON" position, and that your windows are rolled up (otherwise you need to turn it to the "ON" position, and it'll start squirting out gas). I turned mine to the "ON" position for a second, not thinking, and some gas squirted out.... I had all the holes covered with rags, so it didn't matter, and wasn't much. Just an FYI. If you're swapping out the pumps at the same time, this won't be an issue.
As for installing the new pump, make sure to "prime" the fuel system by turning the key only enough to let the motor 'chug.' When the car is ready to start, it will. If you don't do this, and try to start the car on one turn, you'll get a CEL for low fuel pressure.
That's all folks!
Disconnect battery.
Take off the shroud for the intercooler.
Put a tie-wrap below the nut for the low pressure line on the bottom of the pump. This is to keep the nut from sliding down too far.
Unscrew the 19 mm nut on the low pressure line with an open end wrench.
Pull off the two high pressure lines on top. They remove differently, one's got a square clip, and the other you push and turn or something. Use a rag or you may get gas in your face. Like I did.
Use the star socket to remove the bolts holding it in.
Remove stock pump. It is in tight and takes a bit of force to get out.
Reverse procedure with new pump.
Start car, not cranking for but a second or two at a time in order to prime pump and hopefully not get a CEL.
I had to take my HPFP out today to send it back to PTP, so I took a couple pics to help while I was at it to help people out. This could not have been easier. Just make sure you buy an E8 Internal Star socket to get the 3 long screws on the fuel pump out. You'll also need a 19mm wrench, as an adjustable won't fit. I followed the directions above, so I'll slip those in here. I also had to take my hot pipe off, because it was in the way of the wrench.
Disconnect negative terminal on battery, and disconnect the breather tube going to your intake. The breather tube is the small black tube closest to the cone on your intake (about 3/4" in diameter). You can leave the other end attached to the intake valve, just push it up out of the way:
I have a FMIC, so I didn't have to take the shroud off, but that takes 2 seconds. I did have to take my hot pipe off though. You can see that in the above pic though anyways.
Next, put a tie-wrap below the nut for the low pressure line on the bottom of the pump. This is to keep the nut from sliding down too far. This was actually the most time consuming partm for me, lol. It was hard to get the zip tie on there beneath the bolt. Here's a couple pics of that line. AFTER you get the zip tie on there, VERY SLOWLY unscrew the large 19mm nut just above the zip tie. You will hear pressure release when you first start to unscrew it, and a little gas will trickle down below the bolt. I squeezed a rag in there to avoid a mess, but if you do it slow enough, you can bleed off the pressure, and not get sprayed with any gas at all. The wrench was there out of convenience for my picture taking, which was an after thought... wasn't planning on doing a "how to" lol:
Now, take off the plug from the wire harness that is connected to the HPFP, as well as the two smaller high pressure lines. There is a colored "cap" on each of the high pressure lines. Mine were yellow and blue, but one is square and one is circular at any rate. They easily unclip, and then just slide right off the high pressure lines. Some people had problems with gas squirting out, so use a rag for this. I didn't have this problem, because I slowly unscrewed that bottom 19mm nut earlier: EDIT: Be Careful taking these clips off.. there's a smaller light blue plastic piece that sits inside the blue one (2nd pic below), and I dropped it into my engine bay without realizing it. I fished it out today with a coathanger! lol Here's what Philly B from msf said how to do it as he took those clips off the first time, and almost lost the blue thing too, lol:
. I'll double check when I put the new pump back on to make sure.yeah, they half unclip. at least they do on the 3...idk how the ms6 works. on my car, you essentially open up the blue part, and just pull up. twist the blue part, opening it slightly, but enough to pull off the line, but keep everything intact
Here's another picture of the two HPFP lines and the factory wire harness plug disconnected. For the wire harness plug, simply squeeze near the base of it on the bottom. You can see how it unplugs, and it's super easy.
Now, Use the star socket to remove the three (3) long bolts holding the HPFP in. Two are right on the side, and the third one is on the side underneath. They all face the firewall, and you can't miss them. . You can see the one underneath in this pic, as my ratchet is still attached to it, lol. At any rate, they are all easily accessible with a ratchet:
Now that the three bolts are out, just slide the HPFP out towards the fire wall:
And there you have it:
ALSO, if you're going to be out of a fuel pump for a few days like me, make sure to cover up the hole where the fuel pump attached, as well as the HP fuel lines:
It was very easy and takes like 20-30 minutes, and this was my first time doing it. I got hung up on the damn zip tie of all things, LOL. I HIGHLY recommend n00bs to tackle this install on their own, because it is literally 3 screws, a 19mm bolt, a breather tube, two high pressure fuel lines that pop right out, and a plug. And it will save you some $ you can put towards other mods.
I don't have a "how to" re-install because I just mailed that HPFP back today, so I have no fuel pump!! But it's just the reverse of the above steps as the guys said.
I actually skipped taking the part about taking your fuel "circuit" out of the fuse box. I didn't get any gas on me, but that's probably because I VERY slowly released pressure at the 19mm nut for about 1-2 minutes. It might also be because my fuel pressure was low, lol.
ONE LAST THING.... If you're lazy like me and don't drain all the gas out, and just bleed the pressure from that 19mm bolt, make sure you do NOT turn your key to the "ON" position, and that your windows are rolled up (otherwise you need to turn it to the "ON" position, and it'll start squirting out gas). I turned mine to the "ON" position for a second, not thinking, and some gas squirted out.... I had all the holes covered with rags, so it didn't matter, and wasn't much. Just an FYI. If you're swapping out the pumps at the same time, this won't be an issue.
As for installing the new pump, make sure to "prime" the fuel system by turning the key only enough to let the motor 'chug.' When the car is ready to start, it will. If you don't do this, and try to start the car on one turn, you'll get a CEL for low fuel pressure.
That's all folks!
Last edited:
")