
Introduction:
The maintenance interval for the cabin air filter is 30,000 miles. I ordered a replacement WIX #24482 on line at www.nationalfilters.com for $13.56 + $7.55 S&H (to New England). The appearance was identical to and the fit was exactly like the OEM that came out. It took 2 weeks for the order to be shipped. The hard part was figuring out how to get the old ones out. Following is what I did on a 2007 MS3.
This procedure is one of the more difficult things to do. You will be twisted like a pretzel trying to remove parts under the dash. There are a lot of sharp edges and screws in awkward places. It took me about 1-1/2 hour to do this.
Somebody else videotaped the procedure and posted it on you tube, here:
http://www.youtube.com/watch_popup?v=GKhVXslh6Is
I found the hardest part is understanding where exactly the filters are. They are right behind the fan in the center of the passenger compartment. This puts them almost on the floor and back against the firewall. They are inside a plastic housing and accessed from the right side in the passenger foot well. There are lots of things in the way.
Tools needed:
Headlamp
10 mm box end wrench, for battery terminal
#2 Phillips screwdriver, for many screws
12 mm deep socket with 12" extension, for fuse box mount bracket nuts
Step 1: Disconnect negative battery terminal
You will be disconnecting almost all the circuits in the car when the fuse box is unmounted.
Step 2: Remove top trim
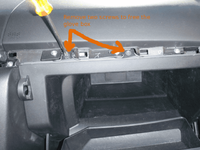
To remove the top trim (the long piece that surrounds the clock/audio display and covers the top of the glove box, use your fingers to grasp it in the middle and pull straight out. See the photo. The right end tucks under so be careful not to pull there. You will need to tuck it back in coordinated with pushing to reinstall the trim.
Step 3: Remove kick panels
The right passenger kick panel overlaps the glove box and must come out. There is a plastic rivet in the middle of it. Grab the center pin of the rivet by pinching with your finder nails and pulling it out, bringing the rivet body with it. Grab the top edge of the panel and lever it straight back. It will disengage a retainer pin then you will have to lever it up and back to free it from the bottom cover piece.
The left passenger kick panel is held with just one plastic rivet in the middle that is removed in the same way as for the right panel.
The fuse panel kick panel cover comes off by grabbing the rear top edge and pulling down. Once it's free slide it back and off.
Step 4: Remove glove box
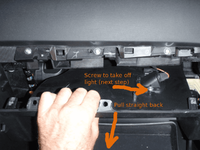
Empty the box. Remove the two screws at top. See the photo. Grab the top lip and pull straight back, releasing several retainers. You will have to stop before removing the box to unscrew and remove the box light.
Step 5: Move the junction box
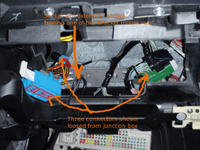
The electric junction box is in the way when the filters are slid out. Remember to disconnect the negative battery terminal. The service bulleting referenced later says to wait at least one minute before doing anything more. Unscrew the two retaining thumb screws allowing the box to drop down on it's hinges. Release the three electrical connectors that are on top. see the photo. Swing the box down all the way to expose two mounting nuts on the box's mounting bracket. Remove both nuts with the 12 mm socket. Pull the whole mess off the firewall and push it nicely down and right away from the center console. This part is difficult but does not have to be perfect. It is difficut because it is attached to the carpet and to other wire connectors. That is ok because you will need to reposition it frequently while jockeying the filters in and out.
Step 6: Uncover the filters
The Mazda service bulletin in the link below shows some diagrams, that are better than any pictures I could take, to help you find and remove the filters.
http://www.google.com/url?sa=t&sour...H-4xXHP5NCGfayJSg&sig2=c1xOl7rjUyC6lxecDtsa3A
Regarding the bulletin's instructions, I found I did not have to remove any of the electrical connections to the white plastic end plate. I just had to remove the four screws that mount the white plate to the filter housing. I even left the black sensor installed.
Step 7: Replace filters
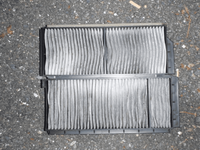
Note how they came out, especially fore and aft in the window. It's hard to see the mounting grooves in the housing. If you cannot remember which filter is which refer to the photo. The top one comes out last and goes in first. It is the one with the foam on top. See the photo for orientation. There are ramped lead-in flanges on the bottom of it for the lower, second filter to slide into.
Remove and replace the filters.
Step 8: Assembly
Assembly is the reverse. Remember that the top trim piece tucks into the right side and that must be coordinated with pushing into place.
The maintenance interval for the cabin air filter is 30,000 miles. I ordered a replacement WIX #24482 on line at www.nationalfilters.com for $13.56 + $7.55 S&H (to New England). The appearance was identical to and the fit was exactly like the OEM that came out. It took 2 weeks for the order to be shipped. The hard part was figuring out how to get the old ones out. Following is what I did on a 2007 MS3.
This procedure is one of the more difficult things to do. You will be twisted like a pretzel trying to remove parts under the dash. There are a lot of sharp edges and screws in awkward places. It took me about 1-1/2 hour to do this.
Somebody else videotaped the procedure and posted it on you tube, here:
http://www.youtube.com/watch_popup?v=GKhVXslh6Is
I found the hardest part is understanding where exactly the filters are. They are right behind the fan in the center of the passenger compartment. This puts them almost on the floor and back against the firewall. They are inside a plastic housing and accessed from the right side in the passenger foot well. There are lots of things in the way.
Tools needed:
Headlamp
10 mm box end wrench, for battery terminal
#2 Phillips screwdriver, for many screws
12 mm deep socket with 12" extension, for fuse box mount bracket nuts
Step 1: Disconnect negative battery terminal
You will be disconnecting almost all the circuits in the car when the fuse box is unmounted.
Step 2: Remove top trim
To remove the top trim (the long piece that surrounds the clock/audio display and covers the top of the glove box, use your fingers to grasp it in the middle and pull straight out. See the photo. The right end tucks under so be careful not to pull there. You will need to tuck it back in coordinated with pushing to reinstall the trim.
Step 3: Remove kick panels
The right passenger kick panel overlaps the glove box and must come out. There is a plastic rivet in the middle of it. Grab the center pin of the rivet by pinching with your finder nails and pulling it out, bringing the rivet body with it. Grab the top edge of the panel and lever it straight back. It will disengage a retainer pin then you will have to lever it up and back to free it from the bottom cover piece.
The left passenger kick panel is held with just one plastic rivet in the middle that is removed in the same way as for the right panel.
The fuse panel kick panel cover comes off by grabbing the rear top edge and pulling down. Once it's free slide it back and off.
Step 4: Remove glove box
Empty the box. Remove the two screws at top. See the photo. Grab the top lip and pull straight back, releasing several retainers. You will have to stop before removing the box to unscrew and remove the box light.
Step 5: Move the junction box
The electric junction box is in the way when the filters are slid out. Remember to disconnect the negative battery terminal. The service bulleting referenced later says to wait at least one minute before doing anything more. Unscrew the two retaining thumb screws allowing the box to drop down on it's hinges. Release the three electrical connectors that are on top. see the photo. Swing the box down all the way to expose two mounting nuts on the box's mounting bracket. Remove both nuts with the 12 mm socket. Pull the whole mess off the firewall and push it nicely down and right away from the center console. This part is difficult but does not have to be perfect. It is difficut because it is attached to the carpet and to other wire connectors. That is ok because you will need to reposition it frequently while jockeying the filters in and out.
Step 6: Uncover the filters
The Mazda service bulletin in the link below shows some diagrams, that are better than any pictures I could take, to help you find and remove the filters.
http://www.google.com/url?sa=t&sour...H-4xXHP5NCGfayJSg&sig2=c1xOl7rjUyC6lxecDtsa3A
Regarding the bulletin's instructions, I found I did not have to remove any of the electrical connections to the white plastic end plate. I just had to remove the four screws that mount the white plate to the filter housing. I even left the black sensor installed.
Step 7: Replace filters
Note how they came out, especially fore and aft in the window. It's hard to see the mounting grooves in the housing. If you cannot remember which filter is which refer to the photo. The top one comes out last and goes in first. It is the one with the foam on top. See the photo for orientation. There are ramped lead-in flanges on the bottom of it for the lower, second filter to slide into.
Remove and replace the filters.
Step 8: Assembly
Assembly is the reverse. Remember that the top trim piece tucks into the right side and that must be coordinated with pushing into place.

")