
07SilverSpeed6
Member
- :
- '08 Mazdaspeed3
Well I am finally writing my how-to about the custom hardwire install I did for a Escort Passport 8500 X50 in my 2008 MS3 Sport with the basic, plain jane, rearview mirror. This setup will allow the Escort to turn on and off with the ignition key.
I have to give credit that is due for the inspiration and ideas.
For sourcing the mounting bracket on the rearview.
And this pic.
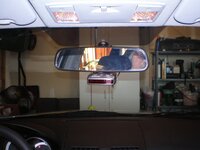
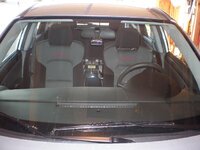
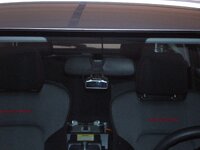
Here are a couple pics of the finished product. I am kicking myself for not taking photos while I was doing it.
First things first. I am not responsible for any damage you do to your car. If you are not comfortable with cutting, hacking, splicing, poking, prodding, fishing, and drilling into your vehicle, don't do it. I will admit that this tested my patience in a couple occasions and it took me much longer than I expected. Then again, this was the first time I take apart the dash on this car.
The major parts and tools were:
This list looks like it is a tough project, but I custom mounted the Smartcord in the section of the center console between the cigarette lighter and the airbag light.
In simplified steps, this is how I did it.
Here is the final product.
If you have any questions, just PM me.
I have to give credit that is due for the inspiration and ideas.
For sourcing the mounting bracket on the rearview.
I have the Escort Passport 8500X50 and have been very happy with its performance.
I have a mount that attaches to the mirror:
http://www.countryjoycrafts.com/ConnectorForRadarDetector.htm
...
And this pic.
Check this out, pic compliments of meha11. I did the same thing and I love it.
Here are a couple pics of the finished product. I am kicking myself for not taking photos while I was doing it.
First things first. I am not responsible for any damage you do to your car. If you are not comfortable with cutting, hacking, splicing, poking, prodding, fishing, and drilling into your vehicle, don't do it. I will admit that this tested my patience in a couple occasions and it took me much longer than I expected. Then again, this was the first time I take apart the dash on this car.
The major parts and tools were:
- Escort Passport X50
- Escort Direct Wire Kit w/SmartCord and 12ft extension
- Rearview mounting bracket (3/4 inch diam.)
- Dremel with cutter bits
- Flat and Phillips Screwdrivers
- 2-part Epoxy
- Patience
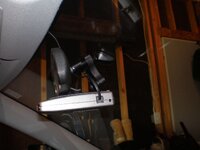
This list looks like it is a tough project, but I custom mounted the Smartcord in the section of the center console between the cigarette lighter and the airbag light.
In simplified steps, this is how I did it.
- Remove dash trim piece above glove box.
- Remove glove box.
- Remove kick panel on center console of passenger foot well.
- Remove center console section between seats.
- Unhook trim ring and shifter boot from center console and move to the side.
- Remove the Ashtray insert.
- Remove Cigarette lighter/Airbag light panel from center console. This takes patience and persistence. You have to pull on it just right for the tabs to unlock.
- Decide if you are going to try to use the SmartCord functions or just hardwire it for power. If you want to mount it like iI have, break out the dremel and get creative. In a nutshell, drilled a couple holes in the panel for the LEDs. Then I hacked apart the case of the smartcord button and LEDs with the dremel. Used the epoxy to adhere the hacked case to the backside of the panel. Then I glued the sticker for the smartcord onto the panel over the holes.
- Splice Positive wire of hardwire kit to positive wire coming out the back of cigarette outlet using the T-splice and teh spade provided.
- Ground the hardwire on a screw on the topside metal bracket in the glove box cavity. Left side.
- Route the long section of the hardwire kit (telephone plug) behind the side panel of the center console of the dash, along the bottom front lip of the glove box cavity.
- Using a flat screwdriver, route the wire along the edge of the right kick panel to the rubber gasket seam of the door.
- Route the wire up the seam until you get to the top lip of the A pillar cover for the airbag.
- Wedge the the wire in the seam to the windshield.
- Feed the wire into the seam along the windshield up to the headliner seam on the top edge of the windshiled.
- Run the wire along the windshield, slip the wire behind the edge of the headliner until you get to the mirror stalk. There is a notch in the headliner.
- Run the wire down the stalk.
- Install the mounting bracket for the escort.
- Attach Escort and plug in the telephone wire end of the hardwire kit.
- Check to make sure it works. Try it again so you don't have to take apart the dash again.
- Reassemble the dash putting the parts back in reverse order.
Here is the final product.
If you have any questions, just PM me.
Attachments
Last edited:
