mazdaspeedjay
Member
O.k. here's the how to and final answer on installing a turbo timer on a speed 3. first off turbo timers are turbo timers there's no real difference in HKS, Greddy . Turbo what ever they all do the same thing unless yours is a full auto or auto timer which means that when set to a certain mode i.e. auto or full auto. the timer will set the idle down or cool down time based on how you drive the car usually using voltage or speed signal to check the load and base the time off certain specs. basicly i've always set my timers myself and set them between 2-3 minutes. for normal driving this should be enough. If your timer has serveral save settings you can program i always have one set for 5 minutes for track and race days or if you've driven you car really hard that day. All or most turbo timers use the same color wires Red , Blue , Green, Black and Gray. Some use pink or purple for accesory hook ups like A/F Ratio or speed signal. These are not needed for a basic install. The main things you want is your 12V constant , 12V ignition, 12V Accessory, Ground ( DUH ), and your E-brake. I stress that e-brake hook up is not needed but i highly recommend because it's a safety feature. Other then monitor your speed the speed signal wire is also a safety feature. When connected if someone bypasses the e-brake wire the timer uses the speed signal to sense if the car starts to move and kills the car. Usually E-brake is enough because chances of someone bypassing it in the time set for cool down. E-brake is used so if you or say a theif drops the e-brake down to take off it kills the car automaticly. I usually only hook up the brake wire cause the speedo is a pain and not needed. E brake is also not need for the timer to work it's your choice it's very easy to hook up so why not.
Tools Required:
-Good sodering iron and some soder. I only soder because only butt heads use butt connectors.
-Good wire strippers and chrimpers
-Razor blade or small razor knife ( basicly something sharp to strip wires. Wire strippers and cut things unless you have those auto strippers those work well but i prefer to use razor blades for they're great in tight places )
-12V volt meter or test light. ( either one will work but i prefer a meter cause you can also check grounds )
-Good quality Electrical Tape. Anyone like me that has done alot of car audio or gauges or eletrical installs knows the pain of using cheap tape trust me.
-Double sided tape and some Zip ties. Ties are used to clean up loose wires and i use double tape or velcrow to mount your actual turbo timer.
*-Heat shrink tubing. Tape works just as good this is a personal preference for some people. Not needed just a personal preference.*
-Vacuum line and Vacuum T's.... This is only for those that their T T's read boost like Blitz units other wise skip this
-Assortment of screw drivers. Philips usually is good enough but it doesn't hurt to have a mutiple choice.
-Assorment of I or eye hole connectors used for the ground wire if not given to you with your timer from the company most are good about that though
-Assortment of 1/4" or 3/8" sockets and tools. These will be used mainly for bolting the ground wire. Yes you can T into a ground but i always ground everything on it's own.
Tools for the easy way out:
-Basicly everything above but except sodering iron and soder. Go buy plastic T taps connectors and Butt connectors.
* Everything Above Can be bought at your local radio shack even some Targets or wal marts might sell them but radio shack is your best bet. Soder or butt connectors are a personal choice. T taps and butt connectors are alot faster and easier but i've had problems with them not connecting well or going up so if you soder and know how to soder you should have a connection good for the life of the car and no problems. Once again if you don't know how to soder then practice and learn the right way it is just like welding in a way. that there is a right way and a wrong way to do this. If you don't know how to then go with the T taps and butt connectors just double check and make sure all connections are nice and good.*
Getting started :
Start by removing the side skid plate that says Mazdaspeed on it and also the lower left kick panel held in place by a little plastic puch clip. First you want to remove your steering column the under cover and side trim pieces right under it basicly where your knees or shins are when sitting in the car before you can remove the under cover you must dismount the hood latch lever. Do this by placing a small flat head screw driver, pocket size works best, threw the top of the assembly you'll see the little tab that needs to be pushed down in the center. Push it down and pull the whole lever assembly out. don't bother trying to take the cable off first this is impossible and not needed. Once that is removed you'll see a philips screw there remove that and pop out the bottom kick panel cover. BE CAREFUL it's only held in by plastic clips and you need to disconnect the dimmer switch and DSC switch wiring harness. There's three philips screws holding the steering colum pieces together you must remove the bottom shin cover and hood latch first to get access to the third screw on the steering colum at the end. Remove all the trim pieces and set them in a safe place so you won't step on them or damage them remember everything is only plastic. Next find a good location to mount your T T ( TT=turbo timer ). Make sure you'll have enough wire after mounting to make it to where you'll be T tapping into your ignition switch harness and E-brake harness wire. If you need to lengthen or anything make sure you use the right gauge wire for that wire or wires they are heavier gauge for a reason. Don't lengthen a 14 gauge wire with a 18 gauge. Buy some extra wire from radio shack just in case in the two gauges used for TTer's just in case doesn't hurt and it's cheap.
Wiring in the turbo timer :
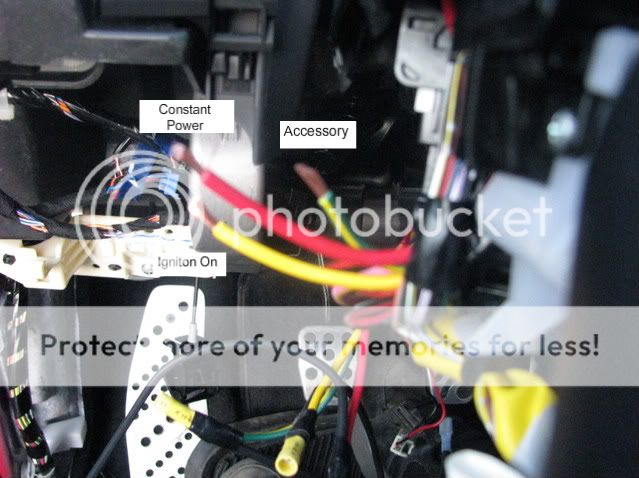
Now you'll want to located your ignition switch connector and wiring harness should be a bunch of big gauge wires on the left ( left as in if you are looking at the steering wheel and colum sitting in the driver seat ). Remove the foam pad at the end of the harness and start to un ravel the tap from the harness. I only unraveled down about six inches from the foam wraped around the harness this should be more then enough room. There will be three wires here you need to look for. Red or Black/Red ( Either one is a 12V Constant I used black with the red stripe ) These two are your 12v constant wires only one is needed so pick one. Next is a Green/Yellow wire ( Green with a yellow stripe) The green/yellow wire is going to be your ignition or switch 12V wire. Last is your Acc. wire. Find the same size All yellow wire. Now some others on other forums say to use the pink and yellow for ACC. My car is a '08 and they're full of s*** BUT this is where a test light or Volt meter come in use. Check the yellow wire with your tool should have 0V with the key off and 12V ( or test light lights up ) WITH THE KEY IN ACC. POSITION ONLY. IF like mine the all yellow wire is it use that if not check the pink and yellow wire and use that one. Now you remove the skid plate and lower left kick panel for a reason. See that black ground with a 10mm bolt. That is going to be your ground and the best spot i found. Ground your TT there unless you found a better spot.
Wiring in the E-Brake Wire :
This wire is not needed for the timer to actually work but is highly recommended to install for safety and security. Also it's a easy way if you don't need to use the timer to to turn it. By droping the e brake it sends a signal to the timer and kills the TT automaticly. I've seen some people even wire this up to clutch switchs or brake switchs at the pedals but not all cars work the same like that so we'll stick with the normal way and use the e brake.
Start first by removing the shift knob. Next remove the cup holder trim piece follow by the shifter boot and trim piece. Now the next step is not needed but will make running the wire alot easier to access. You'll see two 8mm or philips screws holding in the ash tray assembly. remove the two screws and either pull just the ash tray and then the cig. lighter assembly above it or mine came out as one whole piece. Disconnect the cig. lighter, Passenger air bag light and any other connectors to remove the trim piece out of the way. Or there should be enough slack to just set it a side either way works. Locate the e brake signal wire. It's a Black with a light green stripe. It's a pain to remove and gain access to the harness so what i did is follow the wire from the e brake assembly. It goes to a plastic tube surrounding the wire it's a pain in the as but remove the tape and plastic tube covering the black/light green wire. Once done run the wire ( usually gray for TTer's ) for the e brake from the TTer assembly or harness and tap into the black and light green wire for the e brake. Seccure wire and connection and tuck it back under the carpet making sure it doesn't come in contact with the e brake assembly. Re-install trim piece for the shifter and center console in reverse order and your done.
Final :
You should already have a place to mount the TT unit. Some TT units have a display unit and then a actual relay and brain unit so to say. I'm using a STRI Turbo timer. I never heard of them till a week ago but i picked it up from my local performance shop for only $30 so for the money you can't beat it. Some TT units also have a built in boost gauge. If like me you already have a boost gauge installed in your car you don't need to hook this up but if you want to you can T tap into the vacuum soruce right at your gauge instead of running everything threw the fire wall again unless you have a electronic gauge in which you'd have to run it threw the firewall again. I like thr STRi unit that i have cause it's very small and disgreet. I mounted my display unit in the little cubby hole where the OBD access port is on the left side of the bottom kick panel. it's out of the way no one can see if and it's easy to access if i want to. I mounted the brain for my TT to the left of the steering colum on the brace for the front crash bar to give you guys a idea of how i installed mine. Reinstall all trim panels in reverse order and secure any loose wires and turn the key to full on ( two clicks on right before start ) and check to make sure your TT unit works properly. Have the E brake up and then turn it off. the TT if turned on should start to count down. Drop the e brake and check to make sure the TT unit turns off. If everything works fine congrats everything is hooked up right and in working order. If nothing is working right check all your connections if everything except the e brake kill is working then check your connection at the e brake wire. **The E brake must be in the engage and up postion when you turn the ignition off for it to work on most units. Some will work regaurdless but most need it to be up in order for it to work right.**
Enjoy no longer having to sit in your car and wait for it to idle down with your new turbo timer. IF you need pictures of anything just ask but i believe i discribed everything in good detail for there to not need pictures but if you do just ask.
Tools Required:
-Good sodering iron and some soder. I only soder because only butt heads use butt connectors.
-Good wire strippers and chrimpers
-Razor blade or small razor knife ( basicly something sharp to strip wires. Wire strippers and cut things unless you have those auto strippers those work well but i prefer to use razor blades for they're great in tight places )
-12V volt meter or test light. ( either one will work but i prefer a meter cause you can also check grounds )
-Good quality Electrical Tape. Anyone like me that has done alot of car audio or gauges or eletrical installs knows the pain of using cheap tape trust me.
-Double sided tape and some Zip ties. Ties are used to clean up loose wires and i use double tape or velcrow to mount your actual turbo timer.
*-Heat shrink tubing. Tape works just as good this is a personal preference for some people. Not needed just a personal preference.*
-Vacuum line and Vacuum T's.... This is only for those that their T T's read boost like Blitz units other wise skip this
-Assortment of screw drivers. Philips usually is good enough but it doesn't hurt to have a mutiple choice.
-Assorment of I or eye hole connectors used for the ground wire if not given to you with your timer from the company most are good about that though
-Assortment of 1/4" or 3/8" sockets and tools. These will be used mainly for bolting the ground wire. Yes you can T into a ground but i always ground everything on it's own.
Tools for the easy way out:
-Basicly everything above but except sodering iron and soder. Go buy plastic T taps connectors and Butt connectors.
* Everything Above Can be bought at your local radio shack even some Targets or wal marts might sell them but radio shack is your best bet. Soder or butt connectors are a personal choice. T taps and butt connectors are alot faster and easier but i've had problems with them not connecting well or going up so if you soder and know how to soder you should have a connection good for the life of the car and no problems. Once again if you don't know how to soder then practice and learn the right way it is just like welding in a way. that there is a right way and a wrong way to do this. If you don't know how to then go with the T taps and butt connectors just double check and make sure all connections are nice and good.*
Getting started :
Start by removing the side skid plate that says Mazdaspeed on it and also the lower left kick panel held in place by a little plastic puch clip. First you want to remove your steering column the under cover and side trim pieces right under it basicly where your knees or shins are when sitting in the car before you can remove the under cover you must dismount the hood latch lever. Do this by placing a small flat head screw driver, pocket size works best, threw the top of the assembly you'll see the little tab that needs to be pushed down in the center. Push it down and pull the whole lever assembly out. don't bother trying to take the cable off first this is impossible and not needed. Once that is removed you'll see a philips screw there remove that and pop out the bottom kick panel cover. BE CAREFUL it's only held in by plastic clips and you need to disconnect the dimmer switch and DSC switch wiring harness. There's three philips screws holding the steering colum pieces together you must remove the bottom shin cover and hood latch first to get access to the third screw on the steering colum at the end. Remove all the trim pieces and set them in a safe place so you won't step on them or damage them remember everything is only plastic. Next find a good location to mount your T T ( TT=turbo timer ). Make sure you'll have enough wire after mounting to make it to where you'll be T tapping into your ignition switch harness and E-brake harness wire. If you need to lengthen or anything make sure you use the right gauge wire for that wire or wires they are heavier gauge for a reason. Don't lengthen a 14 gauge wire with a 18 gauge. Buy some extra wire from radio shack just in case in the two gauges used for TTer's just in case doesn't hurt and it's cheap.
Wiring in the turbo timer :
Now you'll want to located your ignition switch connector and wiring harness should be a bunch of big gauge wires on the left ( left as in if you are looking at the steering wheel and colum sitting in the driver seat ). Remove the foam pad at the end of the harness and start to un ravel the tap from the harness. I only unraveled down about six inches from the foam wraped around the harness this should be more then enough room. There will be three wires here you need to look for. Red or Black/Red ( Either one is a 12V Constant I used black with the red stripe ) These two are your 12v constant wires only one is needed so pick one. Next is a Green/Yellow wire ( Green with a yellow stripe) The green/yellow wire is going to be your ignition or switch 12V wire. Last is your Acc. wire. Find the same size All yellow wire. Now some others on other forums say to use the pink and yellow for ACC. My car is a '08 and they're full of s*** BUT this is where a test light or Volt meter come in use. Check the yellow wire with your tool should have 0V with the key off and 12V ( or test light lights up ) WITH THE KEY IN ACC. POSITION ONLY. IF like mine the all yellow wire is it use that if not check the pink and yellow wire and use that one. Now you remove the skid plate and lower left kick panel for a reason. See that black ground with a 10mm bolt. That is going to be your ground and the best spot i found. Ground your TT there unless you found a better spot.
Wiring in the E-Brake Wire :
This wire is not needed for the timer to actually work but is highly recommended to install for safety and security. Also it's a easy way if you don't need to use the timer to to turn it. By droping the e brake it sends a signal to the timer and kills the TT automaticly. I've seen some people even wire this up to clutch switchs or brake switchs at the pedals but not all cars work the same like that so we'll stick with the normal way and use the e brake.
Start first by removing the shift knob. Next remove the cup holder trim piece follow by the shifter boot and trim piece. Now the next step is not needed but will make running the wire alot easier to access. You'll see two 8mm or philips screws holding in the ash tray assembly. remove the two screws and either pull just the ash tray and then the cig. lighter assembly above it or mine came out as one whole piece. Disconnect the cig. lighter, Passenger air bag light and any other connectors to remove the trim piece out of the way. Or there should be enough slack to just set it a side either way works. Locate the e brake signal wire. It's a Black with a light green stripe. It's a pain to remove and gain access to the harness so what i did is follow the wire from the e brake assembly. It goes to a plastic tube surrounding the wire it's a pain in the as but remove the tape and plastic tube covering the black/light green wire. Once done run the wire ( usually gray for TTer's ) for the e brake from the TTer assembly or harness and tap into the black and light green wire for the e brake. Seccure wire and connection and tuck it back under the carpet making sure it doesn't come in contact with the e brake assembly. Re-install trim piece for the shifter and center console in reverse order and your done.
Final :
You should already have a place to mount the TT unit. Some TT units have a display unit and then a actual relay and brain unit so to say. I'm using a STRI Turbo timer. I never heard of them till a week ago but i picked it up from my local performance shop for only $30 so for the money you can't beat it. Some TT units also have a built in boost gauge. If like me you already have a boost gauge installed in your car you don't need to hook this up but if you want to you can T tap into the vacuum soruce right at your gauge instead of running everything threw the fire wall again unless you have a electronic gauge in which you'd have to run it threw the firewall again. I like thr STRi unit that i have cause it's very small and disgreet. I mounted my display unit in the little cubby hole where the OBD access port is on the left side of the bottom kick panel. it's out of the way no one can see if and it's easy to access if i want to. I mounted the brain for my TT to the left of the steering colum on the brace for the front crash bar to give you guys a idea of how i installed mine. Reinstall all trim panels in reverse order and secure any loose wires and turn the key to full on ( two clicks on right before start ) and check to make sure your TT unit works properly. Have the E brake up and then turn it off. the TT if turned on should start to count down. Drop the e brake and check to make sure the TT unit turns off. If everything works fine congrats everything is hooked up right and in working order. If nothing is working right check all your connections if everything except the e brake kill is working then check your connection at the e brake wire. **The E brake must be in the engage and up postion when you turn the ignition off for it to work on most units. Some will work regaurdless but most need it to be up in order for it to work right.**
Enjoy no longer having to sit in your car and wait for it to idle down with your new turbo timer. IF you need pictures of anything just ask but i believe i discribed everything in good detail for there to not need pictures but if you do just ask.