How to:Custom Boost gauge install in center vent(56k ummm no...)

VRMS6

Member
:
2011 Kona Blue Ford Edge Sport
Well after looking around and some info on different types of installs from this thread. http://www.msprotege.com/forum/showthread.php?t=123694016
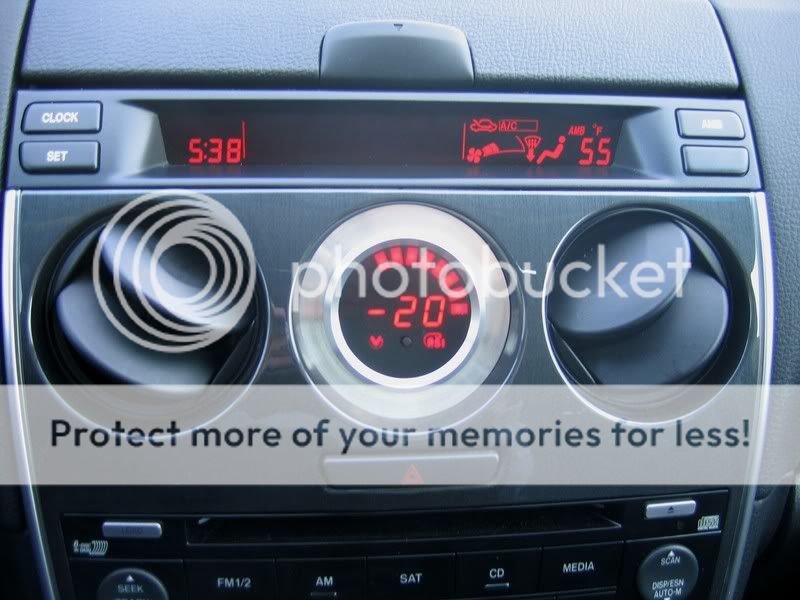
I decided I liked MazdaSpeedguy's install the best as seen in this pic.
gaugepod009.jpg


I want to replicate the mount style of the gauge in the center vent but use it for a boost gauge. He put me in contact with John Jackson at:

Jackson AutoSport
Phone 204-235-1123
jacsport@jacsport.com

Jackson Autosport is a Canadian performance company that does custom work. John made the custom ring/mount as seen above . After speaking to him about replicating the piece for me he asked me to give him some time to get the car back in the shop so he could get measurements of the original piece as it was a custom one off part he made in the shop.... Last Friday I got a email that he had gotten the measurements and had made a mount for me... It finally arrived today....
In the mean time I looked around at a few gauges and decided to go with the Prosport Electrical Premium Boost Gauge. http://prosportgauges.com/amber-white-premium-electric-boost-gauge.aspx
It has the features of the High end DEFI gauge at 1/3 the price. Add to the fact that the lighting looks very similar to the factory gauges and it was a no brainer....

gauge box top
prosportgaugecustomringgw7.jpg


gauge box front
prosportgaugecustomringaw6.jpg


gauge closeup
prosportgaugecustomringsf5.jpg


All needed accessories were included
gauge,sender wiring harness,vac hose,filter,sending unit,bag-o-bolts,tfitting, power wiring I extended
prosportgaugecustomringro3.jpg


After unpacking the trim ring/pod and plug for the vent I could tell right away it was a quality piece....

ring/plug front view

prosportgaugecustomringmd4.jpg


ring/plug side view

prosportgaugecustomringyn9.jpg


ring/plug rear view

prosportgaugecustomringex0.jpg


ring closeup front

prosportgaugecustomringrn1.jpg


ring closeup rear

prosportgaugecustomringwt5.jpg


Placed gauge in ring for a test fit and its perfect

ring/gauge 1

prosportgaugecustomringrr0.jpg


ring/gauge 2

prosportgaugecustomringyi0.jpg


Will do install in the morning and will take plenty of pics.....
 
Well I did the install yesterday and it was fairly easy to do. Hardest part was finding where to go thru the firewall to run the harness from the sender to the gauge.Tools I used included the following

10mm socket,extension, rachet
10mm ratcheting wrench
phillips screwdriver
flathead screwdriver
wire cutters/stripper
zipties
line taps
fuse blade

This is NOT ment to be a complete walkthru but my recollection of the install with pics...

1) Disconnect the neg terminal of your battery
boostgaugeinstall08zy8.jpg


2) Remove ebrake surround and cup holder/ashtray assembly. The are removed by pulling up, no screws to remove.
boostgaugeinstall02hd9.jpg


3) Remove glove box to access 10mm screw for radio/center console removal.
boostgaugeinstall03mz6.jpg

4) remove 2 screws at bottom of center concole/radio assy and pull center console out. start at bottom and work up.

5) back of center vent assy has 4 screws holding vents to center console assy. remove screws and remove vent assy.
boostgaugeinstall04kd5.jpg


6) Remove center vent louvers and guide cup from vent assy. 4 clips hold it on. Pry up carefully and you will be able to reuse louvers if you need to put car back to stock.
boostgaugeinstall05ir5.jpg


7) mount gauge to trim ring as seen in my first post

8) Install Gauge/ring into vent assy, its a pressure fit. Then reinstall vent assy to center console. Note make sure boost gauge is orientated properly.
boostgaugeinstall07hm0.jpg


9) Install supplied vent plug in center vent to stop block hot/cold air from blowing directly on rear of gauge.
boostgaugeinstall06cu4.jpg


Now its back underhood for sender/vac hose/wiring install

10) Find a spot to mount sender. I used a existing screw that was sticking out of the firewall.
boostgaugeinstall08zy8.jpg


11) run Vac hose from sender to BOV using supplied T fitting
boostgaugeinstall09ux3.jpg


12) Install supplied filter inline with Vac Hose
boostgaugeinstall11hg7.jpg


13) Run sender wiring harness thru firewall. I used hole allready there for a OEM wiring harness. Its located above brake pedal and comes out in wiper cowl area. You can see wiring harnedd going into wiper cowl in this pic.
boostgaugeinstall12ss8.jpg


Overview pic showing tfitting,vac hose,filter,sender and wiring harness.
boostgaugeinstall13vw6.jpg


Your done in the engine bay for now.

14) Back in the car wire the red power wire to 12v constant. Black to ground and orange to a switched power wire. I used the cig lighter wiring for the ground and switched sourse. I ran the red wire to the fuse box on left side kick panel and used a blade connector to tap a unused fuse that was on all the tme.

15) plug the sender wire harness and power wire harness to the back of the Boost Gauge

16) Reattach neg battery cable and turn on car to make sure gauge powers up.

17) Rev the disassembly instructions to reinstall dash/center console.

18) Gauge installed power off.
boostgaugeinstall14dp2.jpg


Gauge installed powered on.
boostgaugeinstall15xy0.jpg


This is a simplified install walkthru as some of the steps are allready posted elsewhere on the forums (removal of center console/dash,glovebox, etc)

Couple of notes.
Boost hose is small n stiff. heat a little with heatgun/blow dryer to make easier to slip over tfitting ends.
Extend power wiring harness longer than what you need. You can then cut to perfect size after running your wires to where they need to go.
Use zip ties on the Vac Hoses ends to make sure they dont blow off....
Once again special thanks to
John at Jackson Autosports for making the custom Gauge ring/vent plug for me. Contact him if your intrested in one for your own install.
 
Last edited:
Thanks guys appreciate the compliments....
Few observations after a few days...
Gauge startup sweep looks hella nice....gears in gauge is a bit loud during this...
There is a shut off sequence as well. peak light goes on/off,gauge shows white then red then it cuts off
Peak boost shows 16lbs...It then tapers down on accel..
 
Well, it took over 5 weeks to get the vent adapter. But, I'm very happy with the results. I went with a VEI gauge. The billet ring goes well with the billet housing of the gauge and it's completely black when off.

Thanks, VRMS6 for the excellent how-to. It was a huge help. I would have been afraid to pull up on the center console plastic, if I didn't know that it just snapped in place. There's only one thing I'd like to ad. When I tried to pull the upper dash with the stereo out, it got stuck just a few inches out. I finally figured out that a large shielded cable was zip-tied to the bar behind the glove box. Once I cut the zip-ties, I had plenty of slack to remove it far enough to access the vent assembly screws.

The VEI gauge needed a switched 12v line, a switched light source for dimming purposes, and a ground. I simply tapped into the ash tray lamp and the lighter wires since they were right there exposed in plain sight. Then, I ran a 7/64" hose from the gauge through the top part of the large rubber grommet behind the battery up to the BPV line.

Here's a pic...

vei1.jpg
 
Last edited:
Glad to see my how-to helped... While it was a bit of a wait you have to admit its worth it. The piece is a custom one off that is to notch in quality. Well worth the $$/wait...
 
How did you get the wiring harness through the firewall? Did the OEM hole you used have extra space or did you mess with the insulation or grommet around it? I tried to get my wire through but everything is too tight down there. In other threads i've seen like this the people usually give up and drill another hole through the firewall. I would really like to avoid drilling a hole, mainly because I don't have a drill and i'm afraid I would drill into something on the other side. Any advice would be great, thanks and great write up.
 
Andy if you get up under the drivers side dash above the brake pedal you will see a small wiring harness going thru the firewall. cut a slit in the grommett and run your wire thru there. It will come out below the wipers in the wiper cowl area...
 
Thanks, I just stabbed the grommet a few times and tied it to a wire hanger and pushed it through. Now i'm stuck on the wiring. I have a STRI DSD-SLM II boost gauge and it came with 4 wires. Constant 12V, ignition, illumination, and ground. I hooked the ignition and ground to the lighter and the illumination to the glowing ring for the lighter but now i need to find a 12V constant. I saw some other threads where people plugged them in straight to the fuse box somewhere, I think i'm gonna buy some wire and try that today. Thanks
 
VRMS6 - This is a very clean looking set up. thats a good amount of time and effort to do this, not to mention a very clear and informative write up. thanks for post this (I know I'm late to the thread, but hey I just found the forum), unfortunately I'll have to wait about 15 months to give it a try. Gotta wait for the lease to be up, and buy the car outright before I start serious mods.
 
Thank you. Feels good to have my hard work appreciated. I do my writeup because I know how fustrating it is to want to upgrade/mod my car and not know how to do a install. Having to pay someone else to work on my car is pretty low on my priority list....
As far as you waiting this mod is pretty mild on the mod scale. You can remove the Gauge and all associated hardware in less than an hour with no perminate change to your car....
 
Last edited:
Back