
ok, here it is, lots of pics. This is my first real how-to, so don't flame me plz.
I used hand tools only, because I wanted to take my time, but much of this could have been done with a dremel tool to speed things up a bit.
Tools:
Side cutting pliers,
Round file
Half-round file
Hacksaw or jeweler's saw
razor knife
Hot glue gun
Electrical tape
To remove the vent, grab the vanes and pull straight out. This takes a bit more force than you would assume is necessary. There is an inner vent piece that comes out by twisting clockwise, and pull out. 3 tabs line up into slots in the dash.
Parts.

I started by cutting the trim ring off.

I didn't trim it close enough the first time, and had to cut some more off, or file off lots of plastic.

This is how thin you need it to be, all you want is the trim ring.

The vanes can be cut out with side cutting pliers (dikes), or just pull them out. They are held with little plastic pins that will break easily. Don't worry about this, they will be discarded anyway. sorry, no pic of the pins.
The ring left behind has flat areas that held the pivot pins for the vanes. These have to be filed or cut out.
flat spots:

what it should look like after filing.

The filing process leaves some rough edges that clean up easily with a razor knife and sandpaper.
Next you will have to cut the inner part of the vent. There is a step to a narrower size that will not allow the roush pod to fit. Cut it right above the step.

Here's another view of the step.

This will leave a small gap of around 1/2 inch between the a/c ducting and the back of the roush pod. Some air will escape into your dash, but it still blows around the gauge.
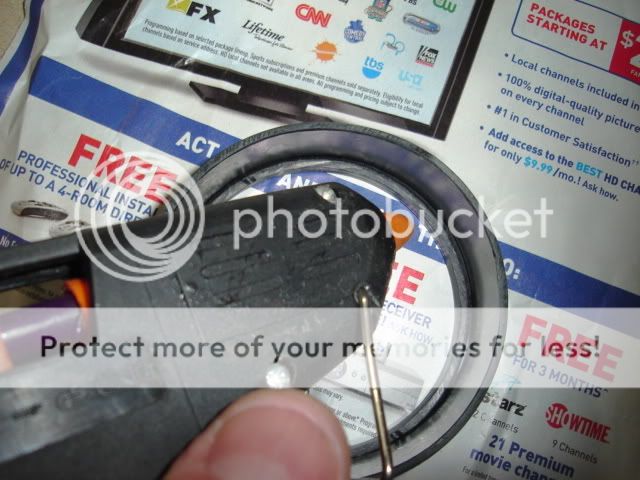
The trim ring gets glued to the inner vent that we just cut.

The only place to glue it is on the inside. take your time and go slowly using a minimum of glue. If you use too much, you can peel it off or trim with a knife. I didn't use superglue here because the vapors given off during the curing process can stain nearby plastic. Plus it is harder to correct any mistakes.
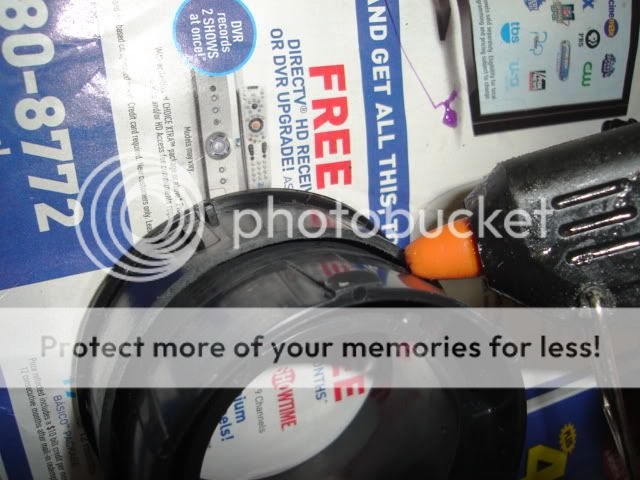
Here it is mounted and glued.

another view.

Now it's time to fit the pod. There are some tabs on the pod that are longer than the rest. The roush instructions said these are for an f150. Cut 'em off with the dikes.

Slide the pod into the vent and test fit. I had to go at the inside of the vent some more with a half-round file to open it up a little more. I took my time here so as to not mar the trim ring.

It ended up being a fairly snug fit, I put the whole assembly trim-ring side down on some newspaper and pushed the gauge pod through 'til they were flush, and hod glued the two together.
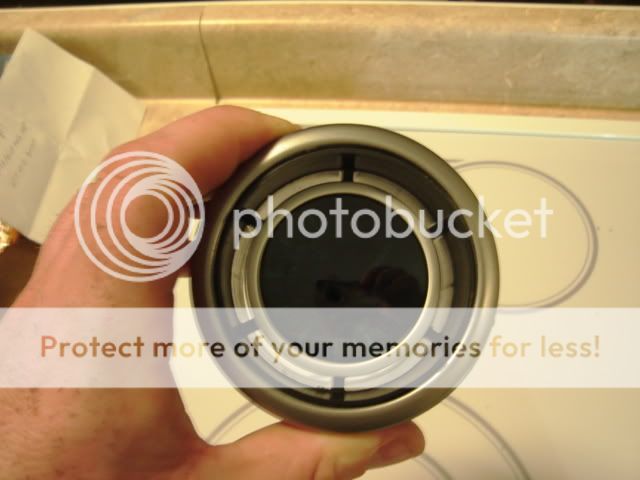
Here is a closeup of the pod installed in the vent.

The Prosport gauge is fairly loose, so I used 2 layers of electrical tape to snug it up.

All of it put together.
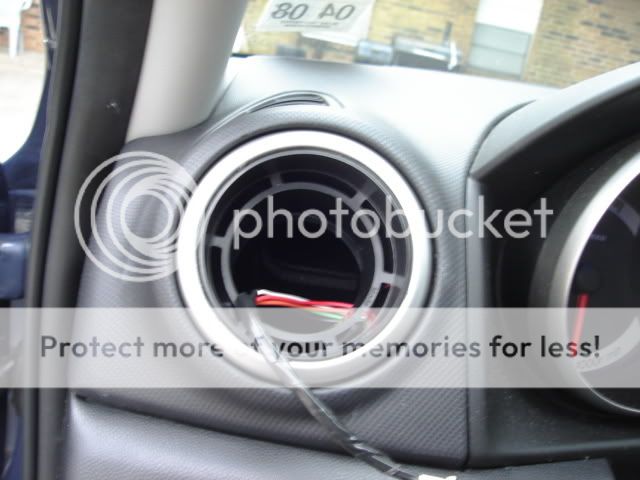
Pod installed in the car.
Now at this point, i connected the gauge, pushed it into the pod, and promptly pushed the vent into the dash, un-gluing the trim ring. It is a snug fit. Don't do that part, it was dumb. After some cursing, and re-gluing the ring on. I put the vent back in, twisting counter-clockwise to secure it in the dash. Lined up the gauge, and pulled the whole assembly back out to seat the gauge. After re-installing it, here's how it looks.

You can see a small bit of hot-glue visible, but I trimmed that away.
It sounds like much more work than it actually was. It only took an hour, and I was going very slow around that trim ring. Not bad if you aren't scared to cut into stuff.
I used hand tools only, because I wanted to take my time, but much of this could have been done with a dremel tool to speed things up a bit.
Tools:
Side cutting pliers,
Round file
Half-round file
Hacksaw or jeweler's saw
razor knife
Hot glue gun
Electrical tape
To remove the vent, grab the vanes and pull straight out. This takes a bit more force than you would assume is necessary. There is an inner vent piece that comes out by twisting clockwise, and pull out. 3 tabs line up into slots in the dash.
Parts.
I started by cutting the trim ring off.
I didn't trim it close enough the first time, and had to cut some more off, or file off lots of plastic.
This is how thin you need it to be, all you want is the trim ring.
The vanes can be cut out with side cutting pliers (dikes), or just pull them out. They are held with little plastic pins that will break easily. Don't worry about this, they will be discarded anyway. sorry, no pic of the pins.
The ring left behind has flat areas that held the pivot pins for the vanes. These have to be filed or cut out.
flat spots:
what it should look like after filing.
The filing process leaves some rough edges that clean up easily with a razor knife and sandpaper.
Next you will have to cut the inner part of the vent. There is a step to a narrower size that will not allow the roush pod to fit. Cut it right above the step.
Here's another view of the step.
This will leave a small gap of around 1/2 inch between the a/c ducting and the back of the roush pod. Some air will escape into your dash, but it still blows around the gauge.
The trim ring gets glued to the inner vent that we just cut.
The only place to glue it is on the inside. take your time and go slowly using a minimum of glue. If you use too much, you can peel it off or trim with a knife. I didn't use superglue here because the vapors given off during the curing process can stain nearby plastic. Plus it is harder to correct any mistakes.
Here it is mounted and glued.
another view.
Now it's time to fit the pod. There are some tabs on the pod that are longer than the rest. The roush instructions said these are for an f150. Cut 'em off with the dikes.
Slide the pod into the vent and test fit. I had to go at the inside of the vent some more with a half-round file to open it up a little more. I took my time here so as to not mar the trim ring.
It ended up being a fairly snug fit, I put the whole assembly trim-ring side down on some newspaper and pushed the gauge pod through 'til they were flush, and hod glued the two together.
Here is a closeup of the pod installed in the vent.
The Prosport gauge is fairly loose, so I used 2 layers of electrical tape to snug it up.
All of it put together.
Pod installed in the car.
Now at this point, i connected the gauge, pushed it into the pod, and promptly pushed the vent into the dash, un-gluing the trim ring. It is a snug fit. Don't do that part, it was dumb. After some cursing, and re-gluing the ring on. I put the vent back in, twisting counter-clockwise to secure it in the dash. Lined up the gauge, and pulled the whole assembly back out to seat the gauge. After re-installing it, here's how it looks.
You can see a small bit of hot-glue visible, but I trimmed that away.
It sounds like much more work than it actually was. It only took an hour, and I was going very slow around that trim ring. Not bad if you aren't scared to cut into stuff.
 . I'm still trying to figure out where to put my gauge..