
Mazda6smtx
Member
- :
- 2004 Mazda 6
Disclaimer: Read this entire thread through before attempting. If you still don't feel comfortable then don't do it. PM me if you have any questions. If you live close enough I'll come over and help you out.
First and foremost jack up the car and support it on jackstands. Never work under a vehicle that is only supported by the jack alone. Have your rear swaybar and bushing ready along with some brand new endlinks and nuts.
These instructions are about 99% the same as the Racing Beat ones, except that I took my swaybar out a little differently.
Here is a picture of all the tools that are required for this installation.
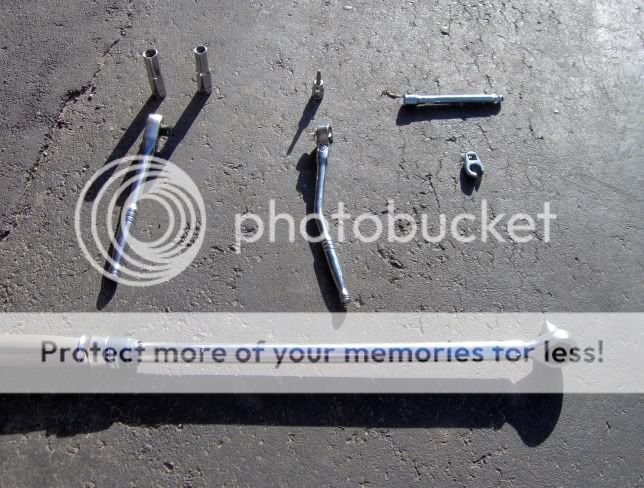
1 - 1/2" drive rachetting wrench
1 - 14mm deep socket
1 - 12mm deep socket
1 - 3/8 drive rachetting wrench
1 - 5mm allan head socket
1 - 1/2" or 3/8" drive torque wrench (must be able to be set at 45 ft.lbs)
1 - 14mm crowfoot socket
1 - 6" swivel extension for your crowsfoot.
Loctite (not shown) is optional, I used it but if this is done correctly you "shouldn't" need it.
Here is a better picture of the crowfoot socket incase people had no idea what it is.
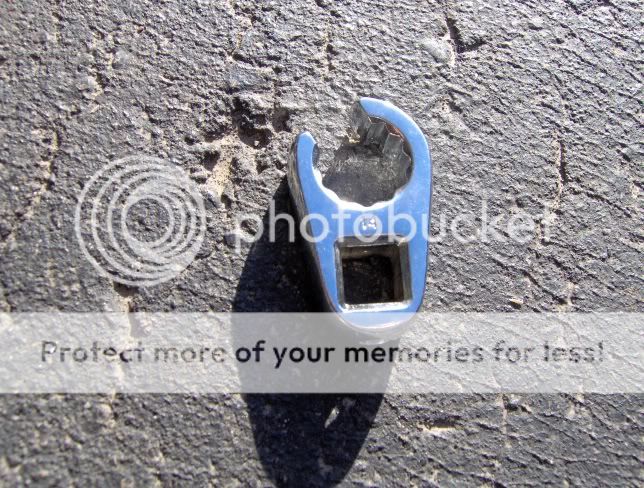
Now if the crowsfoot socket and your torque wrench aren't the same drive you will need an adapter that will make it fit your torque wrench.
If this is your first time underneath your 6 take some time to see how things work and where everything is. This is the time you should decide if you need help. I did this installation with a friend my first time and then by myself the second time.
So here we go:
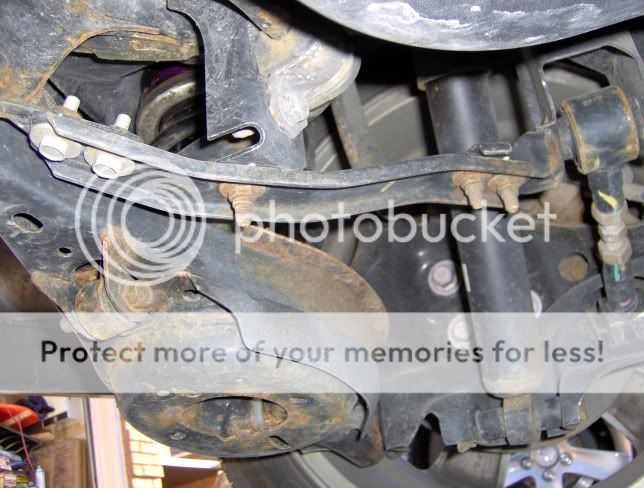
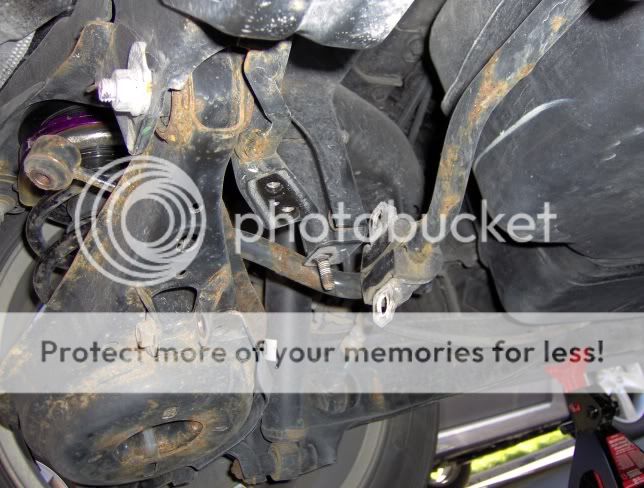
Looking up at the spring cup you will see the attachment piont for the rear swaybars endlink which is a 14mm bolt. This is the first piece to be removed. The other side of the car looks and functions exaclty the same, so remove this bolt on the other side as well.
Also in the above picture you will see 2 - 12mm bolts and 3 - 12mm nuts holding on a brace for the subframe. Remove the 2 bolts and 3 nuts and take the brace off the car and set it aside. Removing the drivers side is more important but I found for the extra 30 seconds you might as well remove the one on the passenger side as well, since sometimes the swaybar is a little tricky to remove and this just makes it a little easier.
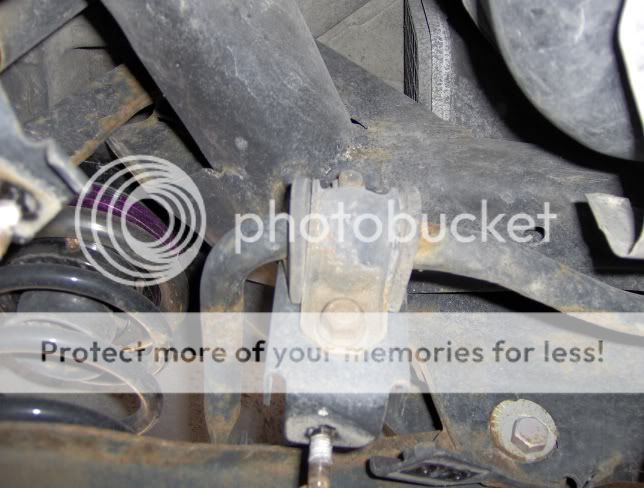
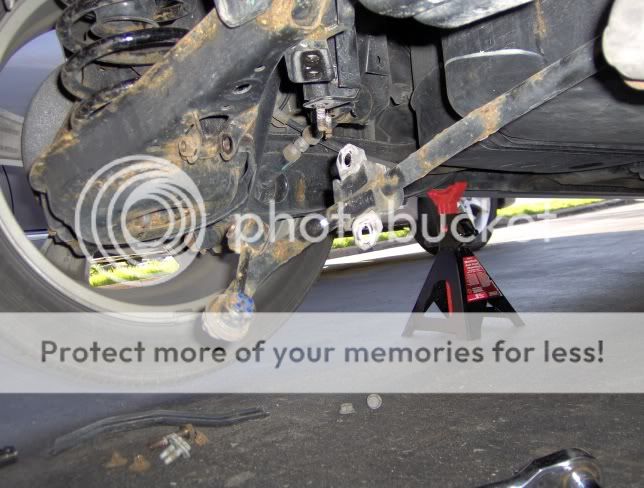
Now we have the swaybar bushing. These location the swaybar relative the the subframe and chassis. Remove the top nut and the bottom bolt. Do this for both mounts amd pull the swaybar toward the front of the car to free the mounts incase they sticking to the subframe.
Next we will remove the swaybar from the vehicle. This is done by pulling the driverside half of the bar forward, and down.
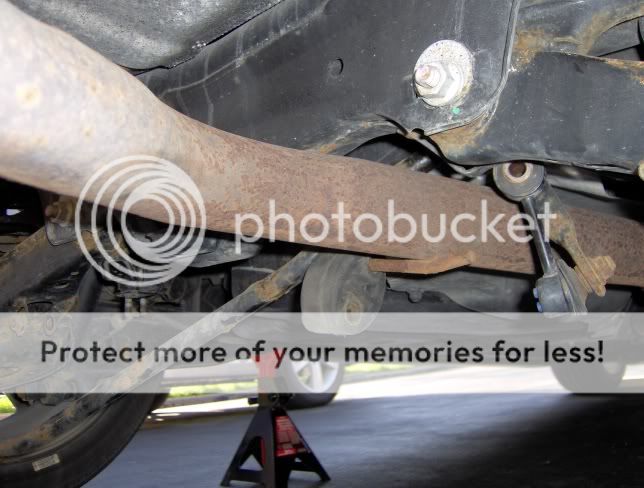
Once the driverside part of the bar is down and out of the way remove the passenger side by moving it forward and then around the exhaust. My exhaust is a custom stovepipe and I was having trouble so I removed the center hanger for installation. If you are having the same issues just pull on the mount and it will come off. If it's being really stupid get some channel locks and pull it off.
Now that the bar is off the car you can do set it aside for sale on E-bay, or throw in the garbage, perhaps keep it as memory that you have left childhood and are now a real man, with a really big bar.
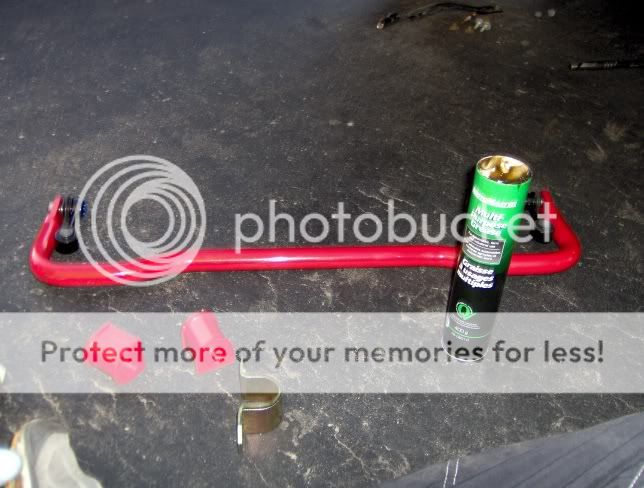
It's now time to attach your new endlinks to your new bar. This is the part that everyone according to Racing Beat is not doing correctly and thus resulted in having their endlinks fail. It's pretty easy to do it just looks complication, because I had to keep everything in place while taking the picture. Basically you do this: Hold the new swaybar between your feet to stop it from rotating. Place the 5mm allan head socket onto your 3/8" rachetting wrench, set this wrench to apply force in the counter clockwise direction. Put your crowsfoot socket and extension on your torque wrench and set it to 45 ft.lbs and to aplly force in the clockwise direction. Turn the too until the torque wrench clicks or beeps to indicate that the correct torque of 45 ft.lbs has been reached. At this time I also applied some red Loctite to the threads on the endlinks. This is how Racing Beat would like you to attach the endlinks so you don't have any issues. Now if I have any issues with this you can bet that they will be hearing from me. Here is what it looks like when you have everything ready to go.

*** IF YOU HAVE NEVER USED A CROWSFOOT SOCKET BEFORE, PLEASE PRACTISE ON SOMETHING BEFORE DOING THIS, CROWSFEET SOCKETS ARE REALLY ANNOYING !!! ***
Now that you have your endlinks torqued down properly get your pushings and some grease. I didn't think the grease supplied was enough because I have read on the forum of people complaining that there bars started to squeek, so I went out and bought a tube of grease.
Remember lubing these bushings are one of those time when you can't put enough. So the more the better, guys this may remind you of college, and some women for that matter. You can't put too much lube.

Now put the bushing on the bar with the flat part facing the direction the ends of the bar are pionted, try to keep these bushing in this position until it's time to bolt everything in. It's not really important it's just one of those things that will make life easier when it's time to bolt the bushing brackets back together.
http://i25.photobucket.com/albums/c57/mazd...tx/HPIM0057.jpg
Installation is exactly the same as removal, just in the reverse order, if so just follow the pictures on your way back up to the top of this post and you should be fine. Please remember the 12mm nuts and bolts are very small and they are locking nuts so they will not be able to thread up all the way by hand. Because they are small they are prone to breaking if you over torque them so please be gentle. When you are finished you should have something that looks like this.
http://i25.photobucket.com/albums/c57/mazd...tx/HPIM0058.jpg
http://i25.photobucket.com/albums/c57/mazd...tx/HPIM0059.jpg
I hope this cleared up some issues that people were having regarding the proper way to torque the endlinks.
EDIT: MAY 11, 2007. After going through my install and wondering why my endlinks eventually broke I realized that I installed the RB swaybar upside down. In the photo's if you look at the removal of the stock bar the end of the swaybar has an arch. The stock bar went up and over the spring cup, while the RB bar goes down closer to the spring cup. For those installing there bars in the further please be mindful of this. If you install the bar upside down the bar will come in contact with the spring cup and thus causes a shearing force on the endlinks which will cause there destruction. I will post more picture latter on when I change out the endlinks. Sorry for this mishap.
___________________________________________________________
I posted this install over at M6C so I decided to move it here because I know they don't allow any cross club posting.
This was last year and wow only 2 winters and my looks nasty underneath, at least there is no rust on the chassis/body.
First and foremost jack up the car and support it on jackstands. Never work under a vehicle that is only supported by the jack alone. Have your rear swaybar and bushing ready along with some brand new endlinks and nuts.
These instructions are about 99% the same as the Racing Beat ones, except that I took my swaybar out a little differently.
Here is a picture of all the tools that are required for this installation.
1 - 1/2" drive rachetting wrench
1 - 14mm deep socket
1 - 12mm deep socket
1 - 3/8 drive rachetting wrench
1 - 5mm allan head socket
1 - 1/2" or 3/8" drive torque wrench (must be able to be set at 45 ft.lbs)
1 - 14mm crowfoot socket
1 - 6" swivel extension for your crowsfoot.
Loctite (not shown) is optional, I used it but if this is done correctly you "shouldn't" need it.
Here is a better picture of the crowfoot socket incase people had no idea what it is.
Now if the crowsfoot socket and your torque wrench aren't the same drive you will need an adapter that will make it fit your torque wrench.
If this is your first time underneath your 6 take some time to see how things work and where everything is. This is the time you should decide if you need help. I did this installation with a friend my first time and then by myself the second time.
So here we go:
Looking up at the spring cup you will see the attachment piont for the rear swaybars endlink which is a 14mm bolt. This is the first piece to be removed. The other side of the car looks and functions exaclty the same, so remove this bolt on the other side as well.
Also in the above picture you will see 2 - 12mm bolts and 3 - 12mm nuts holding on a brace for the subframe. Remove the 2 bolts and 3 nuts and take the brace off the car and set it aside. Removing the drivers side is more important but I found for the extra 30 seconds you might as well remove the one on the passenger side as well, since sometimes the swaybar is a little tricky to remove and this just makes it a little easier.
Now we have the swaybar bushing. These location the swaybar relative the the subframe and chassis. Remove the top nut and the bottom bolt. Do this for both mounts amd pull the swaybar toward the front of the car to free the mounts incase they sticking to the subframe.
Next we will remove the swaybar from the vehicle. This is done by pulling the driverside half of the bar forward, and down.
Once the driverside part of the bar is down and out of the way remove the passenger side by moving it forward and then around the exhaust. My exhaust is a custom stovepipe and I was having trouble so I removed the center hanger for installation. If you are having the same issues just pull on the mount and it will come off. If it's being really stupid get some channel locks and pull it off.
Now that the bar is off the car you can do set it aside for sale on E-bay, or throw in the garbage, perhaps keep it as memory that you have left childhood and are now a real man, with a really big bar.
It's now time to attach your new endlinks to your new bar. This is the part that everyone according to Racing Beat is not doing correctly and thus resulted in having their endlinks fail. It's pretty easy to do it just looks complication, because I had to keep everything in place while taking the picture. Basically you do this: Hold the new swaybar between your feet to stop it from rotating. Place the 5mm allan head socket onto your 3/8" rachetting wrench, set this wrench to apply force in the counter clockwise direction. Put your crowsfoot socket and extension on your torque wrench and set it to 45 ft.lbs and to aplly force in the clockwise direction. Turn the too until the torque wrench clicks or beeps to indicate that the correct torque of 45 ft.lbs has been reached. At this time I also applied some red Loctite to the threads on the endlinks. This is how Racing Beat would like you to attach the endlinks so you don't have any issues. Now if I have any issues with this you can bet that they will be hearing from me. Here is what it looks like when you have everything ready to go.
*** IF YOU HAVE NEVER USED A CROWSFOOT SOCKET BEFORE, PLEASE PRACTISE ON SOMETHING BEFORE DOING THIS, CROWSFEET SOCKETS ARE REALLY ANNOYING !!! ***
Now that you have your endlinks torqued down properly get your pushings and some grease. I didn't think the grease supplied was enough because I have read on the forum of people complaining that there bars started to squeek, so I went out and bought a tube of grease.
Remember lubing these bushings are one of those time when you can't put enough. So the more the better, guys this may remind you of college, and some women for that matter. You can't put too much lube.
Now put the bushing on the bar with the flat part facing the direction the ends of the bar are pionted, try to keep these bushing in this position until it's time to bolt everything in. It's not really important it's just one of those things that will make life easier when it's time to bolt the bushing brackets back together.
http://i25.photobucket.com/albums/c57/mazd...tx/HPIM0057.jpg
Installation is exactly the same as removal, just in the reverse order, if so just follow the pictures on your way back up to the top of this post and you should be fine. Please remember the 12mm nuts and bolts are very small and they are locking nuts so they will not be able to thread up all the way by hand. Because they are small they are prone to breaking if you over torque them so please be gentle. When you are finished you should have something that looks like this.
http://i25.photobucket.com/albums/c57/mazd...tx/HPIM0058.jpg
http://i25.photobucket.com/albums/c57/mazd...tx/HPIM0059.jpg
I hope this cleared up some issues that people were having regarding the proper way to torque the endlinks.
EDIT: MAY 11, 2007. After going through my install and wondering why my endlinks eventually broke I realized that I installed the RB swaybar upside down. In the photo's if you look at the removal of the stock bar the end of the swaybar has an arch. The stock bar went up and over the spring cup, while the RB bar goes down closer to the spring cup. For those installing there bars in the further please be mindful of this. If you install the bar upside down the bar will come in contact with the spring cup and thus causes a shearing force on the endlinks which will cause there destruction. I will post more picture latter on when I change out the endlinks. Sorry for this mishap.
___________________________________________________________
I posted this install over at M6C so I decided to move it here because I know they don't allow any cross club posting.
This was last year and wow only 2 winters and my looks nasty underneath, at least there is no rust on the chassis/body.
Last edited:
