
These are the steps that I used to install my HID kit. There may be some things that I assumed the reader would know how to do.
Difficulty = 4
Tools = Phillips Head Screw Driver, Wire Splices, Wire Snips, Tie wraps, Electrical tape, double sided tape, 6 Pack of beer
Cost = Around $150 Total
O Factor = 5 (Completing this Depending on color chosen) will make your fogs match better with HID headlights.

HID 8K KIT


Driver and Passenger side access points.

I started on the driver side. Remove the screws and pull the panel back out of the way.

There you should see that back of the fog light.

There you will see a tab. Push it in and pull, to unplug the factory bulb. Drink some Beer

With the factory Bulb unplugged twist the bulb to the right and you will feel it unlock. Then pull the bulb out.

As you will see it is an H11 Bulb.

Now remove the H11 Bulb from the HID kit and put it in place of the factory bulb and twist to lock in place. Be careful not to touch it against anything.

After it is in place and locked move over to the passenger side Drink More Beer

Passenger side will be done the same However it is tighter space thanks to the horn and the washer fluid reservoir. What I did was bend the bracket for the horn enough to where I could get my hand in there to work. Unplug the wire from the factory bulb the same way and twist and remove the factory bulb.

Then carefully install the HID bulb. It will be tight spaced but it can be done try not to touch anything. Twist to lock on place.

While in the tight space go ahead and plug in the wires to the Ballast and the HID bulb. I let the ballast rest inside of the bumper. You can use double sided tape to hold it in place if you would like

Also plug the wires in to the Ballast on the drivers side HID bulb and let it rest in the bumper.

NOW Not sure about the kit you may have but Mine required me to run a power cable to the battery and ground a cable also. Then I had on cable that was meant to plug into the factory fog light power plug. Now these did not match so I had to cut the factory plug on the car and the kit and splice those together and used some tape to keep any water out.
Also there was a wire from the HID kit that needs to be run to the passenger side HID bulb. I just ran it underneath the front bumper neatly and out of site unless you are under the car of course.

I put Tape over the Passenger side Factory Fog Light bulb plug to keep water out. There was no use for this plug with this kit.

I zip tied all of the cables to make them look neat and put everything back together.
Finish off the Beer and enjoy your hard work.
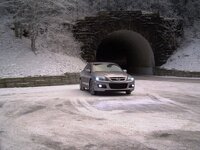
Before the install


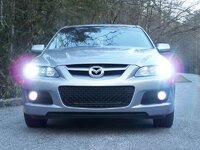
After the install


And that is it for the install. If you have any questions please let me know and I will do my best to answer them.
SIDE NOTE: It is a lot easier if you pull the front Bumper off. If you know how to do that then this whole walkthrough would be easier to complete. I pulled my bumper off to change the factory HID bulbs for headlamps after my fog light install and realized then how easy it would have been if I would have done that.
GOOD LUCK !!
Difficulty = 4
Tools = Phillips Head Screw Driver, Wire Splices, Wire Snips, Tie wraps, Electrical tape, double sided tape, 6 Pack of beer
Cost = Around $150 Total
O Factor = 5 (Completing this Depending on color chosen) will make your fogs match better with HID headlights.
HID 8K KIT
Driver and Passenger side access points.
I started on the driver side. Remove the screws and pull the panel back out of the way.
There you should see that back of the fog light.
There you will see a tab. Push it in and pull, to unplug the factory bulb. Drink some Beer
With the factory Bulb unplugged twist the bulb to the right and you will feel it unlock. Then pull the bulb out.
As you will see it is an H11 Bulb.
Now remove the H11 Bulb from the HID kit and put it in place of the factory bulb and twist to lock in place. Be careful not to touch it against anything.
After it is in place and locked move over to the passenger side Drink More Beer
Passenger side will be done the same However it is tighter space thanks to the horn and the washer fluid reservoir. What I did was bend the bracket for the horn enough to where I could get my hand in there to work. Unplug the wire from the factory bulb the same way and twist and remove the factory bulb.
Then carefully install the HID bulb. It will be tight spaced but it can be done try not to touch anything. Twist to lock on place.
While in the tight space go ahead and plug in the wires to the Ballast and the HID bulb. I let the ballast rest inside of the bumper. You can use double sided tape to hold it in place if you would like
Also plug the wires in to the Ballast on the drivers side HID bulb and let it rest in the bumper.
NOW Not sure about the kit you may have but Mine required me to run a power cable to the battery and ground a cable also. Then I had on cable that was meant to plug into the factory fog light power plug. Now these did not match so I had to cut the factory plug on the car and the kit and splice those together and used some tape to keep any water out.
Also there was a wire from the HID kit that needs to be run to the passenger side HID bulb. I just ran it underneath the front bumper neatly and out of site unless you are under the car of course.
I put Tape over the Passenger side Factory Fog Light bulb plug to keep water out. There was no use for this plug with this kit.
I zip tied all of the cables to make them look neat and put everything back together.
Finish off the Beer and enjoy your hard work.
Before the install
After the install
And that is it for the install. If you have any questions please let me know and I will do my best to answer them.
SIDE NOTE: It is a lot easier if you pull the front Bumper off. If you know how to do that then this whole walkthrough would be easier to complete. I pulled my bumper off to change the factory HID bulbs for headlamps after my fog light install and realized then how easy it would have been if I would have done that.
GOOD LUCK !!
Attachments
Last edited:
")