Rear Brake light Mod

Bigg Tim

Member
:
MazdaSpeed 6
I got this from AzMz6. I saw him do it yesterday on a regular 6 so I did it today and it's cake. It makes it so the 2 red lights on the trunk light up when you hit the brakes, instead of just the 2 on the fenders. It is super easy and takes like 15 minutes.

Remove the liner on the trunk lid.

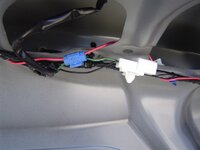
Find the connector for the 3rd barke light connector and tap into the green w/yellow stripped wire. (the 3rd brake light connector is in the middle of the lid just to the right of the latch, it has a black and a green w/yellow wire in it) Run a wire from that wire to each of the lights on the trunk lid.

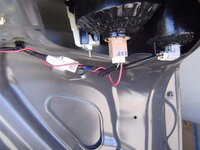
Then strip a small piece of the wire you ran and insert it into the open hole in the connector that plugs into the red light. Add a little glue of some type (I used clear RTV) to hold the wire in and that's it.

Here are pics of the wire to tap into and how it's put into the connector. Once again, this how AzMz6 did it and is much easier then what other people have posted how to do it. Thanks Tony!
 

Attachments

  • DSC02222.jpg
    DSC02222.jpg
    150.1 KB · Views: 2,557
  • DSC02223.jpg
    DSC02223.jpg
    161.9 KB · Views: 2,646
Thanks for the info. I just did this and it took less than an hour. The hardest part is getting all the pressure clips out of the liner on the trunk lid.:)
 
Ok, I'm bringing this back from the dead, but I wanted to add a few things in case someone else decides to do it.

Tools/Materials needed:
-wire strippers
-pliers
-tool for removing trunk liner clips (can be done several ways)
-6' of wire, 12-16 ga. (you will cut this down)
-one quick splice same size as wire you choose
-sealant or glue (RTV, silicone, super glue, etc)
-electrical tape, zip ties, some method of securing the wire

Things I observed:
-Easy mod, just take your time. Make sure your quick splice allows both wires to come out of both ends. If not, take a drill or awl and poke it out so it will.
-Make sure to secure the wire along the main taillight harness. Use tape or zip ties.
-Make sure that you don't push the wires in too far, and test before reassembly.

Enjoy!
 
If anyone performs this mod again, I would appreciate something a bit more in-depth and a few more pictures (noob)
 
If anyone performs this mod again, I would appreciate something a bit more in-depth and a few more pictures (noob)

You should be able to use the pics in the first post and my list of materials and put it together. The wires are hard to miss. Just take your time and post if you have any questions, I'm sure someone will be here to walk you through it.
 
Preeeetty sure reading this post at 3 in the morning MAY have had a hand in me not understanding this post.
I got it now lol, thanks
 
can someone who has this maybe post pics of the lights while theyre on? just interested in seeing how it looks..thanks in advance..
 
I'll snag a pic tonight, I need to take some for some other things so I will grab one for ya.
 
OK, going to do this today. I already removed the trunk liner because I am painting my emblems and thought you had to remove the plastic retainer on the pins on the rear flying M from the inside. After some serious frustration I decided to attack the sticky side first with fishing line and it quickly became obvious that the plastic on the pins pass through the holes in the trunk and just sort of tension the emblem in place.

As far as removing the trunk liner retainers, I was able to remove them very easily by just using a dull knife to pry and get a little seperation between the pin itself and the surround then pulling gently to remove the pin.
 
Last edited:
question. so, on the plug where you insert the red wire is just an empty "wire hole" (for lack of a better term)?

or is there already a wire in there your tapping into?

its kinda hard to tell in pic.
 
ill definitly be doing this this weekend.
not to discount the OP... just cause i luv writing up super easy step by step how-to's with lotsa pics... ill see if n have enough time to do so as i go...

FYI, those plastic liner clips are easy to take out with just a simply credit card.
slip the card under the inner portion of the clip head, cup the credit card and pull up.
works like a charm, fast easy, no tool required. :)
 
You put the wire into the open hole on the connector and secure it.

cool, noted! and thank you very much.

ill definitly be doing this this weekend.
not to discount the OP... just cause i luv writing up super easy step by step how-to's with lotsa pics... ill see if n have enough time to do so as i go...

FYI, those plastic liner clips are easy to take out with just a simply credit card.
slip the card under the inner portion of the clip head, cup the credit card and pull up.
works like a charm, fast easy, no tool required. :)

hmm, yeah i could see how that would work. good idea. i'll give it a try.
 
ended up using the flathead/can opener on my swiss army knife. worked like a charm.

question, before this mod, when did the spoiler light come on? i could'nt make it light up. what gives?
 
Back