2013 Mazda5 Serpentine belt replacement questions

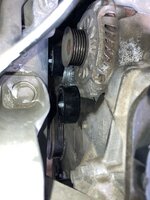
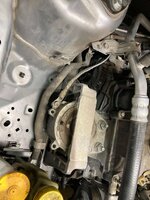
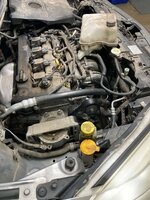
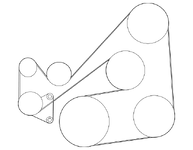
I plan to replace the serpentine belt on my 2013 Mazda5 (2.5l engine) 144k Miles. I'm curious what people believe should be included in the replacement. It looks like there are two idler pulleys (one grooved, one smooth) and a tensioner pulley.
-Is it recommended to replace all three pulleys at the same time as the belt?
-Is there a preferred brand for the belt, idlers, and Tensioner?
-Is mixing and matching brands discouraged? I like the Gates belt, and the price is reasonable, but they are proud of their tensioner.
-Anything else I should replace while I'm at it?

I found a link in the resources with a good tip for installing the new belt from above. Post here. Video here.
Also, found a link for bearing replacement in the grooved Idler here. This saves you from needing to buy the whole idler assembly $$$$.

If you are replacing the Tensioner Assembly, it appears to be easier from below. You can find a good video for the 2.5L engine here.

Another thorough video is here.

Edit: Added links to help future searches
 
Last edited:
I just did my 2012 (virtually identical) a few months ago.
I replaced the belt, both idler pullies, and tensioner

New bottom idler pulley ATPPCCE PN 36263
New top idler pulley Duralast PN 231564
New tensioner Continental PN 49407
New Gates serpentine belt PN K060900

Hope this helps.
 
Let us know what the condition of your belt was like once you get it out.

there was a belt making a sound on cold starts in my 2015 Mazda 6. It was nearly shredded in half upon taking it out. I believe the mileage wasn't much more than yours at the time.

If your belts visually look good and aren't making any sounds upon cold start, you should be good. Otherwise, replacing just the belt should be fine.
 
The Belt definitely has some cracking that can be seen. I'm the second owner of this car, so I don't know if the pulleys have ever been changed. I went ahead and ordered "everything":
Belt - Gates K060900
Tensioner - Gates 39074
Smooth Idler - Gates 36263
Bearings for the Grooved Idler - Timken 6303-ZZ (17X47X14mm)

Prices were best on Amazon and Ebay. It's the first time I've seen RockAuto get beat!
 
Parts finally showed up, so I did the serpentine work last night. Here are my notes:
  • I jacked the passenger side of the car so I could remove the passenger wheel and then the splash guard behind it. Looking back, there would be more room under the car if I had put it up on ramps, and I think the splash guard could still be removed with the wheel on.
  • I also pulled the full undercover/Air Dam, however I'm not sure how necessary that was, I suspect one could leave it hanging and still have enough room.
  • The tensioner bolts do not stand proud of other parts in the area (Crankshaft position sensor!) so a standard depth socket doesn't get your handle out far enough to turn. A deep socket is too much. A Swivel Head Ratchet would go a long way here. I made do by disconnecting the nearby hose mount and wrestling around/through the hoses with an additional 3/8" extension.
  • There is not enough room between the engine and wheel well to fit a 1/4" drive ratchet and 10mm socket to get the Smooth Idler off. It has to be done with a box wrench or I suspect those sockets that drop into a ratcheting box wrench would work, but I don't have any of those.
  • Getting enough torque to break the smooth idelr bolt with the little 10mm box wrench required a cheater bar. I used a large box wrench as a cheater.
  • I pulled the old tensioner first, then put the new one in. Pretty straight forward. If I was doing this again, I would pull the tensioner, then use the extra space to pull the Smooth idler.
  • I recommend pulling the Coolant overflow tank right out of the gate. It really opens up the access from the top. It snaps into place over some sheetmetal tabs, I used a flathead screwdriver to open the plastic slots to get it back off the tabs.
  • I highly recommend the tip mentioned in an earlier post for popping the belt back on using the grooved pulley rather than trying to use the tensioner from underneath. There is much more space to work up top. This! Just use a pry bar against the frame to push/pivot the pulley into place.
Tensioner pulley bearing was smooth, but bone dry. My smooth idler bearing was pretty rough, not wobbling yet, but it certainly wasn't smooth. Belt had some cracking, so I'm happy knowing I've got new parts in there.

All in all it was about a 5 torn glove job and maybe 2.5 hours total. Not too bad :)

Edit: Added last note.
 

Attachments

  • New_parts_in.jpg
    New_parts_in.jpg
    96 KB · Views: 72
  • no_coolant_tank.jpg
    no_coolant_tank.jpg
    122.1 KB · Views: 63
  • overall.jpg
    overall.jpg
    150.1 KB · Views: 69
  • routing.png
    routing.png
    10.5 KB · Views: 67
Last edited:
Back