How To: Swap Tachometer with Aftermarket Gauge

TurfBurn

Member
:
'01 Yellow MP3 #1026
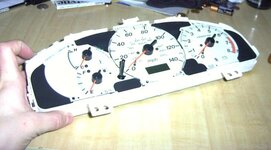
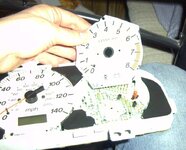
First of all, you'll need to know how to do a little bit of soldering, handle some cutting, and realize that if you mess up you'll destroy a 500 dollar car part. With that being said. See the how to on removing your gauge cluster to get up to the point where this takes off.

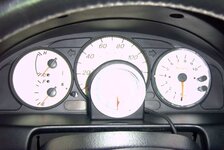
You also need to purchase an aftermarket tach. I picked up a SunPro Powerline 3.5" gauge for doing this. I reocmmend this gauge because it's cheap, it fits perfectly, and both GotZoom and I have gotten this to work nicely.

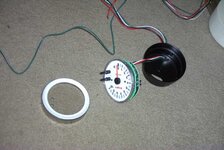
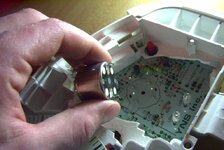
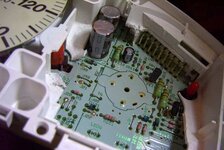
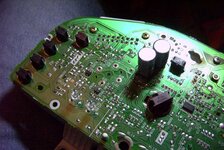
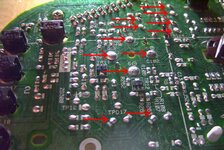
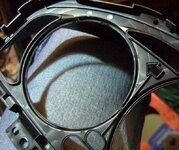
To get the sunpro apart you just need to pry off the front ring with a butter knife. Then seperate the electronics out by removing the little access panel on the back and then using a butter knife to pry on the air core to push the electronics out. Then you are all set:
 

Attachments

  • disassemble sunpro.jpg
    disassemble sunpro.jpg
    44.8 KB · Views: 1,583
Once you have the gauge cluster out completely you should more or less see this on the front and back:
 

Attachments

  • full cluster.jpg
    full cluster.jpg
    24.2 KB · Views: 1,130
  • rear of circuits.jpg
    rear of circuits.jpg
    64.9 KB · Views: 822
Next you need to go in and take off the needle of the stock tach. Just put a butter knife on either side, twist, and it'll pop off nicely. Once that is done, remove the two little black screw, and then remove the plastic facing. Save that as you'll need it for some things later. Then once that is off you can grab the air core and pull it off as well:
 

Attachments

  • before_cutting.jpg
    before_cutting.jpg
    42.5 KB · Views: 874
  • motor pulls off.jpg
    motor pulls off.jpg
    37.9 KB · Views: 862
Once you get the motor out you need to go through and make room for where the aftermarket tach is going to sit. So take a utility knife or a dremel tool and start cutting away the plastic. Get it so that it looks pretty much like this:
 

Attachments

  • cutting_away_inside.jpg
    cutting_away_inside.jpg
    46 KB · Views: 863
the next critical step is to make more room yet for the aftermarket tach electronics. You need to relocate the capacitors to the rear of the circuit board, and you also need to remove the pins from where the motor was, and I also moved the LED's to the back as well so that they wouldn't light up the gauge funny because of a battery indicator or an open door indicator.

I did this instead of removing these components completely because the traces led to so many places and so many chips that appeared to be shared that I didn't want to risk causing the rest of the cluster to stop functioning or worse yet damage it. There is plenty of space behind the cluster when installed in the vehicle, so this was a quick and easy fix.

You'll see pics of the two big caps moved to the back with the LED's and a pic of the points that I believe are what you must desolder. But please verify those points, as I can't guarantee I identified them right in the picture:
 

Attachments

  • electronics relocation.jpg
    electronics relocation.jpg
    62.1 KB · Views: 689
  • desolder points.jpg
    desolder points.jpg
    65.9 KB · Views: 700
Now with the electronics all relocated you should have enough space for the aftermarket tach. Now you need to put the "light screens" back on so that the turn signal, brake light, etc all look properly. Just simply cut them off from the old tachometer face and super glue them on to the plastic of the gauge cluster. Also use the black trim face to make sure that you locate them properly and don't have any gaps that will leak light and so forth:
 

Attachments

  • cutting_light_screen.jpg
    cutting_light_screen.jpg
    47 KB · Views: 1,019
You're nearly there at this point!

Next you have to modify the black gauge trim to accept the new tach. The new tach actually fits in from the front, and if you trim well will snap in place and not move at all. You can not install it flush underneath the black trim as there simply is not enough space no matter what. Thus it will stick out slightly further, but it is not obtrusive at all as you'll see in some later pictures here.

So here is my trimming job done with a utility knife on the black trim piece:
 

Attachments

  • cutting_rings.jpg
    cutting_rings.jpg
    67.5 KB · Views: 744
At this point simply snap the sunpro gauge into the trimmed piece, and feed the wires through betwen the white plastic and the circuit board (I made a little "doggy door" for the wires to make it easier).

Then you'll need to trim out sections of the clear plastic from the rear of the circuit board to allow for the LED's and capacitors to stick through.

Also you can drill out the clear plastic to allow for the buttons on the sunpro. Unfortunately for me despite taping the plastic, and trying to drill carefully, the plastic shattered and I'll have to try and get a new one yet at some point here.

BTW, the "night" picture of the gauge is without the gauge using it's own internal illumination. That is backlighting picked up from the stock cluster lights.

Here are some pics of the finished product:
 

Attachments

  • daytime final.jpg
    daytime final.jpg
    36.7 KB · Views: 1,864
  • night look.jpg
    night look.jpg
    18.3 KB · Views: 1,530
Last edited:
dude...fucken awesome how to! couple more quetions that i have are...

where and how much did you get the sunpro tach from? exact part number?

exactly what do you move from the front to the rear of the gauge cluster? from what it seems like its only the two big capacitors and the two led lights..but there are a lot more soldering points highlighted...

what color is the face of the sunpro gauge? do you have a direct link to it so we can see the features?

this is exactly what i want to do to my car...this is fucken pimp man! i wanna get rid of my big 5" tach and make the car more stealth with something like this...thanks for the how to!
 
found the website...did you get it directly from there? and also, where did you hook up the rest of the wires for the tach? did you run a separate swich for the backlighting? any how-to on that? thanks man
 
duMb KeoLa said:
dude...fucken awesome how to! couple more quetions that i have are...

where and how much did you get the sunpro tach from? exact part number?

exactly what do you move from the front to the rear of the gauge cluster? from what it seems like its only the two big capacitors and the two led lights..but there are a lot more soldering points highlighted...

what color is the face of the sunpro gauge? do you have a direct link to it so we can see the features?

this is exactly what i want to do to my car...this is fucken pimp man! i wanna get rid of my big 5" tach and make the car more stealth with something like this...thanks for the how to!
I go tthe sunpro tach from Ebay.. but they sell them at autozone and a few other places to. It is the Sun-Pro 3-1/2" "performance white face tachometer" CP2012. I bought it for like 50 bucks from Ebay... so just a matter of searching around for it I guess.

You listed exactly what gets moved to the back... the other soldering points indicated are for removing the air motor assembly. So 3 capacitors (2 big, one small) and the 2 LED's.. the back picture with moved parts is not the "final" condition of hte back..

The gauge face is a bit whiter than the other gauges. Look at GoZoom's "1st Phase of my tach project" thread and you'll see a little better the difference.
 
Last edited:
okay..another question that i have is i noticed that you can set a rpm/switch point on the tach....how does it let you know when to do that? i didnt see any type of light that it has extra...so does the lights in the back flash or something?

thanks man
 
actually there is an LED that is at the 0 marker... bright as hell when that thing lights up. But that's where the shift light is. Cleverly hidden as a clear "stop" for the needle down at 0 rpm's.
 
Back