How To : Change Your Horn

Action Jackson

Member
Contributor
Everyone knows the stock horn sucks. I decided to do something about it and bought a replacement one.

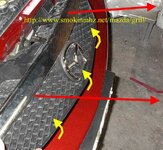
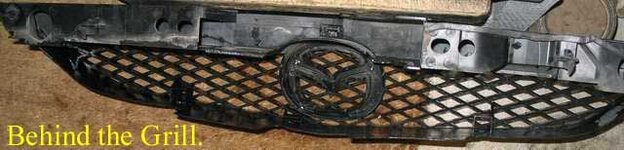
The first thing to do is to remove the grill and a good place to check out is:

http://www.smokinmhz.net/mazda/grill

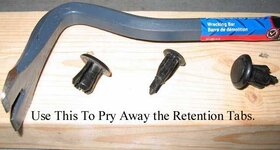
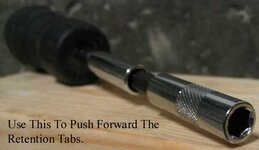
I'll just give some modified tips to speed up the removal.

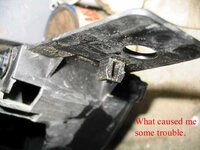
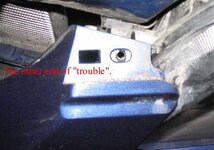
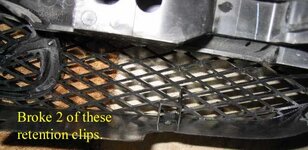
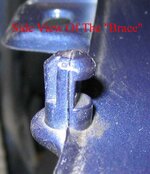
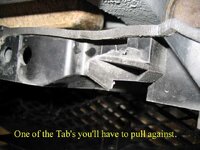
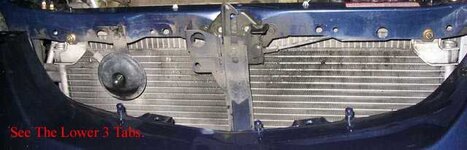
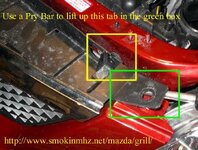
The biggest stumbling block was the vertical tabs that are beside the two screws on the widest part under the green box here:
 

Attachments

  • 1.jpg
    1.jpg
    59.9 KB · Views: 3,256
Last edited:
Under the yellow box above you can use a pry bar to pull out the tabs horizontally out.

Here's a pic of what those tabs look like and the pry bar. I also used the pry bar to carefully vertically lift the side's up in the green box above.
 

Attachments

  • 2.jpg
    2.jpg
    30.5 KB · Views: 1,935
From the website http://www.smokinmhz.net/mazda/grill , the author uses some long needlenosed pliers to squeeze and loosen some clips that are behind the grill.

Instead you can use a screwdriver with an extension, then cup the end of it onto those tabs and just push horizontally out towards the front of the car to pop off those tabs.
 

Attachments

  • 5.jpg
    5.jpg
    20 KB · Views: 1,380
There are 3 lower retention tabs along the bottom of the front grill.

I would suggest that you probably don't want to access them from the front [through the grill] as I broke 2 of the 3 tabs!

Here's what they look like on the grill from behind:
 

Attachments

  • 6.jpg
    6.jpg
    26.9 KB · Views: 1,486
and here's what they look like if they're busted.

Take a note on the words "retention clips" and how the lower part of the rear grill is extended rearwards.
 

Attachments

  • 7.jpg
    7.jpg
    38 KB · Views: 1,257
Here's a pic of the receiving tabs on the lower part of the car that take the 3 lower grill clips:
 

Attachments

  • 8.jpg
    8.jpg
    51.5 KB · Views: 985
There are 2 long tabs that you'll be pulling against to remove the grill but it takes a little muscle.

They are located closer to the rear sides of the grill.

Here's what they look like:
 

Attachments

  • 11.jpg
    11.jpg
    41.8 KB · Views: 1,141
My replacement horn came with nice instructions on how to hookup. I disconnected the NEG- terminal on my battery.

At this point one of my wires from my ground wire kit came loose from the end terminal. Suffice to say that it took about an hour for me to try to reattach it.

Pull out the power connector off the stock horn and here's what you got:
 

Attachments

  • 14.jpg
    14.jpg
    16.4 KB · Views: 1,595
Since the OEM horn hookup didn't fit my new horn, I removed the adapter using a small slotted screwdriver.

I inserted it on the end with the wire and pushed in a bit, then pulled out the adapter to get this:
 

Attachments

  • 15.jpg
    15.jpg
    13.5 KB · Views: 1,759
Remember those "lower grill extensions" I mentioned?

Here's my new horn with it's supplied bracket that I bent to try to install it in the original OEM horn location. As you can see there's no way I can reattach the grill here.

I wanted the opening of the horn to face downwards at first but the tightness of the power wire prevented me from doing so.

The power wire originated from behind the top of the chassis in a loom bundle. A very tight bundle.
 

Attachments

  • 16.jpg
    16.jpg
    69.8 KB · Views: 1,612
Now what. Where do I install that huge horn?

I decided to use one of the bracket screws holding the radiator.

I had to rebend the supplied horn bracket to fit this in.
 

Attachments

  • 17.jpg
    17.jpg
    70.9 KB · Views: 1,255
And a side view of the finished assembly.

Notice how tight the power wire is pulled.

You can see that there's plenty of clearance from the radiator.
 

Attachments

  • 18.jpg
    18.jpg
    62.3 KB · Views: 1,387
There you have it. Hopefully this will help someone with a grill removal and/or a horn replacement.

It should take less than 30 minutes to do the total job IF there are no complicatons.

The horn isn't quite the "Big Rig" sound as advertised on the packaging but IMHO it's better than OEM.

If anyone asks, the pictures are taken with a Canon A70 on highest res. on automatic mode. Cropped and resized with ACDSee, then captions added with Photoshop.

"Honk Honk"
 
pretty good writeup. I even have a similar looking/shaped horn. Though a couple variations I did.

1. I left the stock horn in place and fashioned a new plug so if I ever needed to, I can just plug the stock horn back in. This also saved me the trouble of getting off the grill and possibly breaking a tab or twenty.

2. I mounted the horns (I have dualtones) behind the lower air dam on the bolts holding in the plastic cover. I can try to get a pic or two for ya if you like.
 
Last edited:
Back