- :
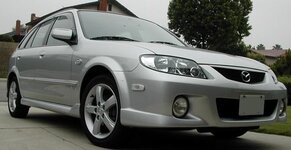
- '07 Mazda3, True red
How To: install Celica style clear bumper lenses on your P5
This is where I bought mine, <a href="http://www.streetbeatcustoms.com/20celclearbu.html" target="_New">StreetBeatCustoms.com</a>.
You may be able to find cheaper. I got them there cause they're local.
Next you'll need two pairs of washers, matching rubber washers and wing nuts. Go to your local Home Depot or Ace Hardware for these.
<img src="http://www.mazdamp3.com/members/azeli73/how%20to/washers_wing_nut.jpg" border=1>
Then go down to Wal-Mart or an Auto parts store and get Door Protection trim to make a grommet. Some automotive superglue
and orange bulbs so you're legal. = )
<img src="http://www.mazdamp3.com/members/azeli73/how%20to/fender_trim.jpg" border=1>
Now you're ready to start making your rubber grommet with the door trim. You'll need to make little pie shape cuts with a razor blade to get
good clean curve around the lens.
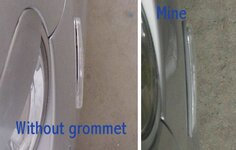
Once this is complete you're ready to glue the grommet on. Start at the bottom and work around it in small sections with the superglue.
Allow it to dry a bit as you go. And don't get it all over your finger. Once you're done it should look like this:
<img src="http://www.mazdamp3.com/members/azeli73/how%20to/grommet_complete.jpg" border=1>
Next get in your car and cut the wheel in so you can get under the fender to remove these plastic screws:
<img src="http://www.mazdamp3.com/members/azeli73/how%20to/under_fender.jpg" border=1>
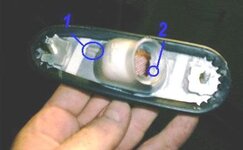
Gently pull back the plastic and reach in and find this part of the back of the lens:
<img src="http://www.mazdamp3.com/members/azeli73/how%20to/pushhere.jpg" border=1>
Push that in while prying the lens out with your other hand. Now you can remove the bulb from the lens and put in your new orange one.
Use a little bulb grease to help prevent moisture.
Twist the new bulb into the clear lens and now you're ready to put it on. Use the rubber washer first and then the regular one to help
protect the bumper. Follow that with the wing nut and tighten them down well so they don't come loose. Screw the plastic screws back on
and repeat the other side. Now you've gotten rid of those ugly yellow lenses and have a nice matching design that looks like it came from
the factory.
<img src="http://www.mazdamp3.com/members/azeli73/how%20to/final_lights_on.jpg" border=1>
Special thanks to KYREDP5 for help with the grommet ideas and part locations! (thumb)
how to by:azeli73
This is where I bought mine, <a href="http://www.streetbeatcustoms.com/20celclearbu.html" target="_New">StreetBeatCustoms.com</a>.
You may be able to find cheaper. I got them there cause they're local.
Next you'll need two pairs of washers, matching rubber washers and wing nuts. Go to your local Home Depot or Ace Hardware for these.
<img src="http://www.mazdamp3.com/members/azeli73/how%20to/washers_wing_nut.jpg" border=1>
Then go down to Wal-Mart or an Auto parts store and get Door Protection trim to make a grommet. Some automotive superglue
and orange bulbs so you're legal. = )
<img src="http://www.mazdamp3.com/members/azeli73/how%20to/fender_trim.jpg" border=1>
Now you're ready to start making your rubber grommet with the door trim. You'll need to make little pie shape cuts with a razor blade to get
good clean curve around the lens.
Once this is complete you're ready to glue the grommet on. Start at the bottom and work around it in small sections with the superglue.
Allow it to dry a bit as you go. And don't get it all over your finger.
Once you're done it should look like this:<img src="http://www.mazdamp3.com/members/azeli73/how%20to/grommet_complete.jpg" border=1>
Next get in your car and cut the wheel in so you can get under the fender to remove these plastic screws:
<img src="http://www.mazdamp3.com/members/azeli73/how%20to/under_fender.jpg" border=1>
Gently pull back the plastic and reach in and find this part of the back of the lens:
<img src="http://www.mazdamp3.com/members/azeli73/how%20to/pushhere.jpg" border=1>
Push that in while prying the lens out with your other hand. Now you can remove the bulb from the lens and put in your new orange one.
Use a little bulb grease to help prevent moisture.
Twist the new bulb into the clear lens and now you're ready to put it on. Use the rubber washer first and then the regular one to help
protect the bumper. Follow that with the wing nut and tighten them down well so they don't come loose. Screw the plastic screws back on
and repeat the other side. Now you've gotten rid of those ugly yellow lenses and have a nice matching design that looks like it came from
the factory.
<img src="http://www.mazdamp3.com/members/azeli73/how%20to/final_lights_on.jpg" border=1>
Special thanks to KYREDP5 for help with the grommet ideas and part locations! (thumb)
how to by:azeli73