My footwell lighting and power accessories project

holyninja3

Member
Contributor
:
2016 Mazda CX-5 Touring AWD, Moonroof/ Bose and Tech package
This thread is going to serve as my project thread for adding footwell and other led accent lighting, as well as (hopefully) adding a 12v accessory power in the dash and 2 110v outlets to my 2016 Mazda CX-5 Touring. This is not a how to, but me asking for help and tracking progress. It may go slow sometimes depending on how much time I have and how long it takes me to figure stuff out.

Please offer suggestions, I am a bit of a car mod and electrical noob, and have found virtually no resources on this project :)
 
Got a box in today!

<a href="http://imgur.com/KsauFon"><img src="http://i.imgur.com/KsauFon.jpg" title="source: imgur.com" /></a>

EDIT:
Here is what I bought: (Some items I did not use!)
1x Multicolor LED Footwell kit with Rear footwell addon and extra Bluetooth RGB Controller: $125
2x 5cm 550 SMD LED Strip - RGB, 3 LED, No controller: $3 Each
2x Universal LED Acrylic Circles - RGB, 72mm: $25 Each
1x LED Toggle Switch - Blue (Kit includes a red one, I wanted blue): $4
A Few Connectors (Male and Female) and Quick Splices: $0.40 Each
3x 2-way RGB Splitter: $3
a couple feet of 18 AWG wire: $0.50 a foot
2x 1 meter and 3 meter RGB Extension Wire: $3 and $5
2x Automotive Relay: $3

Seems I also got extra controllers and 4 way splitters (to go with acrylic?) that I probably will not use too

I also bought a fuse tap and plan on purchasing a trim removal kit.
 
Last edited:
Looking forward to seeing how you make this happen being a n00b as well and interested in doing the same :)

Would you mind starting off by listing your purchased items and cost ?
 
Looking forward to seeing how you make this happen being a n00b as well and interested in doing the same :)

Would you mind starting off by listing your purchased items and cost ?

I would be happy to, but I also want to get started so I know if I need to add anything or if I didn't need something. Most definitely will do this when I make the how to.
I Edited the post to include it, just know that I am not done with the project so I have not used all of it, and a few things I probably will not use anyway
 
Last edited:
Did some work today, but nothing is operational quite yet. Biggest two problems I have right now are where can I tap into power that comes on with the accessories, and where can I find power that turns on with the doors opening? How do I remove the paneling for the front of the center console? Any ideas? 2016 cx5
 
Looking forward to seeing how you make this happen being a n00b as well and interested in doing the same :)

Would you mind starting off by listing your purchased items and cost ?
I would be happy to, but I also want to get started so I know if I need to add anything or if I didn't need something. Most definitely will do this when I make the how to.

Updated posting to include whats in the boxes.

Still looking for help finding power sources and getting that center console trim off!
 
Tap into the dome light through the driver side pillar use a multitap fuse in the inside fuse box (accessories power)
 
This thread is going to serve as my project thread for adding footwell and other led accent lighting, as well as (hopefully) adding a 12v accessory power in the dash and 2 110v outlets to my 2016 Mazda CX-5 Touring. This is not a how to, but me asking for help and tracking progress. It may go slow sometimes depending on how much time I have and how long it takes me to figure stuff out.

Please offer suggestions, I am a bit of a car mod and electrical noob, and have found virtually no resources on this project :)
I would like to add something like this to my CX-5. I'm looking forward to your posts.
 
Tap into the dome light through the driver side pillar use a multitap fuse in the inside fuse box (accessories power)
The pillar along the windshield/ driver side door? Do you know which color wire? I can't find a diagram...

I tried the fuse box inside the cabin, was thinking of using the sunroof. It gets power all the time. Think I found one under the hood though. I am going to check again to see if there is anything in the cabin first.
 
Got another package in last week...

eX6l504h.jpg


All from VLEDS.
2x Vanity lights
4x 3175 lights for dome/ map
1x 3022 light for Cargo area
 
Installed only the footwell lighting, still have not been able to have the time to figure out how to take apart the center console to get to the cup holders and cubby area.

Brief description on what I did:

1) Make sure before doing any wiring to disconnect the negative on the battery.

2) Started with the wiring in the driver side footwell. Each of the LED strips I bought come with a generous amount of wire to connect them, and each also has female receiver pins on the other end so you can string them end to end. +1 for this!
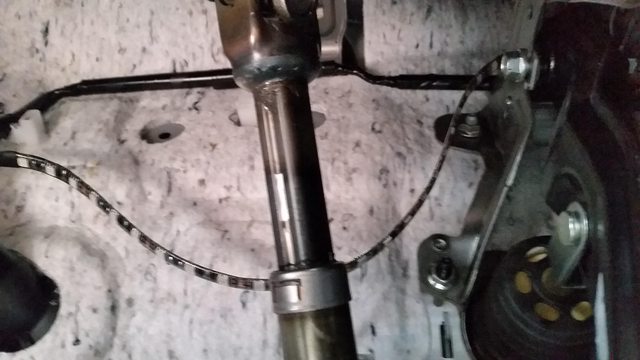
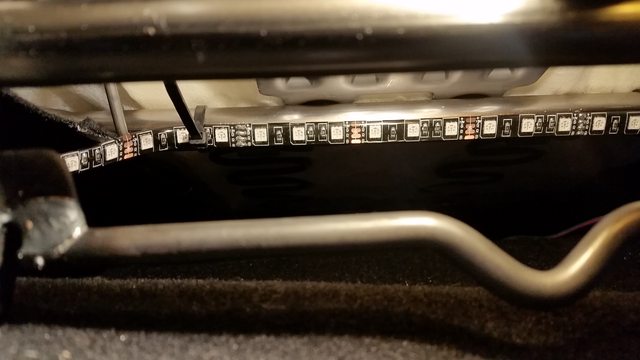
The easiest place to put the driver side one was to zip tie it to a wiring harness against the fire wall. Here is a picture of where I put it. The pole in the middle is the steering wheel shaft.
ET7MjWZl.jpg

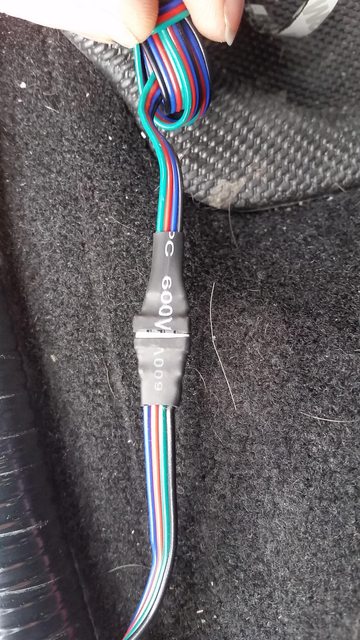
The lights were longer than what I needed, but I did not cut them so I could daisy chain the passenger side to them. Make sure to connect this first before tightening everything up, and either electrical tape or shrink tube the connections to ensure they stay together.

3) Next one to do is the passenger side. You will want to remove the kick panels on the center console to help with easy access. They pop out pretty easily. Feed the wire from the passenger side to the driver side and then plug it in to the female end.
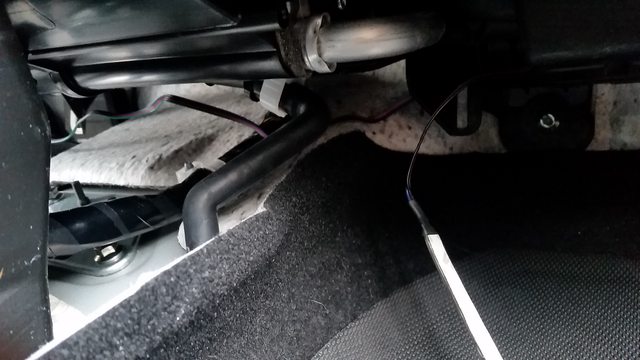
Here is a picture from the passenger side. I routed the cable around a bracket so it would remain out of the way.
CzTP1LEl.jpg

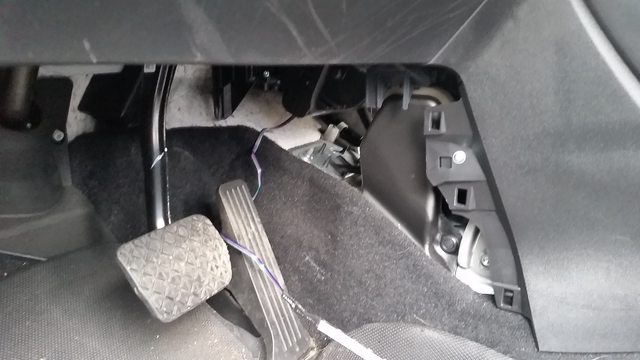
Here it is on the driver side, plugged into the driver side strip
ZrnwB4al.jpg

For the pasenger side, I decided to attatch it to the bottom of the plastic trim at the top of the footwell. (I removed it before the first picture I think) I removed the adhesive protective strip, and then also added some double sided carpet tape as the adhesive is not that great really. The lights were too long so I cut them down at one of the cut marks.

Once this is done, work your way back, managing your cable until you reach the inside fuse box.

4) For the rear seats, I looked first at putting them along the center console or attaching them under the front seats. I couldn't find a nice attachment point, so I decided I would try and put them under the rear seats instead.
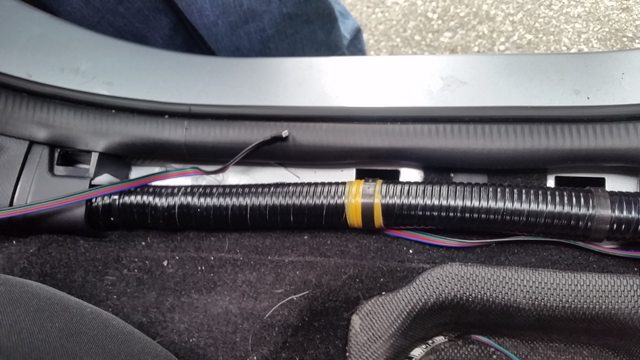
First, I had to route the wiring to the back. I used one of the extension wiries to get to the rear seat. Just remove the plastic door sill trim to expose the wiring harness as shown.
HU1eIWgl.jpg

Make sure you put the male end to the fuse box and the female to rear seats! It was fairly easy to fish it up out of the carpet by folding back some of the rear seat carpeting.

5) I didn't want to cut either of these strips so that the light would remain even, so I started on both sides from the outsides and worked my way in. There is a nice bar under the seats I attatched the light strips to and made sure the lights were angled to the opening.
9o1hAtLl.jpg


Once I got to the middle, I couldn't reach in anymore, so I ended up having to fold up the middle "20" of the 40/20/40 seats. The plastic trim gets removed and with the two bolts taken out, it lifts up very easily. When wiring the middle, make sure to leave ample amounts of slack in the line so the seats can fold down. You only need to mess with the middle seat to test this. After that, getting the slack managed is a bit tricky, but doable.

EDIT: After some time one of the strips broke from the repeated seats going down. I think there was enough space, it was just getting pinched. I re-ran it with a new strip and this time undid the bolts for all 3 seat sections, and then ran the wires from the middle out by starting at the back, zip-tieing to that bar again, and going back again. It is working much better, has no chance of being pinched anymore, and the connections are servicable by undoing the cover between the cargo area and back of the seat. Win Win! END EDIT

After this, I connected them to the wire pulled in step 4 Make sure to keep black with black for all connections! as I found out, the extension wires and the strips do not have the same wire color schemes...
43I219sl.jpg


6) Now that everything is wired back to the fuse box, it is time to connect it up! I left the trim off until after it was tested just incase something didn't work right.
I purchased a fuse expander from the local autoparts store and used the fuse spot listed in my previous post, #12 of this thread. I think it is labeled rear outlet iirc? Power with Acc. (I plan on using this slot later as well for a future center cubby 12v socket) Positive to the expansion fuse, negative to the bolt holding the fuse box to the chassis.
After making sure everything was connected securely, I re-connected the negative on the battery and turned on the ignition. Success! Put all trim and upholstery back, double checking that the back seats can fold and do not put strain on the led strips.

I will have to take some before and after photos and post them :)

I also replaced all of the interior lights with the VLED 5k lights, and they make a huge difference!

FYI, this project is still in progress. I still want to add a toggle switch to turn the lights off if desired, add them to a circuit that will power them with the dome lights are on/ doors open as well, and add cup holder and center console cubby lights, and maybe even a center console or glove compartment light as well. My wiring is a mess, all shoved behind the fuse box cover for now haha
 
Last edited:
First I would suggest you actually add in what fuse you tapped to get the power rather then just a link. Just makes it easier to read and your not going back and forth between threads and what not.

Second, the fuse you tapped gets power all the time? Or do they go on and off with the doors opening? I would like to add entry illumination that lights up when the doors are open and then dims to off when doors are shut.

I plan on making a how-to once I am done and I will reference it directly in that thread. The fuse is labeled rear outlet, and is powered with the accessories. I have yet to find power for the entry illumination but I would like to do this as well
 
The rgb kit seems very pricey i did my mazda5 for about $40 for everything

It is a little pricy, but LOVE the Bluetooth compatibility. Most cheap ones you can't dim either which was a requirement for me.
 
I've done this in every car I've owned. Thank you for your write up, as it may just push to do it again in my CX5. I'm waiting to see some finished photos from you. What color you looking to stick with? I used blue in my 13 elantra as it matched the interior lighting scheme perfectly. Not sure what would go with the CX5. Perhaps red?
 

Latest posts

Back