I'm posting this installation as part of an ongoing project. The project also includes installation of a Class 1 hitch, wiring package for towing, and construction of a mini storage trailer with roof rack for camping and general utility.
I installed this transmission cooler back in September 2014 and have had nothing but smooth sailing since then but, of course, I have not yet done any towing.
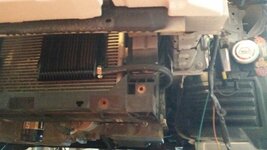
I purchased a Hayden #677 plate and fin style cooler from Rockauto for $37.99. Dimensions for this cooler are 11 x 7.5 x 0.75 inches. It's basically the largest cooler that can reasonably fit in the available space in front of the radiator. In conjunction with this cooler install I performed a complete 10qt. transmission fluid flush using Valvoline Import MV full synthetic fluid.
Step 1.
For access to the radiator/condenser at the front of the vehicle, you must remove the front fascia.

Step 2.
I attached the cooler to the driver's side of the radiator/condenser using the included mounting hardware since that's where the small, OEM transmission cooler is.

Step 3.
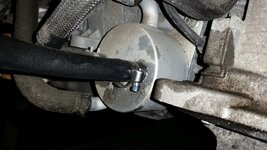
I installed the Hayden cooler in-series with the OEM cooler so that the outflow from the OEM cooler flows into the bottom of the Hayden cooler. The cooled transmission fluid flows out the top of the Hayden cooler, back to the inlet of the transmission housing. Please note, the outflow of the OEM cooler is the attachment closest to the driver's side of the vehicle. This connects to the bottom inlet of the Hayden cooler.

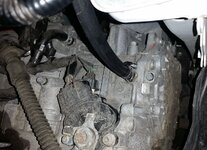
Trace the existing hose from the OEM cooler outflow to the transmission inlet. This inlet is located above and slightly closer to the driver's side of the vehicle. The top outlet of the Hayden cooler connects to this transmission inlet.

Step 4.
Complete transmission fluid flush.
Drain 3 qt. from transmission pan. Put in 3qt. of new synthetic fluid via the transmission dipstick with funnel. Connect a 6-foot length of 3/8 inch vinyl tubing to the outflow of the OEM transmission cooler and put the end of the tube into an empty gallon jug. Start the car, place foot on brake, put into drive and watch the gallon jug fill with old transmission fluid, up to 3/4 full (3 qt.). Add another 3 quarts of new transmission fluid via transmission dipstick with funnel. Turn the car on again and repeat these steps until the transmission fluid running out of the tube is fresh red fluid.
Step 5.
Final connection of the Hayden Cooler.
After the transmission fluid flush, connect the Hayden cooler to the outflow of the OEM cooler and push new fluid through the Hayden cooler to remove any air in the system. Make final connection between Hayden cooler and inlet to the transmission. After this, re-attach front fascia, take the car out for a short ride to bring transmission fluid temperature up to operating levels, and then check the level of fluid in the transmission while the vehicle is running. Top off until the fluid level reads full.
I did not have any capability at the time to measure the difference in transmission fluid temperature pre- and post-Hayden cooler installation. From reading about other similar projects I would not be surprised with a drop in temperature of 30-40 degrees.
I installed this transmission cooler back in September 2014 and have had nothing but smooth sailing since then but, of course, I have not yet done any towing.
I purchased a Hayden #677 plate and fin style cooler from Rockauto for $37.99. Dimensions for this cooler are 11 x 7.5 x 0.75 inches. It's basically the largest cooler that can reasonably fit in the available space in front of the radiator. In conjunction with this cooler install I performed a complete 10qt. transmission fluid flush using Valvoline Import MV full synthetic fluid.
Step 1.
For access to the radiator/condenser at the front of the vehicle, you must remove the front fascia.

Step 2.
I attached the cooler to the driver's side of the radiator/condenser using the included mounting hardware since that's where the small, OEM transmission cooler is.

Step 3.
I installed the Hayden cooler in-series with the OEM cooler so that the outflow from the OEM cooler flows into the bottom of the Hayden cooler. The cooled transmission fluid flows out the top of the Hayden cooler, back to the inlet of the transmission housing. Please note, the outflow of the OEM cooler is the attachment closest to the driver's side of the vehicle. This connects to the bottom inlet of the Hayden cooler.

Trace the existing hose from the OEM cooler outflow to the transmission inlet. This inlet is located above and slightly closer to the driver's side of the vehicle. The top outlet of the Hayden cooler connects to this transmission inlet.

Step 4.
Complete transmission fluid flush.
Drain 3 qt. from transmission pan. Put in 3qt. of new synthetic fluid via the transmission dipstick with funnel. Connect a 6-foot length of 3/8 inch vinyl tubing to the outflow of the OEM transmission cooler and put the end of the tube into an empty gallon jug. Start the car, place foot on brake, put into drive and watch the gallon jug fill with old transmission fluid, up to 3/4 full (3 qt.). Add another 3 quarts of new transmission fluid via transmission dipstick with funnel. Turn the car on again and repeat these steps until the transmission fluid running out of the tube is fresh red fluid.
Step 5.
Final connection of the Hayden Cooler.
After the transmission fluid flush, connect the Hayden cooler to the outflow of the OEM cooler and push new fluid through the Hayden cooler to remove any air in the system. Make final connection between Hayden cooler and inlet to the transmission. After this, re-attach front fascia, take the car out for a short ride to bring transmission fluid temperature up to operating levels, and then check the level of fluid in the transmission while the vehicle is running. Top off until the fluid level reads full.
I did not have any capability at the time to measure the difference in transmission fluid temperature pre- and post-Hayden cooler installation. From reading about other similar projects I would not be surprised with a drop in temperature of 30-40 degrees.
Last edited:
