Sprocket99
Member
- :
- 2008 Mazdaspeed 3
MAZDASPEED 3 EMBLEMLESS GRILL INSTALLATION
Tools recommended:
- a small dremel (small cutting disks worked well)
- a stuby ratchet
- various sized phillips head screwdrivers and I found having a few pen sized flathead screwdrivers helpful
- files
I recently installed the emblemless grill for the Mazdaspeed 3 that can be found on ebay (made by a company called The Speedline: http://cgi.ebay.ca/M04-Mazdaspeed3-...=0&customid=link&campid=&toolid=20001&mkevt=1 ). I believe this grill offered by the Speedline is very similar to the Autoexe emblemless grille. Overall the fitment of the Speedline/ebay grill was quite good (requiring very minimal modification) and I was very impressed with this company in terms of the packaging they sent the grill in. I would recommend that you do not paint the grill before attempting to install it as you will likely need to use a dremel to make the two main mounting holes slightly bigger so the grill can be positioned/adjusted to achieve the best fitment possible and I was constantly "dry fitting" the grill during some of the final stages of the install and it would really suck to scuff up your freshly painted grill. I installed my grill 3 or 4 weeks ago and I took a bunch of pictures during the install. I will try to give some step by step instructions but hopefully I wont forget to mention anything too important. (Also don't hate on me because my car was dirty in the photos, I washed it after the install haha)
1. Begin by removing the most obvious screws and clips that hold the stock grill and the ducts that direct air onto the top mount intercooler (see attached pictures).
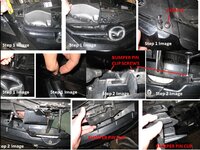
I found the little clips were most easily removed by pushing the round middle part of the clip further into the surrounding sheath part using a small pen style screwdriver (I don't know the proper terminology feel free to correct me and I can update this step). After doing this I was able to pull the small clips out using my fingers and the clips seemed to come out undamaged (not that you need them to install the new grill anyway)
2. Next there are two plastic clips (on either side of the Mazda logo ) on the inside of the bumper cover that need to be removed. I believe the supplied Speedline instructions refer to these as bumper pin clips (they basically hold a rigid plastic piece that gives the stock grill support- this rigid plastic needs to be removed before you can begin cutting the required areas of the stock bumper cover-see attached pictures. Each of these clips/ pins has 2 screws. You may need to use a small ratchet and to get you arm inside the bumper cover to undo a few of these screws that are tougher to get at (see pictures).These clips/pins will need to be used during the installation of the emblemless grill so you may want to mark which side each came from and put them off to the side in a safe place where they wont get stepped on or otherwise damaged.
3. Next I removed the screws that held the gargantuan Mazda logo to the bumper cover. At this point it seems like all the screws that need to be removed have been, but in the very far corners (driver's side and passenger side) on the inside of the bumper cover there are two more screws that are very hard to see and kinda difficult to get at (unless you have tiny hands). I seem to remember hating these two screws I have a few pictures attached to try and give you an idea where they are. I seem to recall using a flashlight and flexing parts of the bumper cover in order to actually catch a glimpse of these screws. Good luck. Also, if you drop or lose a screw in the process you may be relieved to know you will have quite a few of these screws left over after the emblemless grill is installed (only 4 are required).
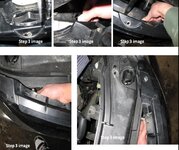
4. There are clips on the inside of the bumper cover "beam" (that goes to the Mazda emblem) which hold the rigid plastic to the bumper cover. I believe these clips are unclipped by just pulling up on a tab (you may have to push down I cant remember either way it should be pretty easy to get these undone).
5. Now you should be able to remove the rigid plastic piece found on the inside of the bumper cover.
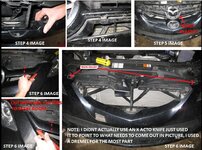
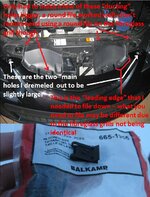
6. Now the nerve racking part comes into play... cutting your stock bumper cover. I started by cutting a large chunk of the beam (that held the emblem ) out (using side cutters) to give myself more room to work. See the attached pictures to get an idea of what needs to come out. I recommend taking out the big chunk first then using a dremel and cutting wheels/disks to cut as you get closer to being complete. I really recommend repeatedly taking out a small amount with the dremel and then dry fitting the aftermarket grill in order to avoid taking out too much of the stock bumper. You may find the two main holes for the screws on the aftermarket grill don't line up all that well with the holes at the top of the bumper cover that are used to attach the grill to the car. I used my dremel and a beveled sanding stone attachment of some sort (sorry again for the lack of proper terminology) to make the holes slightly bigger. This let me adjust the grill to get a good fitment (I didn't have to make the holes that much bigger and had no problem using the screws that were originally in the bumper). Also you may notice when you screw in the grill that it has to flex a bit not only to get the screws all the way down but also to be able to push the grill back into the bumper so it sits flush. I had no problems gently flexing mine into place and those bumper pins/clips set aside earlier do a good job of pulling the grill into place during the final step. After I was finished cutting the bumper and dry/test fitted the new grill to check for proper fitment I got my grill painted. You will notice there are 4 holes on the bottom lip of the new grill that allow for those bumper pin clips to be attached to. I found the holes on my new grill to be too big to allow for the screws to thread into them properly so I just got some U shaped clips from NAPA and slid them over the holes so that the screws could catch nicely (See pics below).
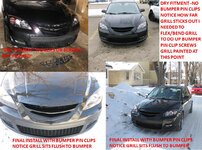
7. After your grill is painted put the bumper pin clips in place and lower the grill into place. Screw in the two main screws at the top of the grill and the 4 screws that hold both bumper pin clips to the new grill. I found I had to actually screws in the bumper pin clips first and then the two main screws but do whatever works best for you. Make sure your grill is centered nicely before tightening everything up. I didn't use any of the supplied 2-sided tape as it was quite cold out when I installed my grill and I couldn't get the tape to stick nicely. I found the grill sat very flush to the bumper without using the tape. I may add some tape in when it warms up here but I found that I really didn't need it which was surprising because I had to flex my grill quite a bit in order to get all the screws in.
8. The final step would be to install the "ducts" that direct air onto the intercooler back onto the grill. I found I had to use some round and flat iron files to make some of the holes on these duct pieces bigger and on the driver's side duct I had to file away a bit of the "leading edge" of the duct to get a good fit. Overall it only took me 5 or 10 minutes to get the ducts to go in nicely.
(I HAD SOME ISSUES WITH UPLOADING PICTURES LET ME KNOW IF THEY DON'T TURN OUT WELL)
Tools recommended:
- a small dremel (small cutting disks worked well)
- a stuby ratchet
- various sized phillips head screwdrivers and I found having a few pen sized flathead screwdrivers helpful
- files
I recently installed the emblemless grill for the Mazdaspeed 3 that can be found on ebay (made by a company called The Speedline: http://cgi.ebay.ca/M04-Mazdaspeed3-...=0&customid=link&campid=&toolid=20001&mkevt=1 ). I believe this grill offered by the Speedline is very similar to the Autoexe emblemless grille. Overall the fitment of the Speedline/ebay grill was quite good (requiring very minimal modification) and I was very impressed with this company in terms of the packaging they sent the grill in. I would recommend that you do not paint the grill before attempting to install it as you will likely need to use a dremel to make the two main mounting holes slightly bigger so the grill can be positioned/adjusted to achieve the best fitment possible and I was constantly "dry fitting" the grill during some of the final stages of the install and it would really suck to scuff up your freshly painted grill. I installed my grill 3 or 4 weeks ago and I took a bunch of pictures during the install. I will try to give some step by step instructions but hopefully I wont forget to mention anything too important. (Also don't hate on me because my car was dirty in the photos, I washed it after the install haha)
1. Begin by removing the most obvious screws and clips that hold the stock grill and the ducts that direct air onto the top mount intercooler (see attached pictures).

I found the little clips were most easily removed by pushing the round middle part of the clip further into the surrounding sheath part using a small pen style screwdriver (I don't know the proper terminology feel free to correct me and I can update this step). After doing this I was able to pull the small clips out using my fingers and the clips seemed to come out undamaged (not that you need them to install the new grill anyway)
2. Next there are two plastic clips (on either side of the Mazda logo ) on the inside of the bumper cover that need to be removed. I believe the supplied Speedline instructions refer to these as bumper pin clips (they basically hold a rigid plastic piece that gives the stock grill support- this rigid plastic needs to be removed before you can begin cutting the required areas of the stock bumper cover-see attached pictures. Each of these clips/ pins has 2 screws. You may need to use a small ratchet and to get you arm inside the bumper cover to undo a few of these screws that are tougher to get at (see pictures).These clips/pins will need to be used during the installation of the emblemless grill so you may want to mark which side each came from and put them off to the side in a safe place where they wont get stepped on or otherwise damaged.
3. Next I removed the screws that held the gargantuan Mazda logo to the bumper cover. At this point it seems like all the screws that need to be removed have been, but in the very far corners (driver's side and passenger side) on the inside of the bumper cover there are two more screws that are very hard to see and kinda difficult to get at (unless you have tiny hands). I seem to remember hating these two screws I have a few pictures attached to try and give you an idea where they are. I seem to recall using a flashlight and flexing parts of the bumper cover in order to actually catch a glimpse of these screws. Good luck. Also, if you drop or lose a screw in the process you may be relieved to know you will have quite a few of these screws left over after the emblemless grill is installed (only 4 are required).

4. There are clips on the inside of the bumper cover "beam" (that goes to the Mazda emblem) which hold the rigid plastic to the bumper cover. I believe these clips are unclipped by just pulling up on a tab (you may have to push down I cant remember either way it should be pretty easy to get these undone).

5. Now you should be able to remove the rigid plastic piece found on the inside of the bumper cover.
6. Now the nerve racking part comes into play... cutting your stock bumper cover. I started by cutting a large chunk of the beam (that held the emblem ) out (using side cutters) to give myself more room to work. See the attached pictures to get an idea of what needs to come out. I recommend taking out the big chunk first then using a dremel and cutting wheels/disks to cut as you get closer to being complete. I really recommend repeatedly taking out a small amount with the dremel and then dry fitting the aftermarket grill in order to avoid taking out too much of the stock bumper. You may find the two main holes for the screws on the aftermarket grill don't line up all that well with the holes at the top of the bumper cover that are used to attach the grill to the car. I used my dremel and a beveled sanding stone attachment of some sort (sorry again for the lack of proper terminology) to make the holes slightly bigger. This let me adjust the grill to get a good fitment (I didn't have to make the holes that much bigger and had no problem using the screws that were originally in the bumper). Also you may notice when you screw in the grill that it has to flex a bit not only to get the screws all the way down but also to be able to push the grill back into the bumper so it sits flush. I had no problems gently flexing mine into place and those bumper pins/clips set aside earlier do a good job of pulling the grill into place during the final step. After I was finished cutting the bumper and dry/test fitted the new grill to check for proper fitment I got my grill painted. You will notice there are 4 holes on the bottom lip of the new grill that allow for those bumper pin clips to be attached to. I found the holes on my new grill to be too big to allow for the screws to thread into them properly so I just got some U shaped clips from NAPA and slid them over the holes so that the screws could catch nicely (See pics below).


7. After your grill is painted put the bumper pin clips in place and lower the grill into place. Screw in the two main screws at the top of the grill and the 4 screws that hold both bumper pin clips to the new grill. I found I had to actually screws in the bumper pin clips first and then the two main screws but do whatever works best for you. Make sure your grill is centered nicely before tightening everything up. I didn't use any of the supplied 2-sided tape as it was quite cold out when I installed my grill and I couldn't get the tape to stick nicely. I found the grill sat very flush to the bumper without using the tape. I may add some tape in when it warms up here but I found that I really didn't need it which was surprising because I had to flex my grill quite a bit in order to get all the screws in.
8. The final step would be to install the "ducts" that direct air onto the intercooler back onto the grill. I found I had to use some round and flat iron files to make some of the holes on these duct pieces bigger and on the driver's side duct I had to file away a bit of the "leading edge" of the duct to get a good fit. Overall it only took me 5 or 10 minutes to get the ducts to go in nicely.
(I HAD SOME ISSUES WITH UPLOADING PICTURES LET ME KNOW IF THEY DON'T TURN OUT WELL)
Last edited:
