Seat bottom adjustment!

twintrbo

Member
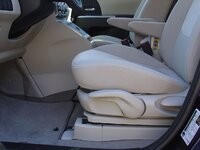
To put it lightly, it was a success! For those who did not catch the original post, I felt that Mazda did not put enough pitch on the seat bottom cushion and it made the seat poor on thigh support and I felt like I was sliding out of it.

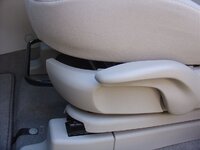
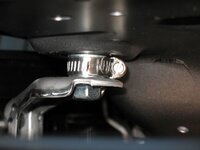
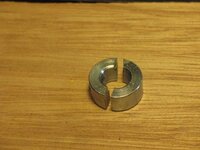
I took a quick look and decided to just unbolt the front of the seat cushion and put a 1/2" spacer in there to give it a little tilt in the direction I wanted. Currently its temporary but I will continue to evaluate it and I'm sure I will make it permanent once I get the right hardware to do so. This mod can be done by anyone with half a brain in about 10 min.

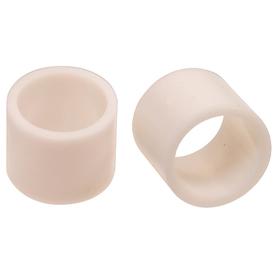
Now the bad.......There is a 1/2" space between the trim and the cushion now. Most people would not even notice it and the added comfort it gives is worth it. I know I can live with it. I have to check but I think they are M12 bolts that you will need to replace with longer ones for obvious reasons. From what I saw, the seat frame offers no support to the cushion so this will not change the strength of the seat bottom in any way. Originally I thought about moving the entire seat from the bottom mounts but I decided not to mess with structure. That would require very strong bolts and there were tabs to lock the seat frame in place that would be bypassed if it were spaced up.

Bottom line: if you want more thigh support or just more angle on the cushion to feel more like you are sitting IN a seat instead of ON one, you must do this!
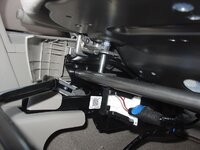
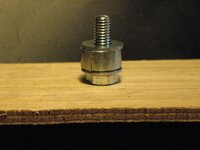
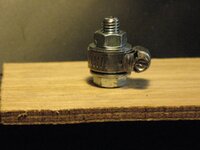
 
I am very interested in seeing some pics of your mod and where and what parts you got to do this. I too am disappointed with the lack of current thigh support. TIA
 
Thanks for the info. This is something I want to try. Do you think the longer bolts are available in a decent hardware, auto etc.. store? Next week I'll pull a bolt and check it out.
I can live with the space from the trim if a 1/2 inch turns out to be enough.
 
Here are some pics :

#1 shows the gap from close up
#2 is what I did temporarily to make sure this is a mod I can live with. At the moment I have a long bolt from underneath and 2 nuts on top to hold the spacing. The bolts extend just enough to "locate" the cushion from sliding around. I will get proper bolts after I get some seat time to ensure its what I wanted the seat to feel like.
#3 is the view of the gap from further back.

I should have taken another shot from eye level so you can see how it looks when you open the door, if anyone wants that shot too, let me know. I would really like to get some solid blocks of aluminum in order to space the seat and distribute the pressure evenly, so I will be looking for that and post where I got it. I thought about moving the trim to close the gap but there are too many things poking through to move it easily. Also you should be able to do this without removing anything more than the front bolts on the seat cushion, there is enough play in the cushion to place them in. Enjoy!
 

Attachments

  • DSC06079.JPG
    DSC06079.JPG
    148.5 KB · Views: 410
  • DSC06080.JPG
    DSC06080.JPG
    139.8 KB · Views: 437
  • DSC06081.JPG
    DSC06081.JPG
    134.2 KB · Views: 397
2010 Mazda 5 Sport
I had some time today so I gave this a try. I'm not up on metric hardware but I pulled a bolt and went to my local hardware. I believe I have a M8 1.25 pitch bolt about 5/8" long. The end is tapered. I bought a longer bolt with no taper and found it too difficult to get the bolt started with the spacers (I also used large nuts) installed. Just enough out of alignment and I was afraid I would strip the threads on the seat. The tapered bolt started but I felt it was too short to leave in. So I'll look for a longer bolt with a taper.
 
Oops, I realized I put M12 but I was thinking of the socket size, sorry guys. Yes its an 8mm x 1.25 bolt. Not sure why the non tapered bolt would have issues threading, the taper just makes it easier to line it up on the assembly line, the threads are the same as they would be for any bolt on the cushion. Using nuts is not a great idea however, because it makes it hard to tighten properly. Washers or some sort of spacer block is the only thing that should be used in this application. I only used nuts in order to check the measurement but I will find something more suitable when I make it permanent.
 
I think I had a problem with regular bolts because the spacer has created an angle between the support and the seat bottom. There wasn't enough slop in the support hole to line up on the seat bottom. I just don't want to damage any threads. The taper may guide the bolt into the threads, if I can find a tapered bolt. I'm still playing with this so we'll see.
 
I did some like that to lower the steering on a 00' Focus... but I use the bolt washer from home depot...

Just keep adding washer until you reach the angel/height that you want...
 
Well I finally got back to this project. I was concerned about threading the longer bolts into the seat bottom due to the new angle between the support and the seat bottom threads. I could not find tapered bolts locally in small quantites. This is the current fix. I used a 3/8 X 3/4 shaft coupler that was at the local hardware (True Value) in those many pull out drawers. Basically I cut the coupler in half and added it after the new bolt and with washer was threaded. Since there was only one washer thickness, the bolt threaded easily.
I threaded the new bolt with one washer into the seat. Then the seat was lifted, and the two halves of the coupler were placed around the bolt. I added a hose clamp just to insure nothing moved when I tightened the bolt. Hopefully the pictures will give you an idea of what I mean. The nut on the bolt in the picture would be the seat bottom. So far I have only done the passenger seat so my wife will be driving me around for testing. Note from the pictures I went to one washer during installation.
This almost equals 1/2 inch of lift. So far from just sitting in the seat I like the results. Time will tell. A bit of a pain this way but worth it.
Not good at adding pix so let's see what happens.
 

Attachments

  • 008.JPG
    008.JPG
    28.2 KB · Views: 454
  • 001.JPG
    001.JPG
    42 KB · Views: 394
  • 006.JPG
    006.JPG
    36.7 KB · Views: 385
  • 007.JPG
    007.JPG
    38.9 KB · Views: 392
I figured out a really good spacer idea that I will do as soon as I get a chance. I will use a 1 3/8" hole saw to cut out a large round wooden washer to distribute the load. I will then use a belt sander to put a slight angle on it for the new tilt of the seat cushion, I figure 5/8" wood should be perfect to get the 1/2" raise I need. So simple its silly :) If I have an issue with the tapered bolt, I can just use a cut-off wheel to round the threads a bit as well. Anyone else try this mod yet?
 
I added the mod I described above to the drivers seat and am happy with the results so far. A correction to my post. What I cut in half was a shaft collar, not coupler. Thanks twintrbo for the mod.
 
My pleasure, really makes me wonder how many people actually drove the prototype that they missed this issue. Next up is moving the brake pedal away from the gas somehow so my size 12's dont get hung under the brake pedal. That one might be difficult............
 
My pleasure, really makes me wonder how many people actually drove the prototype that they missed this issue. Next up is moving the brake pedal away from the gas somehow so my size 12's dont get hung under the brake pedal. That one might be difficult............

I highly experienced welder can easily fix that. Too much of a hassle for me, but I know at least two guys who could do that. Dig around if it's that important to you. You may have a nice mod to sell to the 5 community.
 
Is there a reason you can't use nylon spacers? If you place a large fender washer at the top, it would help distribute weight too. Also, why couldn't this be done where the seat bolts to the floor? Wouldn't this move the trim gaps to the floor where it would be less noticeable?

008236708189lg.jpg
 
Last edited:
I did a mod similar to this a couple weekends ago. Simply used 2 washers between the seat bottom and frame, and 2 washers under each of the front legs. Of course the result isn't as drastic as the OP, but my 5'11 legs are more supported now. I pump up the seat to sit more upright like a van and it doesn't require me positioning the seat all the way back. This simple change helped.
 
Back