
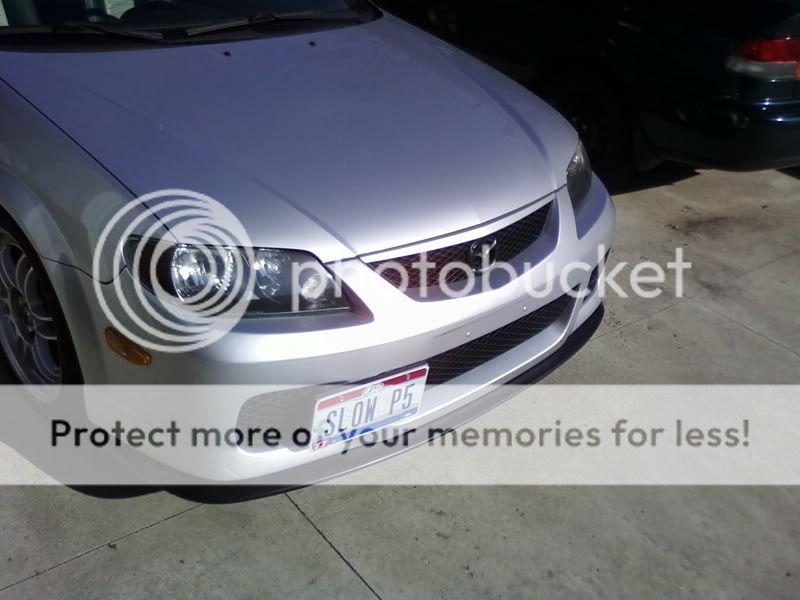
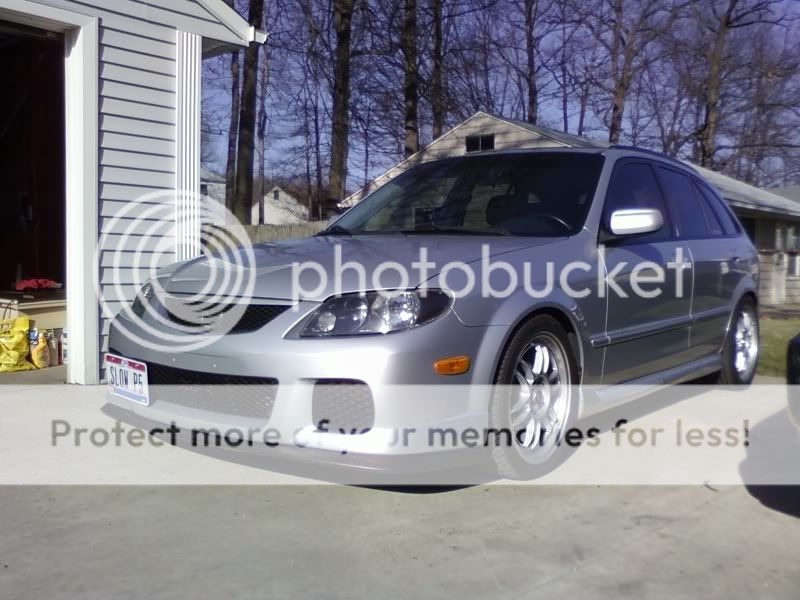
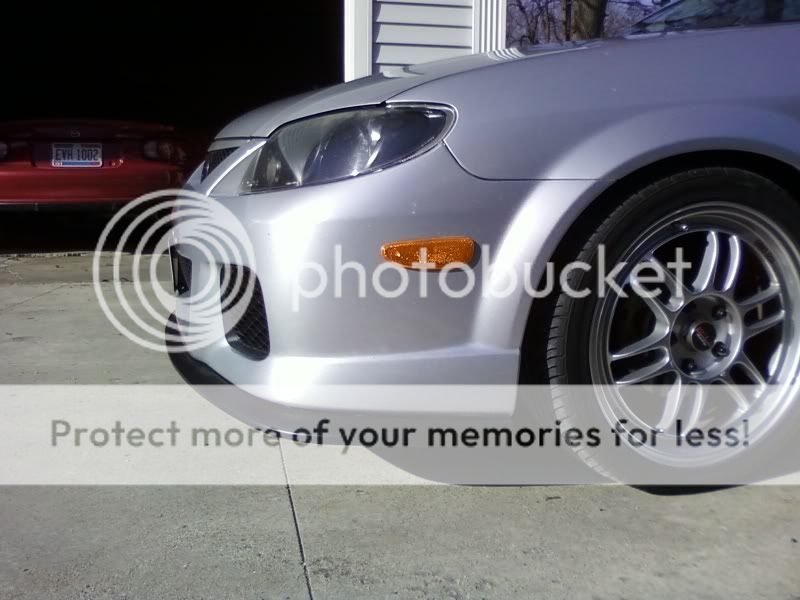
Hey guys. I wanted a lower front lip but didn't really want to spend the cash on the 03.5 MSP lip (though they do look sexy as hell) and didnt really want a DGM lip because everyone already has them. I wanted something a little more unique, inexpensive, subtle and clean. I saw a member on here selling the JDP-style front lower lip/splitter for the 03.5 MSP lip and after some simple modifications, got it to fit my OEM '02 P5 front bumper. There were a few other interested P5 owners (and a couple MSP bumper cats) that said it couldnt be done, so I gave it a shot. I think it looks good, unique and isn't too low to the ground I have to worry about speedbumps and potholes.
Here's the for sale thread for the lower lip/splitter. Just PM MSPSILVER24 and order one up from him. They are $185 shipped. He responded to me within 2 days and had my lip shipped that week. Good seller!

This was a pretty simple install. Took me and my friend about 2 hours. I removed my front bumper to make it easier to install, here is a bumper removal thread on the forum (in the 2nd paragraph), its very simple.
Tools needed:
-shorty philips head screwdriver (for front bumper removal)
-8mm socket (for front bumper removal)
-10mm socket (for front bumper removal)
-Dremel with a cutting disc OR grinder with a cutting wheel
-Drill and small drill bit for pilot holes for mounting screws (or use your Dremel with a drill bit)
-Four 1/4" long self tapping sheet metal screws (along with the supplied 13 black mounting screws supplied with the front lip)
-LocTite glue, Super glue or something of that nature (for glueing the caps back on)
-A friend or two to hold the bumper and lip while mounting. (Thanks to forum members Jay Keller and SATimko!)
Step 1;
Remove the front bumper, then set it aside upside down on top of something to keep it stable. I used an empty box that was just laying around.
Step 2;
Use your dremel or grinder to trim off the top "chin" of the front lip. This is the section that raises up into the MSP lip. The P5 lip doesn't have this cut out so the front lip needs to be flush and level. Cut the chin section off horizontally, so you will still have flat material to screw the front lip to the bumper. It should look like this when you're finished cutting off the chin.


Step 3;
After removing the chin section, you'll need to remove the little raised section for the MSP lip so it will sit flush against the P5 bumper. I kept mock fitting the lip to the bumper during the process so I could see just how much material I would need to remove. Try to remove as little material from the lip as possible. It's easier to cut off more but impossible to put more back on. I cut a V-notch out of this little mounting section. Now the lip should fit flush on the flat profile of the P5 bumper.


Step 4;
Next I mounted the front lip to the center of the P5 bumper using one of the supplied black mounting screws. I started in the center and worked my way around to the left side to the end of the bumper. I aligned the front lip using one of the molded mounting tabs to the middle of the P5 bumper. The center of the P5 bumper is the square notch, and using the mounting tabs on the lip as reference. From mounting tab to tab on the front lip was 37". So I simply mounted the center mounting screw at 18-1/2" inches. But it's important for this first mounting screw to be centered and not too forward or backward on the bumper, or else your whole lip will be off center, so take your time. Remember the saying "Measure twice, cut once!".

Here you can see the P5 bumper (grey in colour and all scratched up) and the new front lip (black with a ragged edge) mounted to the bumper.

Step 5;
The MSP bumper is a bit wider than the P5 bumper, so the lip wants to extend out farther to the outer edges. I pulled the outside edges in and noticed they were binding a bit, so I trimmed this section to allow it to bend more freely. I just cut out a notch to allow the bumper to flex.


Step 6;
Now you can start mounting the front lip to the bumper with the supplied black screws. I used the mounting tabs on the lip and put 2 screws where the lip used to flex up with that "chin" we removed earlier. It closes the little gap and makes everything flush on the bumper. The two screws are arounf 5" and 8" from the left mounting tab.

Step 7;
Then work your way around the bend of the bumper and make sure the lip bends evenly with the bumper contours, working your way from the center of the bumper out, to the end.

Step 8;
Repeat steps 5-7 for the right side mirror imaging everything you just did. I used the 4 extra 1/4" sheet metal screws to mount the lip to the bumper for additional support.

Step 9;
Now we'll remove the excess ends of the lip to fit flush with the bumper. We'll re-use the section we're cutting off to make "caps" for the new ends.


Step 10;
The ends of the lip we just removed we will clean up and recap the lip with them. I trimmed off the excess plastic and made them flush and smooth. I also made the ends of the mounted lip flush and smooth to mount the new caps to. I used LocTite glue to glue them back on. When using any glue, make sure you clean both the piece you're glueing AND the piece you're glueing it to with rubbing alcohol for a good secure bond.

Then glue the caps back onto the ends of the lip.

Step 11;
Remount your bumper and you're done.
Here's the for sale thread for the lower lip/splitter. Just PM MSPSILVER24 and order one up from him. They are $185 shipped. He responded to me within 2 days and had my lip shipped that week. Good seller!
This was a pretty simple install. Took me and my friend about 2 hours. I removed my front bumper to make it easier to install, here is a bumper removal thread on the forum (in the 2nd paragraph), its very simple.
Tools needed:
-shorty philips head screwdriver (for front bumper removal)
-8mm socket (for front bumper removal)
-10mm socket (for front bumper removal)
-Dremel with a cutting disc OR grinder with a cutting wheel
-Drill and small drill bit for pilot holes for mounting screws (or use your Dremel with a drill bit)
-Four 1/4" long self tapping sheet metal screws (along with the supplied 13 black mounting screws supplied with the front lip)
-LocTite glue, Super glue or something of that nature (for glueing the caps back on)
-A friend or two to hold the bumper and lip while mounting. (Thanks to forum members Jay Keller and SATimko!)
Step 1;
Remove the front bumper, then set it aside upside down on top of something to keep it stable. I used an empty box that was just laying around.
Step 2;
Use your dremel or grinder to trim off the top "chin" of the front lip. This is the section that raises up into the MSP lip. The P5 lip doesn't have this cut out so the front lip needs to be flush and level. Cut the chin section off horizontally, so you will still have flat material to screw the front lip to the bumper. It should look like this when you're finished cutting off the chin.
Step 3;
After removing the chin section, you'll need to remove the little raised section for the MSP lip so it will sit flush against the P5 bumper. I kept mock fitting the lip to the bumper during the process so I could see just how much material I would need to remove. Try to remove as little material from the lip as possible. It's easier to cut off more but impossible to put more back on. I cut a V-notch out of this little mounting section. Now the lip should fit flush on the flat profile of the P5 bumper.
Step 4;
Next I mounted the front lip to the center of the P5 bumper using one of the supplied black mounting screws. I started in the center and worked my way around to the left side to the end of the bumper. I aligned the front lip using one of the molded mounting tabs to the middle of the P5 bumper. The center of the P5 bumper is the square notch, and using the mounting tabs on the lip as reference. From mounting tab to tab on the front lip was 37". So I simply mounted the center mounting screw at 18-1/2" inches. But it's important for this first mounting screw to be centered and not too forward or backward on the bumper, or else your whole lip will be off center, so take your time. Remember the saying "Measure twice, cut once!".
Here you can see the P5 bumper (grey in colour and all scratched up) and the new front lip (black with a ragged edge) mounted to the bumper.
Step 5;
The MSP bumper is a bit wider than the P5 bumper, so the lip wants to extend out farther to the outer edges. I pulled the outside edges in and noticed they were binding a bit, so I trimmed this section to allow it to bend more freely. I just cut out a notch to allow the bumper to flex.
Step 6;
Now you can start mounting the front lip to the bumper with the supplied black screws. I used the mounting tabs on the lip and put 2 screws where the lip used to flex up with that "chin" we removed earlier. It closes the little gap and makes everything flush on the bumper. The two screws are arounf 5" and 8" from the left mounting tab.
Step 7;
Then work your way around the bend of the bumper and make sure the lip bends evenly with the bumper contours, working your way from the center of the bumper out, to the end.
Step 8;
Repeat steps 5-7 for the right side mirror imaging everything you just did. I used the 4 extra 1/4" sheet metal screws to mount the lip to the bumper for additional support.
Step 9;
Now we'll remove the excess ends of the lip to fit flush with the bumper. We'll re-use the section we're cutting off to make "caps" for the new ends.
Step 10;
The ends of the lip we just removed we will clean up and recap the lip with them. I trimmed off the excess plastic and made them flush and smooth. I also made the ends of the mounted lip flush and smooth to mount the new caps to. I used LocTite glue to glue them back on. When using any glue, make sure you clean both the piece you're glueing AND the piece you're glueing it to with rubbing alcohol for a good secure bond.
Then glue the caps back onto the ends of the lip.
Step 11;
Remount your bumper and you're done.
Last edited:

