Design's Long Term Ownership/Build Thread

Update at 45K:


MSCAI Filter

Mazda recommends cleaning the filter every 20K so I took a couple hours off to get it done. First thought? A 2nd filter would be REALLY convenient lol. Most filters - even CAI ones - are pretty easy to access once installed. Mazda's version is a bit more challenging due to the splash shield. On a lowered car you're required to jack it up, remove the driver's side wheel/splash shields, and remove the MSCAI filter/splash shield assembly. Not to hard but certainly more work than a short ram. What's worse is that the filter takes a good 24-48 hours to dry depending on the weather. Here are a few pics of the process (for those who don't have the MSCAI):

- Filter cleaning kit (two bottles). Exact same contents as the AEM version, part #21-110.
http://carphotos.cardomain.com/ride_images/1/1259/1349/3145674026_large.jpg

- Few shots of the filter removed. The lower splash shields need to be removed in order to access the filter assembly. On lowered cars, it's recommended you remove the driver's side front wheel for easier access.
http://carphotos.cardomain.com/ride_images/1/1259/1349/3145674027_large.jpg
http://carphotos.cardomain.com/ride_images/1/1259/1349/3145674023_large.jpg

- The filter splash shield bolts directly to the intake piping. So removing the bolts first will allow you to disconnect and pull the assembly out from under. As you can see, the filter is impossible to remove without first unbolting the splash shield.
http://carphotos.cardomain.com/ride_images/1/1259/1349/3145674028_large.jpg
http://carphotos.cardomain.com/ride_images/1/1259/1349/3145674021_large.jpg
http://carphotos.cardomain.com/ride_images/1/1259/1349/3145674019_large.jpg

- Cleaning the filter requires both bottles to be used. Empty one into a bucket of warm water and rotate the filter back and forth a few minutes to agitate the dirt. DO NOT allow the water to enter the neck or dirt released from the outer layer of the filter will adhere to the inner assembly and eventually soil the MAF. Remove the filter, tap off excess water, dump the bucket and repeat the process again.
http://carphotos.cardomain.com/ride_images/1/1259/1349/3145674020_large.jpg


So how was the end result? Nearly disastrous. Took the car on a test drive after letting the filter air dry for 24 hours. Damn thing bogged violently on anything but a light tap on the throttle. Turns out the interior of the filter assembly was still slightly damp and interfering with the MAF under load. After letting the filter dry another 24 hours all was good. Inspected the MAF for any residue or dirt. Nothing. Could have easily been a $200 mistake. :(


CPE RMM Update/Corksport Inserts

As I mentioned previously the CPE 75 duro RMM wasn't quite working out. After a good 1K of constant driving with the HVAC on it was time for a change. Ended up doing a trade + cash with a member who had been running Corksport Inserts for 40K. The results were pleasantly surprising.

Many people on the boards claim the inserts wear out after several thousand miles. I can tell you first hand that's NOT the case - at least compared to stock that is. The inserts, despite having some hard miles on them, made a noticeable difference the moment I drove out the garage. Minor increase in NVH but Corksport retains approximately 60-70% of a solid mount's rigidity. The real test was the wife who didn't even notice a change over stock. The inserts alone won't completely solve wheel hop but it's a great compromise between performance and practicality. I'd consider this product a must-have.


H&R Coilovers Update

I had noticed the rear end getting a bit squirrely over uneven roads and suspected one of the shocks might be getting a little weak. Imagine my surprise when I saw this:
http://carphotos.cardomain.com/ride_images/1/1259/1349/3145674007_large.jpg

You can't really tell in the crappy cellular pic but that's oil all over the rear passenger shock. Completely blew the seal. Fortunately Bilstein rebuilds H&R dampers as the internals are very similar. Difference is that H&R uses more aggressive damping to compensate for the lower ride height.

According to the guy who performed the service the shock blew because of excess dirt in the shaft. The good news is that it only costs about $65 for general servicing. The bad news is that the excess dirt scored the rod and required a new one to be custom cut to match. Total cost was just over $100 and was done in less than 4 business days. Hats off to Bilstein for excellent service and communication.

So does H&R have crappy build quality? Nope; my own damn fault. When you trim the rear jounce bumpers for additional suspension travel, you have to remove the dust shields. Hence the excess dirt in the shaft. So when putting the shocks back in I added a nylon cap for extra protection.


Hankook Ventus V12 Evo Update

In dry weather the Hankooks are still holding up great. Getting a little noisy but expected of a tire with 16K worth of wear. What I didn't expect was how slippery they've become in the wet. Some of it is due to the uneven wear pattern generated by the increased camber/toe of the lowered ride height. But I still have another 4-5mm left of usable tread. So I'll plan to flip the tires on the next rotation interval and monitor their performance. I suspect they'll be replaced by the summer if not sooner.


That's it for now. Thanks for looking!

3145674009_large.jpg
 
Update at 50K


Maintenance


Pads and Rotors

At 47K the OEM pads were getting a little thin. In fact, they were so worn I hadn't even noticed that one of the inner pads had worn down to the backing plate. Picked up replacement pads and rotors through onlinemazdaparts.com for about $300.

I had been thinking about trying a set of aftermarket pads since many go for half the price of OEM. But after driving two MS3's with Hawk HPS pads equipped, I realized OEM is worth the price. Hawk and other street pads aren't bad. But in addition to reduced initial bite, they just require some extra braking effort to stop on par with OEM. And I really like the feel of the Mazda pads.

Being new to ABS, I enlisted my buddy Tony to help out with the swap. With the exception of the retainer spring, they're really no different than standard brakes. But I found it interesting that Mazda does not use brake lubrication on the slider pins or pad guides. In the future I'll probably do them myself - they're that easy.

Few photos:
http://carphotos.cardomain.com/ride_images/1/1259/1349/3145674102_large.jpg
http://carphotos.cardomain.com/ride_images/1/1259/1349/3145674101_large.jpg
http://carphotos.cardomain.com/ride_images/1/1259/1349/3145674103_large.jpg
http://carphotos.cardomain.com/ride_images/1/1259/1349/3145674104_large.jpg

Tony taking apart the assembly. That original pad is THIN:
http://carphotos.cardomain.com/ride_images/1/1259/1349/3145674105_large.jpg

After driving the car for a bit I've noticed the pedal is still a little soft. Still holds pressure and stops on a dime. But I miss the firm brake feel I used to have. I may have them bled and see if that solves the issue. Otherwise I'll take it to a pro for some more integrated diagnostics. More about that in the future.


CEL

So at about 48K I had my check engine light go off. Ran the codes with a little $45 scanner tool I picked up at Harbor Freight. Pulled these codes:
- P2187 - Too Lean at Idle Bank 1
- P0442 - P0442 Evap System Small Leak
- P0456 - Evap System Very Small Leak

After a bit of reading I suspected it was a bad purge valve. Apparently a common problem with these cars. So I took the car do the dealer and handed them a copy of a TSB about the issue:
http://www.miatamania.com/graphics/products/miata_service_bulletins/01-021-09-2108.pdf

Sure enough, 5 hours later my car is good to go with a new purge control valve installed (had it shipped from a nearby dealer). No other maintenance issues to report.


Pirelli PZero Nero Tires

In my previous entry I mentioned some aggressive wear on the Hankook Ventus Evos. Turned out they were shot at 18K. I did run them at .1* Toe-In on the front. But I'm still surprised they burned through this quickly. My next set would need to last a little longer and have basic all season capabilities. Enter the Pirelli PZero Nero.

We have Pirelli's on my wife's car. Fairly quiet. Long life. Good grip. All around, a decent tire for the money. And for the MS3, Pzero Nero's faired pretty well on TireRack:
Finding the "Ultra" in Ultra High Performance All-Season Tires

Picked up a set through Discount Tire for 160 each installed. Stock size; 400 treadwear rating; 45K warranty. Despite the harder compound, my first impression is favorable. Fairly low noise (not as quiet as Hankook) and excellent grip w/o squeal. We have rain coming here tomorrow so we'll see how they fair in the wet. But so far I'm happy with them. I'll post a couple of pictures of them next time.


KW V2 Coilovers

I had mentioned in an earlier post that I was looking to replace the used H&R coilover set I picked up in April. Main reason was because the set I bought was designed for the MZ3 and had minimal suspension travel up front. I also wanted topside rebound control for family outings.

So last week I finally had a new set of V2's installed. Once again my buddy Tony was kind enough to help out. Few photos:

http://carphotos.cardomain.com/ride_images/1/1259/1349/3145674050_large.jpg
http://carphotos.cardomain.com/ride_images/1/1259/1349/3145674052_large.jpg

KW supplies a more aggressive strut bushing (bearing pack):
http://carphotos.cardomain.com/ride_images/1/1259/1349/3145674080_large.jpg

KW requires you to reuse the OEM strut perch. Here's a photo of it assembled with KW's strut bushing:
http://carphotos.cardomain.com/ride_images/1/1259/1349/3145674074_large.jpg
http://carphotos.cardomain.com/ride_images/1/1259/1349/3145674078_large.jpg

KW also requires you to use a 10mm drill bit to widen the rear OEM top mount. Few photos of the completed effort:
http://carphotos.cardomain.com/ride_images/1/1259/1349/3145674089_large.jpg
http://carphotos.cardomain.com/ride_images/1/1259/1349/3145674090_large.jpg

Pics installed on the car. The black marks on the strut indicate max in min height range:
http://carphotos.cardomain.com/ride_images/1/1259/1349/3145674086_large.jpg
http://carphotos.cardomain.com/ride_images/1/1259/1349/3145674087_large.jpg
http://carphotos.cardomain.com/ride_images/1/1259/1349/3145674092_large.jpg
http://carphotos.cardomain.com/ride_images/1/1259/1349/3145674091_large.jpg

Pics of the car. Rear is at the initial drop and front is 2mm lower. Since then I've lowered the car another 2-3mm:
http://carphotos.cardomain.com/ride_images/1/1259/1349/3145674093_large.jpg
http://carphotos.cardomain.com/ride_images/1/1259/1349/3145674094_large.jpg


I've only put on a few hundred miles so I'll share some high level impressions.
- Stiff but not harsh
- Dead quiet
- Excellent control over multiple undulations

The ripple effect from undulations - especially on the highway - was a huge fault of both the OEM suspension and the H&R coilovers. The OEM rear shocks were too underdamped to control chassis movement while the H&R's were slightly overdamped. I still think the H&R's provide a more compliant ride under most conditions, but the V2's have a wider range of "acceptable" road manners (due to the adjustable rebound). I also like KW's placement of the strut endlink mounts and rear adjustment perch. Money well spent.

V2's have 18 levels of rebound adjustment. On the recommended settings (9 clicks), low speed damping can get a bit irritating around town. However, dialing back the rebound 4-5 clicks is much better for the daily commute. For aggressive days, the recommended settings work well.


That's it for now, but plan to have an update on the tires and coilovers after another 1K of use. Thanks for looking!

3145674035_large.jpg
 
Quick update. It's now been 700 miles and the coils/tires have worn in nicely. Few thoughts:
  • The KW V2's are dead quiet. There is some mild noise in situations where the piston compresses quickly, such as a speed bump or small pothole. Not a problem just a minor annoyance.
  • Compression damping is spot on. At approximately a 1" drop there is just enough forgiveness to prevent excessive contact with the bump stops. This was the solution I required that the MZ3 H&R's couldn't provide.
  • Spring rate is a bit stiff for DD. They're not harsh, but 45 mile+ trips can get a bit weary. Wife is 8 mos pregnant and says the ride is livable. Daughter has no problem sleeping in the back, but some bumps can juggle her around slightly. I have rebound dialed back to 5 clicks about soft when they're in the car.
  • Near the limits these coils shine. Understeer is still prevalent but a bit more controlled. Case in point, my usual 270* onramp leads to an off-camber exit just before reaching the fwy. That nasty transitional hump would upset both the H&R's and OEM suspension, but at least the H&R's kep the rear wheel planted. The KW's allow the chassis to glide over the hump in a smooth, predictable oversteer condition. Furthermore, there's no harsh shift in direction as the front regains traction - a dangerous behavior with OEM.
  • High speed damping is much more controlled. These coils beg to go fast and feel better at higher speeds. They remain flat over concrete deviations and moderate, multiple undulations where OEM did not. H&R's would occasionally encounter a pogo effect but it was very rare, and only under a combination of undulations at higher speed.
  • Rebound and perch adjustment are incredibly easy. Rear height can be adjusted on the ground, no disassembly required, by spinning the adjuster from under the lower spring mount. Fronts you simply remove the wheels to access the perch. With 18 levels of adjustment, I find 5 works best for DD (7 for me alone). 9-11 works best for spirited drives. Anything more than that and the chassis overreacts to every imperfection in the road.
  • Pirellis pick up more road noise than OEM/Hankooks. They grip just as well as the Evos but pick up more vibrations due to the harder compound. That was expected of an A/S tire. Like Hankook, there is no squeal until you actually break loose. Sidewall on the Pirellis is definitely stiffer. I can run these at 32-34 PSI where the Hankooks I had to run at 36-38. Wet traction is very good. Had no issues with the recent rainstorms here in Cali over the last several weeks.

That's it for now. Thanks for looking!

3145674106_large.jpg
 
Thanks for the update. I'm running the P-Zero Nero A/S too. I agree with your assessment. They are an excellent all season choice. My only complaint is that at the dragstrip or when doing 60 ft accelerometer logging practice, they are terrible. My 60 ft. times have gone up by two tenths of a second over the stock tires. With my mild mods and the Hypertech tune, they just go up in smoke in first and second gear. No amount of feathering the throttle keeps them planted. On a flat shift they even spin all the way through third gear. Just way too hard.

I'm not sure I'll ever wear them out and they do excel in cold weather and especially cold wet weather. But I'm probably going to shop around for some really sticky top of the line summer tires, another set of OEM rims and save these for cold weather.

I really appreciate you keeping this thread going.
 
Update at 89K:

For too long since Ive posted so here goes.


Maintenance


Front Brakes

At 58K I burned through my 2nd set of OEM front pads. As much as I love OEM I decided to try out the Hawk HPs. I have driven two Gen1's with HPs and didnt think they were horrible. I decided it might be worth trying them out for a season and see how theyd hold up long term. Matched them with a new set of OEM blanks.

My assessment after 30K? Not as good as OEM.

The good:
- More progressive/linear braking
- Less dust
- Cost $110 less

The bad:
- Reduced initial bite
- Increased braking effort
- Occasional noise under light braking

Ive confirmed that the noise/performance has nothing to do with the pad/disc combo. I drove my buddys car with HP/Centric discs and noticed the same issues. So I may return to OEM pads after the HPs are done. More to follow.


CV Boot

At 80K I noticed that my drivers side LCA was accruing grease. Looking just above, I noticed a small pinhole in the CV boot. Didnt look like it had been there long and the leak appeared to be very slow. So it was likely that the CV joint hadnt yet been contaminated.

I learned two important things when researching replacement options:
- The passenger side CV boot is not replaceable; the entire assembly must be swapped out ($300)
- When swapping out the assembly on higher torque applications, NEVER use a cheap aftermarket CV joint/assembly. On the EMPI/DTA models, there have been quite a few reports of leaky CV boots and balance issues.

Fortunately, Mazda sells a driver's side boot kit for $55. Has everything you need - boot, clip rings, and grease. The DIY below is a pretty good summary of what to do. Just be sure to drain the tranny fluid first lol:
How-To: CV axle / seal replacement. - Mazda3 Forums : The #1 Mazda 3 Forum

Its been about 9K since I replaced the boot. No noise or other leaks to report.


Tires

Also at 80K I decided to replace the Pirelli P-Zero Neros. As most of us know, performance all seasons are a mixed bag. They are great for the first 20-25K. Then as the harder compound becomes exposed, they get noisy fast. With 15K left on the treadwear warranty, and with the tires down to 4/32nds, the shop was willing to warranty the remaining tread. Despite the noise and occasional squeal, I felt the Pirellis aged well. So I picked up another set. Total cost with the warranty credit was less than $400 installed.


General

Overall this car is holding together well. The KW V2s are rock solid (abet a few extra rattles from the interior). No major flaws with the interior materials/panels, paint, or body panels. Clearbra has held up well with only a few scratches.

I've noticed the throttle is not as responsive and gas mileage has decreased slightly. I suspect it's due to a heavy buildup of carbon deposits. I may do a full cleaning of the intake manifold and throttle body. Weve had a couple guys in our area get it done with favorable results. DIY can be found here:
http:// www. mazda speed forums .org/forum/f33/how-clean-your-valves-easy-cheap-120211/


Bose Upgrade

I had been meaning to create a thread of my audio build that was done last year. But for now Ill post a few thoughts. As most of us know the Gen 1 Bose is lacking. Muddy mids, distorted highs, and non-existent lows. Much of it is due to the signal processing in the Bose amp. But the paper speakers dont help either. With a budget of $700, I set out to do a full swap of the amp, speakers and sub. Heres what I ended up with:

1. Pioneer TS-A1604C 6.5 Component Front Speakers: Pioneer TS-A1604C (TSA1604C) 6.5" 2-Way Component Speaker System

2. Pioneer TS-D6902R Coaxial 6x9 Rear Speakers:
Pioneer TS-D6902R (TSD6902R) 6" x 9" 2-way D Coaxial Car Speakers

3. Pioneer GM-6500F 4 Channel Amp: Pioneer GM-6500F (GM6500F) 760W 4-Channel GM Car Amplifier

4. Pioneer GM-5500T 2 Channel Amp: Pioneer GM-5500T (GM5500T) 820W 2-Channel GM Car Amplifier

5. JL Audio 8W3V3-4 subwoofer with jack-mount stealthbox: JL Audio 8W3V3-4 (8W3V34) 8" Single 4 ohm W3v3 Car Subwoofer

6. PAC AOEM MAZ-2 HU Integration Unit: PAC AOEM-MAZ2 (aoemmaz2) Interface that Allows Replacement or

7. OEM Mazda blank door sills for the tweeters

I have mixed feelings about using custom baffles and sound deadening. They make a significant difference on medium to high power setups. On lower power systems, Ive found the advantages to be marginally thin. So I decided Id test the setup without baffles/deadening for a bit, despite buying several sheets of sound deadening. I have passengers so I wasnt too keen on skipping the rear speakers.

With the help of [MENTION=3714]meelo88[/MENTION], we got everything installed on two separate days. First were the doors. OEM speakers were 6x8 both front and rear. In the back, the Pioneer 6x9s dropped right in the factory location with almost no modification. But in the front, a baffle is needed for the 6.5 cone. Fortunately, Pioneer supplies a decent set of composite baffle plates with every D series speaker. And that allowed us to install the front cones with very little modification.

The speaker installation took several hours taking our time. During the install we tested the rears with Pioneer on one side and Bose on the other. The Bose sounded like it was behind a foam panel while the Pioneer sounded relatively clean and clear. But the balance was still off. Output was very bright in the upper midrange. And bass was muffled.

On Day 2 we installed the amps and wiring. I picked up the Pioneer amps specifically because they take up minimal space. We ran the amp wiring through the firewall behind the glove compartment. Then through the lower door plate and under the passenger seat. Everything tucked away nice and tidy. Unfortunately the PAC AOEM MAZ-2 was defective so we had to splice the amp harness under the drivers seat. We took the F/R inputs and converted to RCA. We then hooked up the subwoofer to run off the rear channel. But the low frequency roll-off was too aggressive. Later on I swapped the sub to the front channel. Results we better, though we still noticed a mild low frequency roll-off.

Installing the jack-mount stealthbox requires some minor cutting of the interior carpet. This makes it difficult to adjust damping on the KW V2s. So I cut a small access panel in the carpet near the top of the drivers rear shock. The JL Sub is a very tight fit in this box. So I may go back and install a small MDF spacer ring to give an extra clearance.

Overall I am very pleased with the results. Replacing the factory amp/signal processor has made the single biggest difference in sound quality. Speakers are still a little bright in the upper mid-range but nowhere near that of OEM. Output is balanced in all other areas except below 100hz. What weve determined is that the 08.5-09 factory HU trims the low level frequencies to preserve speaker life. It can be tuned out with a good EQ or a 6-12DB bass boost that is featured in many amps.

After switching from the harness back to the AOEM-MAZ2, I noticed a slight improvement in bass response but the roll-off is still present. This limitation, combined with the lack of Bluetooth and HD radio, has convinced me to switch to an aftermarket HU. In the coming months Ill be installing the following:

1. Pioneer AVH-P8400BH: Pioneer AVH-P8400BH 7" Touchscreen DVD Car Receiver w/ Bluetooth

2. Kanatechs OEM fit Piano Black Dash Kit: KANATECHS Stereo Install Kit For 2007-2009 Mazda3

3. Axxess ASWC Steering Wheel Control Adapter: Axxess ASWC Universal Steering Wheel Control Interface

4. Possibly more dense and water resistant speaker baffles

I think most people looking to upgrade the Bose would be happy with a simple amp or HU replacement. But Ive learned that any upgrade should focus on bypassing the Bose processor/amp.

Thats it for now. Thanks for looking!

3145674008_large.jpg
 
Your updates are great, I'm thinking of going with KWs after almost 50K on H&Rs. Sounds like it's a worthwhile upgrade. On the CAI I ended up getting 2nd filter due to long drying times.
 
Thanks. Yeah the filter is a PITT. I wish it was more accessible or they went with a short ram. Not much difference with an intercooler. I liked the H&Rs but could never get them high enough for daily commutes. The V2s are stiff but have more versatility with the rebound damping.
 
When you installed the KWs, did you reuse the OEM rear spring upper bushings? Did mine this weekend and left them out simply because I've forgotten about them, only to discover their existance while sifting through OEM springs. Part 28-012A in this diagram:

mazda3rearsuspension.jpg


You're right about the ride, high speed control is fantastic compared to H&R, settings at 9 all around.
 
Update at 103K:

Had my first reliability issue involving a bad AC compressor. Apparently this is a common problem as Panasonic makes the compressor for the MS3/MS6. According to several folks, they generally only last 6 yrs/60K. A replacement through Mazda wholesale costs roughly $1500 which includes the compressor, clutch, coil, drier, expansion valve, and serpentine belt. Knowing I'm going to drive another 100K, I'm ruling out going with a used one.

2009 MAZDA 3 Parts - Online Mazda Parts


Now for the good news. A quick search netted me a company based in San Diego called Discount AC Parts. They've been around since '88 and have a fairly good track record for the volume they provide. A replacement kit costs $430 which includes the genuine Panasonic compressor/clutch/coil assembly, drier and expansion valve.

https://www.ebay.com (commissions earned)


For the price I am willing to risk the installation to see how this pans out. Total cost should be roughly $700 installed. I will update in a couple of weeks.
 
Another quick update.


First, I have almost 10K on the new compressor and it's been awesome. Discount AC Parts is the way to go for the Genuine Replacement.


Second, I ended up replacing the Pirellis with Michelin Pilot Sports A/S-3s, 225/40/18. After running them for a month I can now say they are the best tires I have ever owned. Like the reviews say, they pick up more noise than the Continental Extreme Contact DWS or Pirelli P-Zero Nero, but turn-in is much more precise with less sidewall flex. So Cal just had a huge storm and these tires just stuck to the road. No slip and no gripes from the steering wheel. We'll see how well they hold up after another 10K.


And finally, I got my hands on a cheap Hypertech ECU flash. I know, should have gone AP. But after running COBB's OTS tune for a week, I knew I would have to spend another $400 to get a decent load-based tune on 91.

That said, I understand now why people claim HT adds no power, according to the butt dyno. And I actually had to flash back to stock to ensure I had a gain. But the virtual dyno confirmed I got 15 peak HP increase at the crank (about 11-12 at the wheels) over baseline with MSCAI. Seems to be right in line with Hypertech's claims.
 
Update at 120K:

Thought I'd spend a little more time and give a proper update.


Maintenance


KW V2 Coilovers

I've now put 70K on the V2s and couldn't be happier. Just completed another inspection this weekend. No leaks, rust or noise. Damping has degraded slightly. But overall this system has held up well. I will probably have them serviced/resealed in another year or two.


Michelin Pilot Sport AS-3 Tires

After 5K miles I am still very happy with the Michelins. They continue to grip well and remain fairly compliant over most road environments. As most of us know, many companies use a harder compound to help reduce wear during the last 50% of an all-season tire's life. But unlike the Pirellis, the Michelins don't appear to be degrading as fast. I'll report back in another 5K.


Mazda FL22 Coolant

Last weekend I did the the coolant change at the recommended interval. Mazda recommends FL22 long life coolant for a couple of reasons. First, it extends service life of the typical coolant change from 30K to 60K. Second, unlike some aftermarket coolants that use silicates and/or phosphates, it is not as harsh on the rubber components. Probably worth the extra $6-8 to pick this up from the dealer.

The MS3 reportedly uses 1.9 gallons of coolant in the system. The DIY below was the only reasonable one I could find, in case you decide to do yourself:
How to : Coolant flush + Install of new Radiator hoses - Mazda3 Forums : The #1 Mazda 3 Forum

Couple thoughts if you're just doing a drain and refill:
- Remove the lower radiator hose to drain the passenger side fluid. That will usually account for a quart.
- If it's been a while since your last service, and to ensure you're removing as many contaminants as possible, run the car a few minutes to circulate the system. Then drain/refill again. This method requires an extra gallon of coolant.


AC Compressor

The new compressor has about 15K miles so far. Seems to be holding strong despite the nasty heat wave we had in So Cal last week. No other issues to report at this time.


Mazdaspeed CAI and Hypertech

As I mentioned previously the car has responded very well to the addition of the Hypertech unit. What I did not expect is how much better it would react with a slightly cleaner air filter. Along with the fluid change I did a quick clean of the MSCAI. And according to DashCommand's virtual dyno afterwards, I averaged am 8.5% improvement in average power across the curve from 3K-6K (vs. stock tune w/MSCAI). Not a bad gain for $200.

Fuel economy continues to be good for a car of this age. 21 city, 25 hwy; no hypermilling.


Audio System and Android Integration

I've now put over a year on the Pioneer AVH-X8500BHS and thought it was time to share some additional impressions:

- I still find sound quality to be pretty good for a unit in this price range. Though I had to use the AutoEQ to tune out a nasty spike at 2.5 khtz. This suggests that Pioneer uses a much more complex logic compared to the standard 8 band graphic EQ.
- AllShareCast (miracast) continues to works pretty well with AppRadio on the Galaxy Note 2. Though most phones probably cannot leverage this setup without at least 2 GB RAM and a quad core processor. I occasionally have to disconnect/reconnect. And the phone gets a little hot with extended use. But overall still very happy with this setup.
- Waze continues to work very well with AppRadio. No issues with GPS antenna as reported by other Samsung users. But as mentioned above, I don't use MHL to connect the phone.
- DashCommand still works well with AppRadio. Lag is still roughly 1/2 second between the OBDII dongle and the HU display. But datalogging is fairly consistent. After using the custom tuxedo skins, track/GPS app, and skidpad, I'm convinced this is well worth the additional $5 over Torque.

Here are a couple of videos showing the connection process and navigation of a few apps. The second video is a more detailed look at DashCommand:
https://www.youtube.com/watch?v=zEhruQ45UVA
https://www.youtube.com/watch?v=GtA8tS7TLLA


That's it for now. Thanks for looking!

19054844.jpg
 
It's been a few months since I last updated this thread. A few things to report at 133K:


Michelin AS/3 Tire Update

After 9 months and 15K, I'm happy to report that these tires are wearing VERY well. Still approximately 7-8 mm of tread left. I expect I'll get 30-35K out of these easily.

As expected, there's a slight increase in noise as the harder compound is exposed. But they are continuing to hold up surprisingly well in both wet and dry conditions. By comparison, I experienced a bigger performance loss with the Pirellis (and every other tire for that matter) once I crossed 10K. Simply the best A/S tire I've owned to date.


KW Coilover Update

I've now crossed 80K with the KWs and couldn't be happier. They continue to be dead quiet and compliant over most reasonable roads. I am noticing a slight increase in harshness over moderate to poor road conditions. But I am unable to determine whether this is more to do with deterioration of the bushings vs. damping/coil integrity. No leaks, rust, peeling, or seizing.


Ambient Temp Sensor Issue

I had posted in another thread that I was having issues with my AC compressor engagement. Turned out that it was related to false readings within the ambient temp sensor. Whenever the sensor reads 31* or less, the AC compressor shuts off to prevent lockup.

The weird thing was that I only encountered false readings during rain or after a wash. That usually means a bad sensor or an exposed wire. So I took a spay bottle and began spraying down each section with water, starting with the sensor, until I was able to replicate the issue.

Turned out the ambient temp sensor wiring was resting against metal behind the driver side parking light, causing an open circuit each time it got wet. So I wrapped in electrical tape and tied down the wire away from the metal assembly. Seems to have resolved the issue.


Oil Cooler Issue

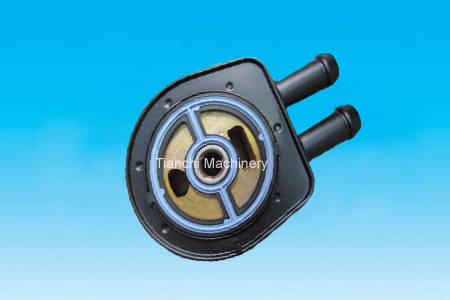
I noticed a very slow leak coming from the oil cooler a few weeks ago. Turned out to be the gasket that seals the cooler and oil filter assembly together. Unfortunately, Mazda only offers this part with the oil cooler assembly. And buying a new one costs around $400 wholesale.

Somewhere along the way, Mazda recognized their mistake and redesigned the oil cooler in '08. But unfortunately for Gen 1 MS3 and MS6 owners, the original cooler "should" be replaced once the gasket fails. And that didn't sit well with me.

Fortunately, there are a couple options to service the Gen 1 Oil Cooler gasket:
- 1. Remove the rubber liner along the gasket and replace with high temp gasket sealant (i.e. Permatex Ultra Black 82180).
- 2. Purchase an aftermarket gasket from Dorman for around $30.

I chose to go with option 2, using the vendor below:
https://www.ebay.com (commissions earned)

There are several ways to access the oil cooler without draining anything but the oil from the filter assembly. You will need a box wrench to access the 15 mm bolt that sandwiches the cooler to the filter assembly. I chose to drain both the oil and coolant while I was there; here are the instructions I used:
- Removal: https://www.youtube.com/watch?v=s3Yx3rFnMuc
- Dis-assembly and inspection: https://www.youtube.com/watch?v=glhk_RQTH8k
- Service, reseal and re-install: https://www.youtube.com/watch?v=YO9mgpotcik

The inner ring of the aftermarket gasket is a TIGHT fit on the oil cooler. I had to sand the inner ring approximately 1/4 mm in order to fit. Otherwise the gasket seems to be holding up well. I'll report back after my next oil change.


One installation note; this method ONLY applies to Gen 1 coolers that are painted black, as per the photos below.

Gen 1:
Mazdaspeed_3_Stock_Oil_Cooler.jpg


Gen 2 with serviceable gasket:
$_12.JPG
 
Quick update at 139K.

I am currently tracking down an oil consumption issue which has become more noticeable the last month. I cleaned up the engine bay due to oil residue from November's oil cooler leak. Engine area continues to be mostly bone dry, which tells me I'm burning it through the turbo, the rings, or the intake/PCV.

I will say this now. This type of issue is exactly why a typical owner will blow right through the motor or turbo. This issue resulted in a sudden oil loss with 0 evidence of leaking, smoking or smell. And if the average owner isn't checking the level regularly (which many don't), it's a guaranteed rebuild shortly thereafter.

I'm fairly confident this is a PCV issue as I am noticing some mild oil seepage behind the alternator. I suspect the valve is stuck open causing crank case pressure to build; thereby forcing oil out the seals (and sucking out/burning the rest). If left unchecked, I imagine this can become a significant issue to the seals and downpipe/02 sensor. I'll have to pull the intercooler, intake and plugs to see where oil is pooling. I will also probably inspect the turbo for shaft play. From there I will likely swap the PCV valve, clean the entire intake and cold/hot pipes, then evaluate any further oil consumption. If that doesn't fix it, I will take it in for compression and leakdown.

More to come.
 
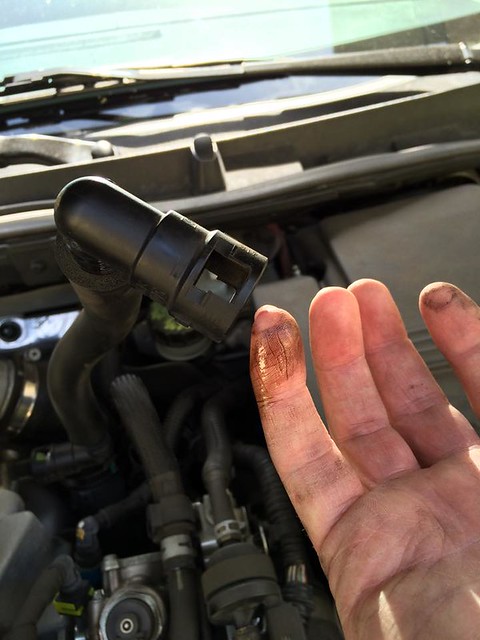
Quick update. I pulled the breather tube on the intake and noticed a good buildup of oil inside. It is not dripping down the intake but I suspect it's enough to explain the oil consumption I have now. I also noticed the outlet has oil buildup around the seals. I can't confirm if this is a normal condition since our PCV already generates higher than normal crank case pressures. But combined with the oil seeping near the alternator, this would explain a lot. See pictures below.

I've been researching the replacement procedure and can't believe Mazda chose to hide the valve behind the IM. The battery, intake, IC, throttle body and manifold will all likely be removed. For first-timers, this is easily a weekend job - especially if your tool selection is limited. So it looks like I'll be cleaning the intake valves along with replacing the PCV valve in the upcoming weeks.


(Click the link then remove the spaces in the address to view)
http://www.mazdaspeed forums .org/forum/f111/how-change-your-stock-pcv-valve-venturi-83614/

17054504116_f7f3ca3d01_z.jpg

16460375333_bed18d3090_z.jpg
 
Last edited:
I'm at 111,000 miles (mods in sig) and continue to follow your journal. It is very helpful and mostly mirrors my own experiences. Thank you.

Check cylinder compression. My guess is that it is still fine and that you are right about the PCV.

Absolutely clean the intake valves when you have the manifold off. I've done it once at around 75,000 miles and was amazed at how much carbon was baked on the back of the valves. Even so, max grams per second air flow was not down very much. The improvement after cleaning seemed to be more in throttle response. Either walnut blasting media or a good hydrocarbon solvent and wire brush scrubbing will work well on the closed valve. I used Chemtool B12 solvent, shotgun bore brushes, fresh gasoline to first verify that the valve was closed, and then again at the end to flush, ending using shotgun patches to soak it up and compressed air blast to dry it out. Walnut may be faster, but can be messy.
 
Last edited:

Latest posts

Back