
You are using an out of date browser. It may not display this or other websites correctly.
You should upgrade or use an alternative browser.
You should upgrade or use an alternative browser.
$2008 GRM Challenge – Turbo AWD Mercury Tracer LTS
- Thread starter kcbhiw
- Start date
Very impressive.
Sounds like the ultimate sleeper!
#1. How much do you think it will weigh when completed?
#2 What is your power goal?
Thanks!
#1. Dunno. It weighed in at about 2500lbs stock and untouched. I'll be removing everything from the interior except the dash and driver's seat. Of course, there's no A/C, power steering, etc. I'd like to get it down to aroudn 2100.
#2. 225 between the 4 wheels? Dunno. We'll see. I'll be using a T3 from a Thunderbird with MegaSquirt running things.
We'll see!
")
Coming Together
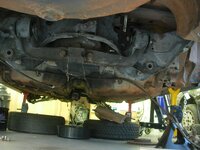
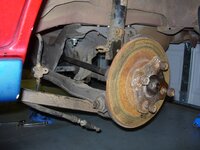
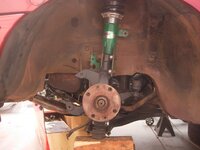
As the car sit now, everything is [loosely] assembled in the rear. Everything fit as it should. Furthermore, the input of the rear differential aligns with the output of the transmission. I'm using the Tracer's trailing arms as they share exactly the same dimensions of those from the GTX but beefier. I'm also using the Tracer's struts as the GTX's top mounts don't fit the tracer's strut towers. I had to drill a couple holes in the lower mounts to fit the GTX's knuckles. However, that'll all change when I get around to finalizing the suspension that's all temporary for the moment.
The GTX's spindles are still installed but will be swapped out for the Aspire's front 4x100 spindles as soon as I source a pair. I've already confirmed that the spline diameter and count matches the front and that the bearings are the same size.
All that currently remains to do in the back of the car, aside from that mentioned, is to sort out the hard brake lines, mount, the rear brake calipers, mount the GTX's fuel tank, reinforce the subframe mounting, and tighten everything up. I'm really surprised, and nervous, as to how easily everything went together.
I can't wait until I get everything cleaned up. There is some nasty funk on these parts.
Attachments
wow, great work, wish ihad the time to do something like this... i would custom fab a Miata AWD.... that would be fun..
getting the power to the front wheels may pose a bit of a problem lol
getting the power to the front wheels may pose a bit of a problem lol
thats why it would be cool...... an awd go cart... lol..... that would be alot of fab work.. but would be soo cool in the end..
thats why it would be cool...... an awd go cart... lol..... that would be alot of fab work.. but would be soo cool in the end..
and it wouldn't be a miata anymore... what with a laterally mounted engine / transaxle. RWD > *
If I'm not mistaken, Subaru boxers mount longitudinally. You don't have to mount transversely to get AWD, it just happens that most AWD cars start life as FWD cars.
True, but the transmission in the miata, where the drive shafts for the front wheels of this theoretical machine would have to come from, is significantly to the rear of the actual wheels, which as I said, poses a bit of a problem
Last edited:
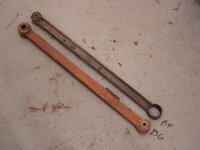
Looks like fun Kevin. I'm glad those old control arms could come into play. One hting you may want to do with the control arms and other suspension parts is to beef them up a little by welding a plate to the back of the stamped arm to "Box" the design. Basically look at all the AWR parts and copy what they have been doing- subframe, trailing arms, lateral links, etc. Should help to stiffen up the suspension a little.
Looks like fun Kevin. I'm glad those old control arms could come into play. One hting you may want to do with the control arms and other suspension parts is to beef them up a little by welding a plate to the back of the stamped arm to "Box" the design. Basically look at all the AWR parts and copy what they have been doing- subframe, trailing arms, lateral links, etc. Should help to stiffen up the suspension a little.
I ended up using the 626 control arms as they used a rod-type rear mount instead of a bolt. Other than that, the geometry is the same as the Protege's. In fact, I'm using the ball joint boots from your old arms as they were intact. Fortunately, they're pretty 'closed up' already. I plan to seam weld as much as I can, time permitting. Thanks for the info!
Moving Forth, Falling Back
It's been a while since I last posted, but work and life in general have kept me aloof. In the time I've been able to wrench, several significant snags have crept upon the build.
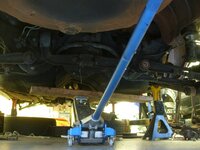
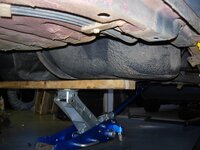
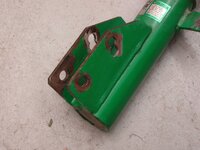
As the car stands, three corners are bolted together and pretty much ready to go. I finally came to a point which allowed me to tackle the front right corner. The strut has been modified to fit the Capri knuckle and everything was ready to bolt together. In doing so, the axle seamed to want to bottom out and bind. After an hour long staring session, a touch of measuring, and about three beers later, it was clear that the front passenger side axle was too long...by about 3/4. Whoops. Everything fits perfectly on the driver's side including the amount of free play in the axle. The opposite is the case on the passenger side. I'm currently researching my options, but it's seeming like I'll have to fork over the cash to have the axle shortened. That'll be a good ding to the budget for such a small change.
Moving to the back of the car, I've also been busy with the fuel tank. I have removed the fuel tank from the GTX and cleaned it. Aside from draining about 9 gallons of fuel, I also removed an measurable amount of sand and various other types of debris. I haven't a clue how sand found it's way into the tank. What I do know is that the car spent most of its life in Savannah, GA. I have found sand in just about every nook and cranny that I dig into.
After trying a number of ways to fit the GTX's tank underneath the Tracer, I have come to the conclusion that it just isn't possible without 1) modifying the tank or 2) cutting and rebuilding the rear seat pan. In the Tracer's current state, the GTX's tank sits unacceptably low and wouldn't allow the drive shaft to clear. The first object that the car travels over will likely damage the tank.
The first option is out of the question and the second is somewhat feasible. To satisfy the second option, I would either have to cut out the Tracer's seat sub-pan and rebuild it with various pieces of new metal or cut and remove the seat pan from the GTX and graft it into the Tracer. Yikes! Neither task sounds enjoyable.
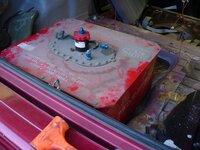
I stumbled across a third option, however. Six years ago, upon disassembly of a wrecked IMSA racer, I removed an 8-10 gallon fuel cell and threw it into the boss's pile of junk. It has been sitting there ever since since and had little likelihood of ever being used. After making an offer of $50, it was mine.
The fuel cell will me mounted in the spare tire well of the trunk as that is the only place it will logistically fit. I'm not yet sure if it has an internal fuel pump, so that'll have to be determined and sorted. Furthermore, the mounting bracket(s) and fuel lines will also have to be manufactured.
It's been a while since I last posted, but work and life in general have kept me aloof. In the time I've been able to wrench, several significant snags have crept upon the build.
As the car stands, three corners are bolted together and pretty much ready to go. I finally came to a point which allowed me to tackle the front right corner. The strut has been modified to fit the Capri knuckle and everything was ready to bolt together. In doing so, the axle seamed to want to bottom out and bind. After an hour long staring session, a touch of measuring, and about three beers later, it was clear that the front passenger side axle was too long...by about 3/4. Whoops. Everything fits perfectly on the driver's side including the amount of free play in the axle. The opposite is the case on the passenger side. I'm currently researching my options, but it's seeming like I'll have to fork over the cash to have the axle shortened. That'll be a good ding to the budget for such a small change.
Moving to the back of the car, I've also been busy with the fuel tank. I have removed the fuel tank from the GTX and cleaned it. Aside from draining about 9 gallons of fuel, I also removed an measurable amount of sand and various other types of debris. I haven't a clue how sand found it's way into the tank. What I do know is that the car spent most of its life in Savannah, GA. I have found sand in just about every nook and cranny that I dig into.
After trying a number of ways to fit the GTX's tank underneath the Tracer, I have come to the conclusion that it just isn't possible without 1) modifying the tank or 2) cutting and rebuilding the rear seat pan. In the Tracer's current state, the GTX's tank sits unacceptably low and wouldn't allow the drive shaft to clear. The first object that the car travels over will likely damage the tank.
The first option is out of the question and the second is somewhat feasible. To satisfy the second option, I would either have to cut out the Tracer's seat sub-pan and rebuild it with various pieces of new metal or cut and remove the seat pan from the GTX and graft it into the Tracer. Yikes! Neither task sounds enjoyable.
I stumbled across a third option, however. Six years ago, upon disassembly of a wrecked IMSA racer, I removed an 8-10 gallon fuel cell and threw it into the boss's pile of junk. It has been sitting there ever since since and had little likelihood of ever being used. After making an offer of $50, it was mine.
The fuel cell will me mounted in the spare tire well of the trunk as that is the only place it will logistically fit. I'm not yet sure if it has an internal fuel pump, so that'll have to be determined and sorted. Furthermore, the mounting bracket(s) and fuel lines will also have to be manufactured.
Attachments
Thanks, Luke!
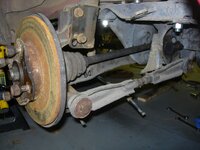
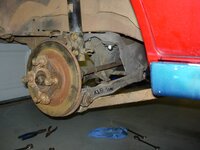
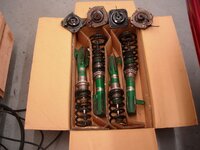
On a positive note of the build happenings, I have acquired a worthy suspension setup for the car. With many thanks to Luke (Rogue), I purchased his old Protege5 Tein suspension for a fair price. Like all other B-series chassis', the Protege5 has all 4 corners suspended with McPherson struts.
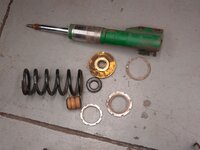
To fit the P5's struts to the Tracer chassis and the aforementioned Capri front knuckles and GTX rear knuckles, the lower mounting points need to be modified. The upper mounting hole of the both the front and rear struts was lowered and moved inward to induce a fair amount of negative camber. At static ride height, found by placing a jack under the lower control arm, the front camber angle is at about -2.5[FONT=Times New Roman, serif][/FONT]....a good starting point for a front Mac-strut. I still have to complete the assembly of the rear struts, but it's looking like rear camber should be a about -1.75[FONT=Times New Roman, serif][/FONT].
In addition to modifying the mounting holes, I had to incorporate spacers between the knuckle and receiver on the the strut. A 3/8 plug worked perfectly for the front. As seen in the below images, I pushed the front strut toward the rear when installing the spacers to reduce the already severe caster angle. The rears knuckle, when finished, will be centered in the strut receiver.
Finally, I'm employing the P5's top mounts on the front and the Tracer's top mounts in the rear. The Protege5's top mounts are significantly improved over those of the (also worn) Tracers and bolt right in. However, I'm using the Tracer's rear mounts as they mount via 2 bolts whereas the P5's mounts via 3.
On a positive note of the build happenings, I have acquired a worthy suspension setup for the car. With many thanks to Luke (Rogue), I purchased his old Protege5 Tein suspension for a fair price. Like all other B-series chassis', the Protege5 has all 4 corners suspended with McPherson struts.
To fit the P5's struts to the Tracer chassis and the aforementioned Capri front knuckles and GTX rear knuckles, the lower mounting points need to be modified. The upper mounting hole of the both the front and rear struts was lowered and moved inward to induce a fair amount of negative camber. At static ride height, found by placing a jack under the lower control arm, the front camber angle is at about -2.5[FONT=Times New Roman, serif][/FONT]....a good starting point for a front Mac-strut. I still have to complete the assembly of the rear struts, but it's looking like rear camber should be a about -1.75[FONT=Times New Roman, serif][/FONT].
In addition to modifying the mounting holes, I had to incorporate spacers between the knuckle and receiver on the the strut. A 3/8 plug worked perfectly for the front. As seen in the below images, I pushed the front strut toward the rear when installing the spacers to reduce the already severe caster angle. The rears knuckle, when finished, will be centered in the strut receiver.
Finally, I'm employing the P5's top mounts on the front and the Tracer's top mounts in the rear. The Protege5's top mounts are significantly improved over those of the (also worn) Tracers and bolt right in. However, I'm using the Tracer's rear mounts as they mount via 2 bolts whereas the P5's mounts via 3.
Attachments
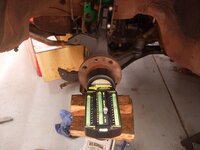
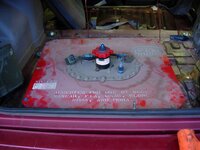
that's a cool toy you have for camber. where'd you snag that thing?
Directly from Longacre.
http://www.longacreracing.com/catalog/item.asp?id=129&catid=5