What have you done to your CX-5 today?

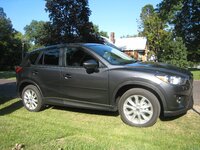
Plasti Dipped my rims as well. Straight up Matte Black, 6 coats. I then did the handles too

1zb47x1.jpg


A few days later, I prepped her for the 9 hour drive by putting a car bra on and using a black protective spray (can be washed off easily with water) on the side mirrors.

23syhw2.jpg

Great pic!!

Did you plasti dip the mirrors too? That's a awesome idea!
 
Not to get off topic, but I've never understood why people edit out the plate number. It is readily visible by hundreds of people on the street everyday, so what is it going to hurt to show it on the internet? Just curious what people think the danger is.

When i take pics of my car i edit out my plates since there are crazy ass people out there. Yes its visible while driving but you will never see the people around you again... also i dont need anyone to track me down knowing my exact plates... yet i have custom made military plates so that doesnt help me too much lol
 
Last edited:
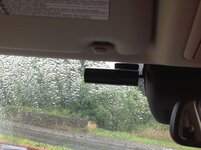
Decided to install the blackvue dash cam with the smart power adapter.Quite an easy install have it set for 24hr park record with battery voltage set for 12.3v
 

Attachments

  • image.jpg
    image.jpg
    687.2 KB · Views: 344
After I closed the door on my CX-5 and walked into flight school I saw this (historical) but funny picture on the wall

 
Last night getting onto Route 1/9 from Rt 440 raced a 2014 CX-5 Liquid Silver in color, destroyed him at the jughandle couldn't keep up on the turn. Guess he hasn't quite got the hang of how good the handling on the CX-5 at high speeds is :D once we got on 1/9 he proceeded to zip by me honking his horn and smiling lol. Too late buddy too late I killed you with my 2.0 lmao :D
 
Last night getting onto Route 1/9 from Rt 440 raced a 2014 CX-5 Liquid Silver in color, destroyed him at the jughandle couldn't keep up on the turn. Guess he hasn't quite got the hang of how good the handling on the CX-5 at high speeds is :D once we got on 1/9 he proceeded to zip by me honking his horn and smiling lol. Too late buddy too late I killed you with my 2.0 lmao :D

I love ripping past cars who cant keep on turns.
 
I killed a spider inside my windshield while driving on the highway... Any other car, I would have just jumped out...

god dam spiders
 
Decided to install the blackvue dash cam with the smart power adapter.Quite an easy install have it set for 24hr park record with battery voltage set for 12.3v


Hi Gareth45,

Can you tell us how you did the install? I am interested in setting one up on my '13 cx5.

Thanks!
 
Hi Raden
Fitting blackvue dash cam with smart power adapter sold separatly.
Items to remove passenger drop down glove box once opened squeeze sides and open to 180 degrees plastic counter lever to unclip on base and remove unit.
2 Remove passenger side rubber seal from around Internal door opening adjacement to A pillar also A pillar internal trim down side of front window screen this just pulls off.
3 Remove passenger side fuse cover in foot well
tools needed to assist in install
1 x side cutters
1 x multi metre / or test light for voltage test
Consumables
5 x Cable ties
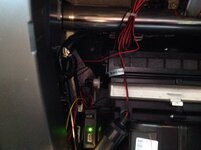
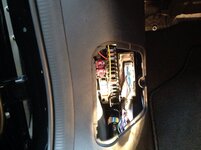
On install I did not solder or cut/ splice any wires for warranty reasons firstly you will need to find on passengers side fuse box one 12v permenant feed which is the yellow wire and one 12v ignition feed which is the red wire also earth wire is black.
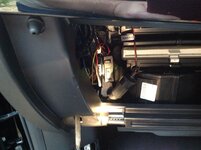
I found that when removing the maxi fuse see which side is live you need to attach the wire to the opposite side of fuse simply by jamming in behind fuse when re installing fuse into fuse box so your device is now protected and vehicle wiring is original. I placed the smart power adapter that comes with sticky pad to side of heater fan housing out of way of closing glove box the smart power adapter comes with a cigar adapter this is where your camera plugs into.
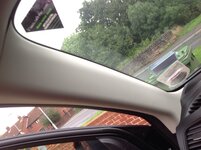
I run the camera wire up the side of passenger side A pillar and under front roof liner this is flimsy so just tucks under then cable tied all wiring to dash support beam to make tidy re install trim pictures for refrence.
 

Attachments

  • image.jpg
    image.jpg
    520.4 KB · Views: 390
  • image.jpg
    image.jpg
    545 KB · Views: 324
  • image.jpg
    image.jpg
    554.9 KB · Views: 324
  • image.jpg
    image.jpg
    338.4 KB · Views: 331
Hi Raden
Fitting blackvue dash cam with smart power adapter sold separatly.
Items to remove passenger drop down glove box once opened squeeze sides and open to 180 degrees plastic counter lever to unclip on base and remove unit.
2 Remove passenger side rubber seal from around Internal door opening adjacement to A pillar also A pillar internal trim down side of front window screen this just pulls off.
3 Remove passenger side fuse cover in foot well
tools needed to assist in install
1 x side cutters
1 x multi metre / or test light for voltage test
Consumables
5 x Cable ties
On install I did not solder or cut/ splice any wires for warranty reasons firstly you will need to find on passengers side fuse box one 12v permenant feed which is the yellow wire and one 12v ignition feed which is the red wire also earth wire is black.
I found that when removing the maxi fuse see which side is live you need to attach the wire to the opposite side of fuse simply by jamming in behind fuse when re installing fuse into fuse box so your device is now protected and vehicle wiring is original. I placed the smart power adapter that comes with sticky pad to side of heater fan housing out of way of closing glove box the smart power adapter comes with a cigar adapter this is where your camera plugs into.
I run the camera wire up the side of passenger side A pillar and under front roof liner this is flimsy so just tucks under then cable tied all wiring to dash support beam to make tidy re install trim pictures for refrence.

Thank you for the write up and the pics. I'll give it a shot once I get the camera.
 
My car got delivered today and I picked it up. I was not that impressed with the dealer cleaning... Found lots of plastic that was note removed properly, even between the tire and the rim. So I took my sweet time today to cuddle and get to know my car - aka detailing. I only put on 100km (60 miles) and will drive some more tomorrow. Just made a list of upgrades and finding places to order them from. It is all good. After three weeks of misery after the accident with my other car ((Hyundai SF) I am glad I have made the decision to go with the CX5. NAV works fine, made a copy of the original SD and put a copy in my system to preserve my original SD - too many horror stories. So that is what I did for my car today. Mudflaps are coming, just received confirmation - two weeks and they are here.
 
Made some adjustments to my 6k HIDS that I swapped for the OEM 4200s. You can change the hids without removing the bumper IF (very big if) you have skinny wrists/hands. Even then it's hard and potentially painful. You also need to have an idea of how the retaining clip works so you can feel it out and undo it (also risky because you may bend it). In my case I did slightly bend one of the clips just enough he lite wobbled a bit. I also accidentally knocked the light into the housing when I was trying to remove it to play with it some more. I had to remove the bumper to get it out of the light, but it also allowed me to bend the clip a bit to make it snug again.


Clip Closed (Push towards the lights and towards the middle -> ^ <- )


Clip Open
 
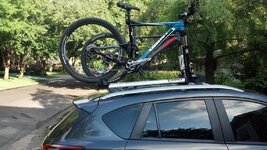
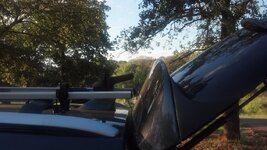
rack2.jpgrack1.jpgCut my Inno bike racks so I could open the hatch without it hitting. I measured 43 1/2 and hacksawed away!!!!
 
Last edited:
Back